How to draw golden hands. Animation Basics: How to Draw Cartoon Hands
 Depicting hands is one of the most thorny tasks that a beginning artist faces. What are hands? Yes, we see them every day, they are constantly in front of us, because we perform most of the actions with the help of them, but at the initial stage hand drawing- these seemingly visual parts of the body, difficulties always arise. In this online drawing lesson, I will try to teach you how, without much difficulty, to understand the plasticity of the hand and the technique of its execution.
1) To learn how to draw hands, first you just need to try to draw (at least from the pictures below), from your own hands, from photographs, and after that, when you encounter certain difficulties, you can study this article in detail and here you will already find answers to common mistakes and some subtleties and tricks when drawing hands.

2) Each drawing, naturally, begins with a sketch or sketch. A drawing that is executed correctly and in proportion is primarily due to the sketch. A sketch, especially of parts of the human body, can be done correctly only thanks to knowledge of human proportions or anatomical structure. So, what do we know about the proportions of the human palm? In the picture below we see that the human palm can be measured relative to the head - from the jawline to the hairline.

3) The next thing we need to know about the structure of the hand for drawing is that the bones, or knuckles, are not located in a straight line - this is a common mistake - they are located in an arc (see example). And in general, as for the hands, there are almost never parallel and even lines. Everything moves here, the hand is multifunctional, the hands are a separate being, they live their own lives.
4) The fingers are of different lengths. The longest finger is the middle finger, the next in descending order is the ring finger, then the index finger (the last two differ slightly in length), the little finger (reaches the upper joint of the ring finger) and the thumb, although the thumb is equal in length to the little finger, it is lower than all the others and this makes it seem the shortest. You also need to know that the length of the middle finger is almost half the length of the palm. The thumb just barely reaches the second knuckle of the index finger and, basically, when working and moving the hand, it is 90 degrees in relation to the other fingers. The width of the palm is approximately 75% of the length of the palm, or a little more than half.

5) Despite the fact that the hand is the most flexible and unpredictable, at first glance, part of the body, there are also laws by which the hand, palm and fingers live. We all know these laws, but when we start drawing hands, for some reason we forget about them. The mechanical principle of the hand is that the palm can only close and open, and the fingers bend or curl down toward the middle of the palm, squeezing the metacarpus like the closing bud of a flower. The hand is concave on the inside and convex on the outside, the fingers grow tightly, and when folded, they form a continuous extension of the palm. An incorrect drawing is one in which the fingers are widely spaced from each other or when added (mentally) gaps are obtained.
To master this, you need to watch your hand as it holds, reaches, or grabs something. Only by knowing how the hand works, which phalanges are involved in a particular reflex process, can you convincingly draw a hand in motion or in a static state. Here's another tip I'll give you to learn how to draw hands: always divide your palm into three parts: the first part is the base of the palm, the second is the base of the thumb, which grabs a significant piece from the bottom, the third is the upper bases of the other four fingers. The muscle of the thumb (the second part of the palm) is the most powerful of all located on the palm, it is the most important and most visible, the most convex and voluminous. In the middle of the palm on the inside there is a characteristic hole with lines of fate. My advice to you: when drawing a hand, first sketch out the lines of the hand, then based on the lines, build blocks or those same three parts, this will make it easier to depict a natural hand.

 6) The bones in the palm and fingers are visible only in the form of knuckles on the back of the hand, in other cases they only form shapes and when sketched they can be depicted as lines along which the hand will be built. The fingers are made up of several bones, which is why they have a rhythmic shape - from each knuckle to the next they narrow and widen. At the joints the fingers look a little thicker; there are folds on the inside that are located just above the joint. You also need to study the hinge ability of your fingers to bend, so that you don’t later draw an implausibly bent finger. The first two joints can bend at right angles, but the upper ones cannot even bend at a sharp angle. Look at the unconscious dependence of the joints, for example: when the second joint bends, the upper one automatically bends. When the fingers are extended, the upper joint tends to bend back.
The tendons on the hand are visible on the back of the hand and appear as threads or lines forming a straight line with each of the midline of the fingers. They appear when the palm is very tense or arched. It would be a mistake to depict the tendons of the back of the hand in children, adolescents and overweight people, since in these cases they are hidden, not noticeable or underdeveloped.

7) Another important thing that we will look at in the online lesson “how to draw hands” is the location of the finger lines. Notice that the line of the middle finger divides the palm into two equal halves. This line is also at right angles to all the others. This finger unclenches and contracts exactly towards the palm, while the rest, when compressed towards the palm, tend to its center and take an angle.
8) How to draw women's hands. As elsewhere, when depicting a woman and her parts, we must remember that the main things here are smoothness and roundness. The knuckles on the fingers and the outer side of the palm of a woman are smaller, the fingers are mostly thin. With clenched fingers, they tend to one point more clearly than a man’s, as if a few more centimeters and they would merge into one point.

A hand is a drawing object that is always at hand (sorry for the tautology). Even when you draw with one hand, you always have a second one, in order to see how the palm or finger, or phalanx behaves in this or that case. Of course, in the technique of drawing a hand, the main thing is practice; studying anatomy, behavior and structure is half the battle, and then you need to practice and practice. The hand is a part of the body that you won’t have to draw twice in the same position, so each time you will learn it in a new way, but thanks to the basic knowledge that you have received, these will be little things that you can easily build around the base of the sketch.

Follow the releases of the site and in the next updates of the Articles section, there will be new training lessons on drawing parts of the human body.
Do you want to make a good impression on the people around you? In the Duhi Original online store you will find Montale perfumes that you can buy at the most reasonable prices. A wide range of products with flavors to suit every taste.
Apart from the face, hands are the main transmitter of people's emotions. Human hands are flexible, so they are able to convey an emotional state better than many other parts of the body. If you have a desire to learn how to draw brushes correctly and naturally, then this lesson will teach you how to draw a human hand step by step. The lesson will go from simple elements to complex ones. To be able to depict people's hands, their portraits, figures correctly and realistically, knowledge of how to correctly depict a hand is required. And in order to learn this, you need to know some rules and practice a lot.
Proportions
To be able to draw hands correctly, you first need to know the proportions and apply this knowledge in your work. It's not as difficult as it might seem. By learning a few rules, you can improve your drawing skills. The drawn hands will look natural, giving away emotions. To draw a brush correctly, you need to know a little anatomy, or more precisely, the structure of the hands.
General Similarities
Fun fact - the hands are similar to a scapula, consisting of the metacarpus and fingers. The length of the fingers coincides with the length of the metacarpus. This ratio must be remembered and be sure to be able to apply it in practice. You can start your drawing with a schematic symbol. Draw the diagram in the form of a hand and divide it into two identical parts. 
The length of the hand can be depicted in different ways, since people have both long and short fingers; both square and oblong in shape.
Fingers
The fingers are long and flexible due to the joints. The bones of the metacarpus are longer and larger, and the finger joints are attached to them. Each subsequent phalanx is built more finely. The proportions of the phalanges in the image should be 2/3 the length of the previous one.
In the image, the first phalanx is marked in red, the second in red, and the third in yellow. 
The four fingers (thumb excluded) consist of four joints. The thumb is placed to the side in relation to the remaining fingers. The length of the finger, as a rule, reaches the first phalanx of the next finger. The length of the little finger reaches the length of the last phalanx of the previous finger. 
Directions
If you observe different people, you will notice an additional feature that must be used when drawing. If you draw a line over your fingers, you will end up with a semicircle. The apex of this semicircle is the middle finger.
It is also worth paying attention to the inner and outer sides of the palms. If you draw a comparative line at the tips of your fingers, you will get an arc that starts at the index finger and ends at the little finger.
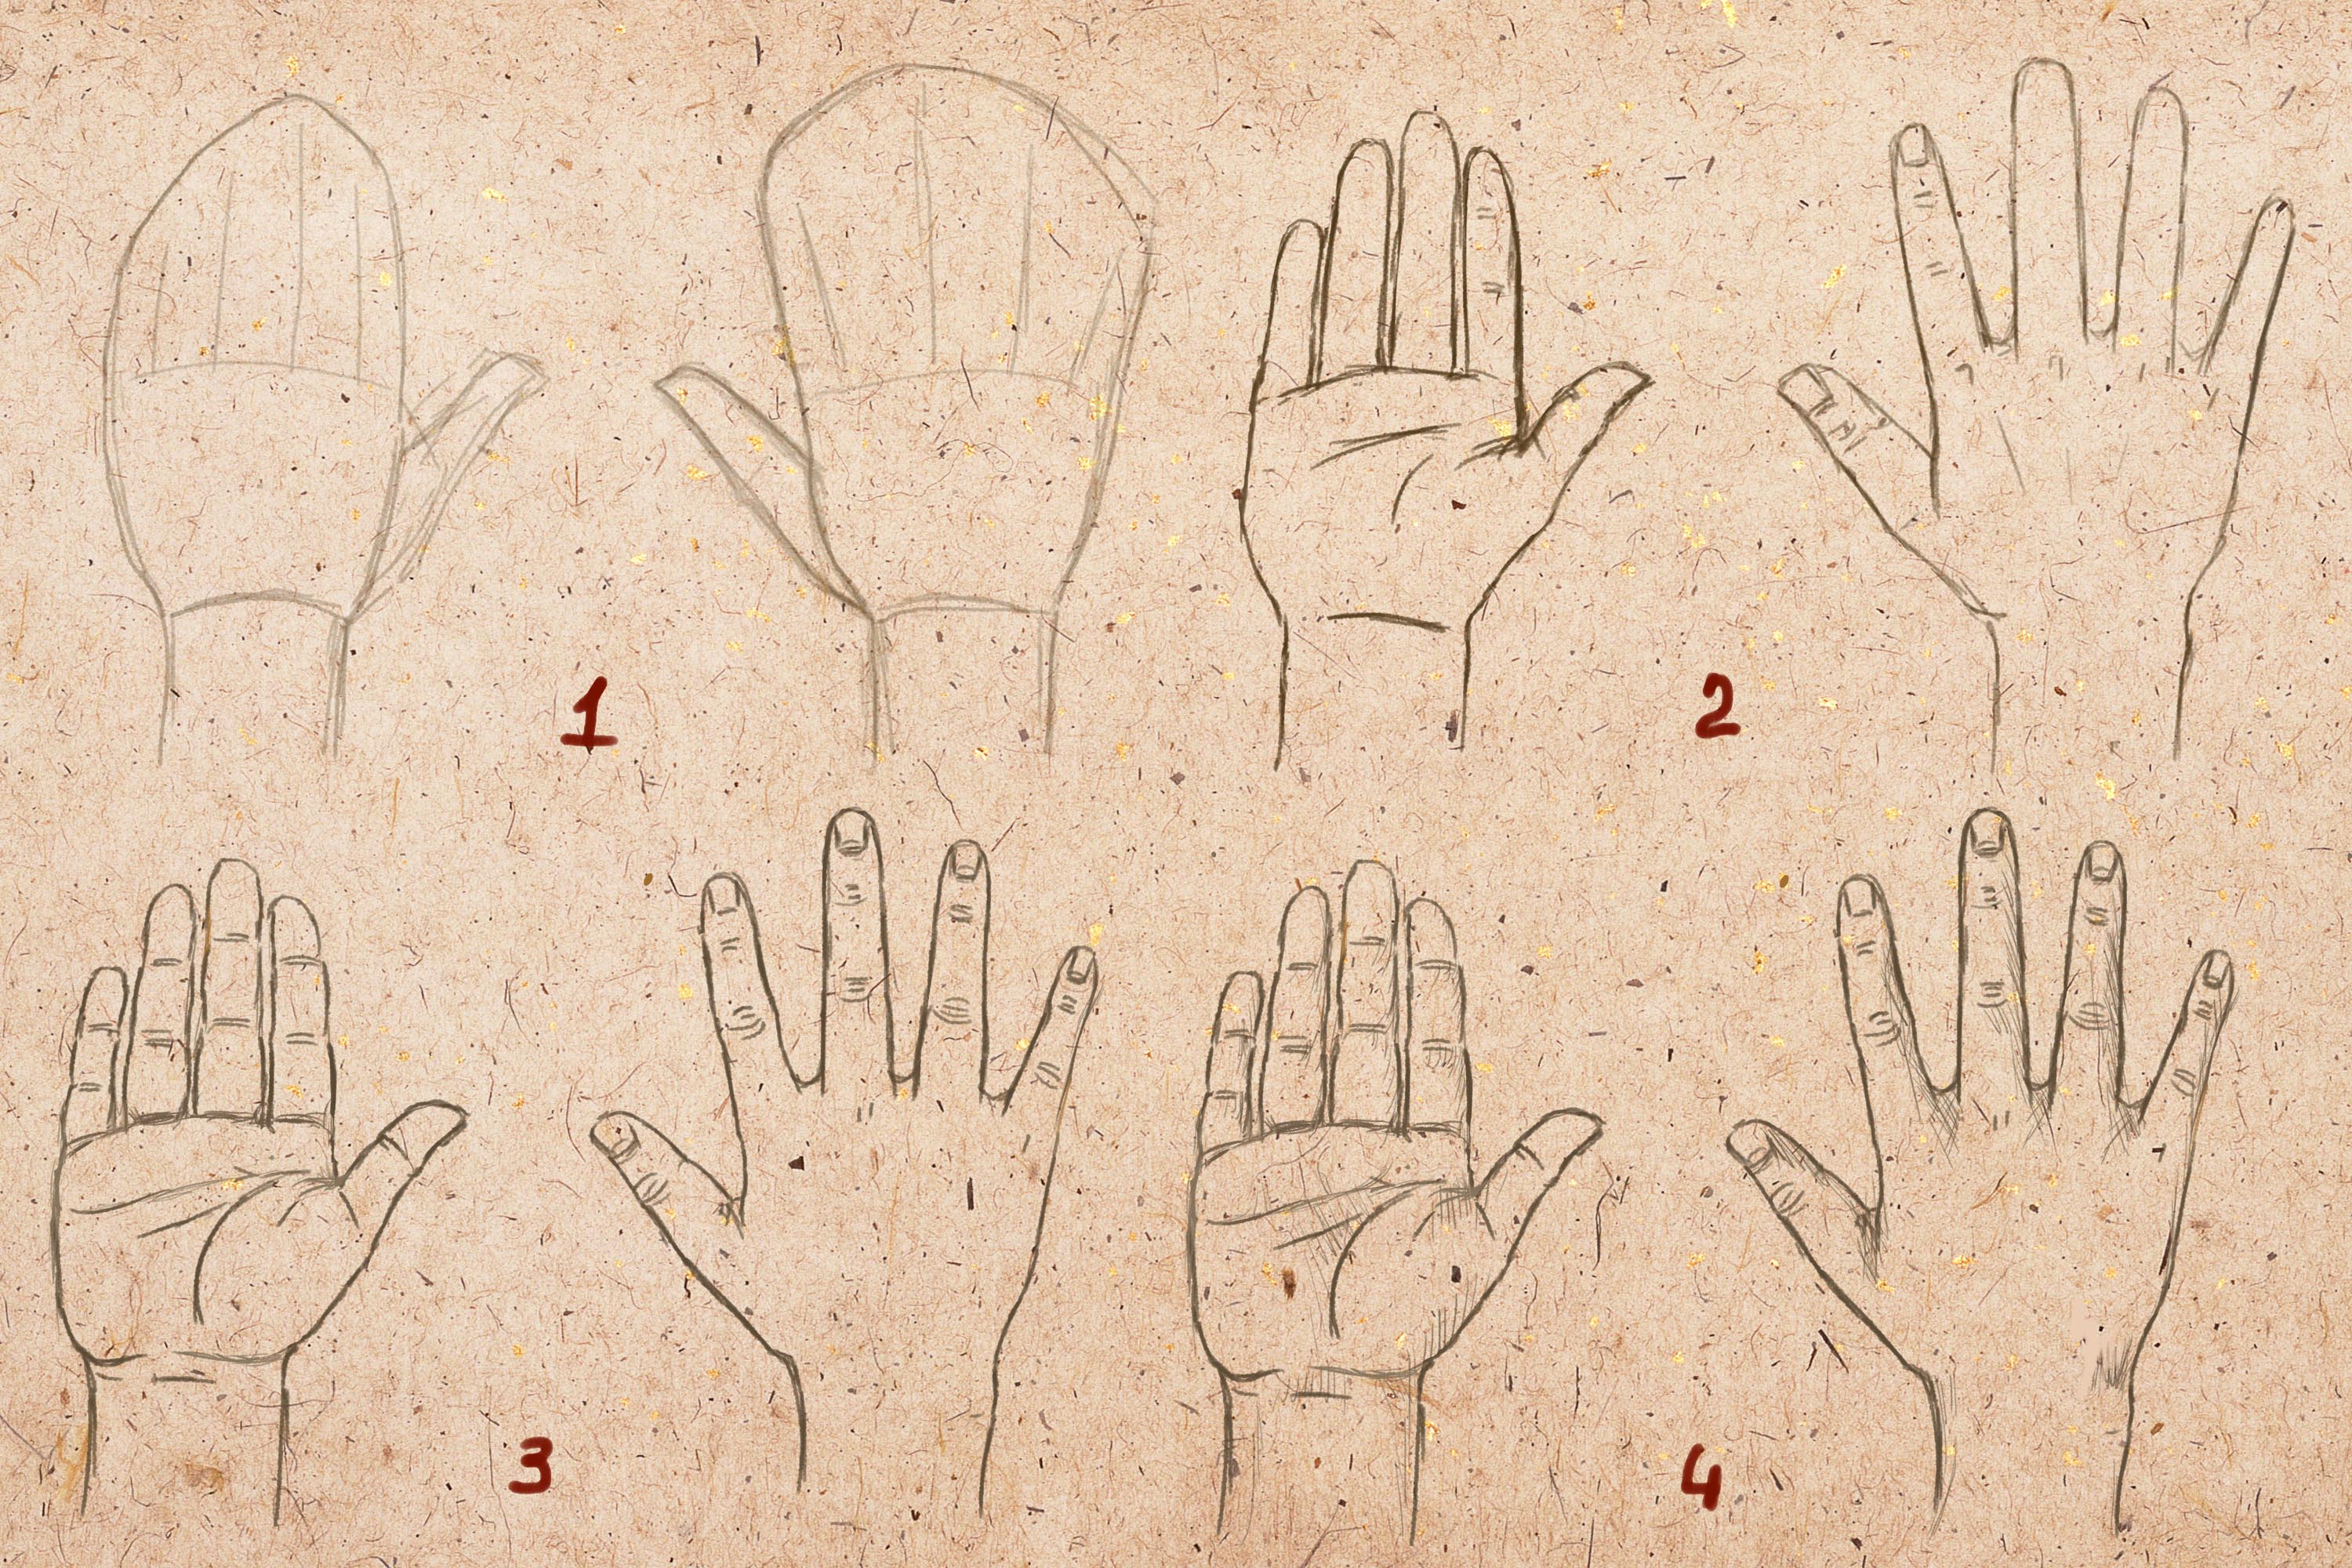
In the image below, all marks are highlighted in red. You can start the image with a diagram in the form of a mitten. Gradually you need to mark the necessary directions. Over time, you can add additional details, turning the diagram into a drawing. 
The protrusions on the inside have one direction, namely, they go down from the index finger to the little finger.
Fist
A little more information on how to draw brushes correctly and naturally. For example, the image should show a clenched fist. Equally bent fingers should also form a semicircle. 
Look at the smallest hand in the image. In the diagram you can see that the width of each subsequent phalanx narrows. It is worth taking this into account and remembering to apply it in your work.
In the clenched fist, under the little finger on the outside, there is a fold, which is emphasized by the green line in the image above. By adding this fold to the drawing, you can more accurately convey the image of a hand squeezing something.
Important Additional Details
The figure below shows an image of a skeleton hand. At the junction, the joints are thicker. You need to know this in order to be able to convey the image more realistically. This particularly applies to thin or elderly people. At the bend, the finger should always be slightly thicker than along the length of the flank. 
Notice how the curved brush is shown in profile. The instructions above show in red how the first phalanx is attached to the metacarpus. Green indicates the membranes that are located between them; they are usually considered the beginning of the first phalanx.
If you pay attention to the hand in profile, you will notice that the outer side is flat, only the knuckles protrude. The inner one, on the contrary, is soft, the protrusions are evenly distributed.
Step by step drawing of a hand
Before you start drawing, decide on the location of the wrist and forearm. To practice, it is advisable to start with your hand. Try redrawing it.
1. First you need to lightly outline the outline of the brush. Then you need to highlight the shape of the thumb without adding details. Lines should depict the position of the remaining fingers.
2. First draw the index finger, then indicate the shape of the rest.
3. Now you can add details: knuckles, pads, nails, etc.
4. By applying strokes, the drawing can be made voluminous.
5. If desired, you can add colors and shadows under the brush.
Drawing with brushes constantly requires improvement and development. Due to the fact that the hands are quite flexible, positions and angles can be completely different. 
Angles
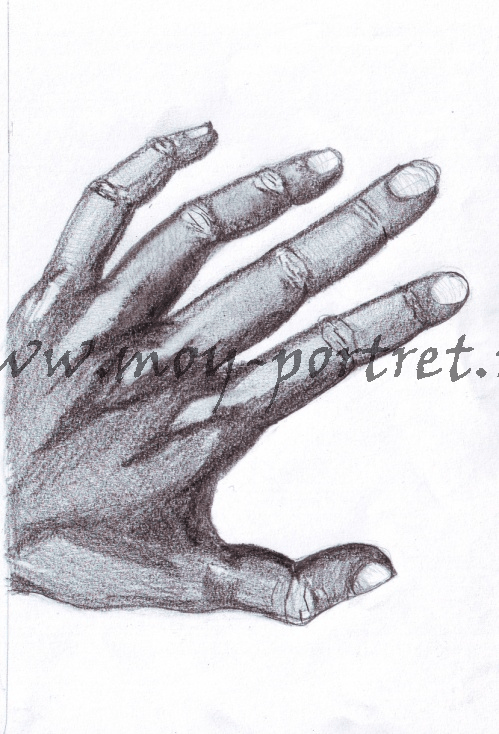
If the brush is in a difficult angle (unusual location), it is much more difficult to depict it. There are ways to help get rid of possible errors.
The most popular and effective option for creating a brush in its original position is to mark the lines of each finger separately. 
There are times when using lines alone is not enough. A solution to the problem may be additional shapes, such as a cylinder or parallelepiped. Using auxiliary objects you can designate the phalanges. 
If you decide to create an original hand position, then first you should test this position on yourself. Place your hand and place your fingers as they should be in the drawing. If the brush looks natural, you can paint on it. The hand and fingers are interconnected, so it is worth considering that by changing the position of the fingers, you may have to completely change the position of the hands.
For example, you can try to bend your little finger while trying to keep your hand straight. Is there a result? Hardly. There are a lot of similar examples, so before you start drawing, you need to think carefully and draw up a preliminary image in your head.
If you do not take into account a person’s face, then most of all a person’s emotions are conveyed by the position of his hands. The hands and fingers are very plastic and perfectly reflect the emotional state of a person. In this lesson we will draw a human hand with a pencil step by step, from simple to complex.
If you are learning to draw a person, portrait or figure correctly, you definitely need to know how to draw a hand, correctly and naturally, and this requires some knowledge and a little practice.
Proportions
In order to learn how to draw hands, first of all, you need to learn proportions and be able to apply your anatomical knowledge in practice. It's not as difficult as it might seem at first glance. By remembering just a few simple rules, you will improve your drawing skills several times, and your hand drawings will miraculously acquire believability and naturalness.
General relationships
An interesting fact is that the hand is a bit like a shoulder blade, which consists of two parts: the metacarpus and the fingers.
The length of the fingers is equal to the length of the metacarpus.
This ratio must be respected. The drawing of a hand can be started from a schematic designation of its shape, and a line is used to show the line dividing the hand into two equal parts.
How to draw beautiful eyes
The length of the entire brush can be completely different. There are people with short and long fingers and, accordingly, a square or elongated brush.
Fingers
Movable and flexible fingers consist of joints. The bones of the metacarpus are the largest and the longest, where the finger joints are attached. Each subsequent phalanx is smaller and thinner than the previous one. 
Our hands are designed according to the principle of the golden ratio, which is why women’s hands attract the glances of surrounding men. The proportions of the phalanges are in the ratio of 2/3 of the length of the previous phalanx.
The picture below shows the first phalanx in red, the second in orange, and the third in yellow. 
All fingers except the thumb consist of four joints: three phalanges and one joint in the metacarpus. Thumb set aside, slightly turned in relation to the other fingers and consists of three joints. Its length usually reaches the middle of the first phalanx of the index finger.
How to draw glass: how to make a glass vase

Length little finger almost reaches the bend of the last phalanx of the ring finger. This is shown in the illustration above.
Directions
If you carefully observe the hands of different people, you will discover another common feature that also needs to be taken into account in your sketches. If we outline the brush from above with one line, we get small semicircle, the top of which is the middle finger.
Pay attention to the inside and outside of the palm. If we draw a conventional line at the base of the fingers, we will also see a small arc that goes from the index finger and goes down to the little finger.
In the illustration below this is indicated by red arrows. You can draw a hand starting from the mitten, which is shown in the corner in brown, immediately outlining all directions.

The pads and folds on the inside of the palm also have one common direction; they seem to descend from index finger to little finger.
Fist
A little more information about directions that will help you draw a brush more quickly and correctly. Let's say you need to depict a hand clenched into a fist. Evenly bent fingers again form a certain arc, with general direction “down to the little finger”.
Drawing a fish

Notice the top part of the illustration - a small hand drawn in brown. Here is a schematic diagram of how it narrows width of fingers in each subsequent phalanx, take this into account and do not forget to show it in your works. Compare the lengths of the red, orange and green segments.
The hand clenched into a fist, on the outside, under the little finger, forms a fold; it is emphasized by a small green arc in the illustration above. By labeling it, you will be able to create a more realistic image of a hand holding something or clenched into a fist, etc.
Important Details
The picture below shows what the skeleton of a hand roughly looks like. The joints where they connect are slightly wider and thicker. We need to understand this in order to know how to draw a hand realistically. This is especially true for the hands of elderly and thin people. At the bends, the finger will be a little thicker, along the length of the phalanx - a little thinner. 
Pay attention to how to draw a curved hand in profile. Look at the joint of the metacarpus and the first phalanx of the finger. In the picture above, the red line shows where the first phalanx attaches to the metacarpus joints. This is the beginning of the finger, it can be identified by the joint protruding upward - the knuckle. The green line indicates the place where there are membranes between them; they are often mistaken for the beginning of the first phalanx.
Human balance in motion
If we look at the hand in profile, we will see that the outer side is quite flat, with only the knuckles protruding. The inner one, on the contrary, is soft; under each phalanx there is a protruding pad. There are two “pads” under the first phalanx, one under the joint is especially large and stands out well in everyone.
Drawing a hand step by step
Before drawing the hand, decide on the position of the forearm and wrist. To begin with, let's take the simplest example, use your brush as a nature, and do not redraw the picture below.
How to draw a blooming iris
In general, drawing hands is a skill that needs to be constantly developed and improved. The hands are very plastic and can take on hundreds of different positions and angles.
Complex angles
Interesting angles in which the fingers are in different positions are more difficult to depict. There are several ways to help avoid mistakes.
One of the effective and most often used ways to depict a hand from a non-standard angle is to mark the position of each finger with a line: 
Sometimes the line does not cope with the task and you have to use auxiliary shapes, cylinders or parallelepipeds to indicate the position of the phalanges:

When drawing a person, special attention should be paid to both the face and hands. Firstly, besides the head, the arms are the most exposed areas of the body. Secondly, they are also expressive and mobile. Additionally, due to the complexity of the connecting joints, convex and flat parts of the hand, the hands can be, and usually are, the most difficult part when studying the structure of the human body.
The first mistake when drawing is having too small hands. And here the ability to draw a head comes to the rescue. If you know how to correctly build the proportions of the head, then you can assume that you already have the correct proportions for drawing a hand. If you put your hand to your face, the tip of your middle finger will be at the hairline, and the hand will end at chin level. Here's your main way to measure brush parameters.
I hope you now understand the importance of knowing how to draw the human body. If you can draw a human body, you can draw anything for two reasons: 1) you now know enough about the three-dimensional shape of the human body; and 2) if you place this body in a room with various objects, you can easily determine the dimensions of these objects in relation to the body. And you will also already know that all these objects have their own volume and shape.

Let's return to the topic - Building a hand.
The hand has two volumetric convexities: one is at the base of the thumb (B), the second is the palm (the remaining part of the hand) (A). Double rows of finger bones, or carpal bones, are connected to the hand, creating a single unit. The wrist does not exist separately, and it is not attached to the hand with a ball-and-socket joint, like in wooden dolls. The movement of the hand starts from the wrist. It tapers slightly at the junction with the forearm. The wrist can also be considered a universal connector because it moves in all directions - up and down, side to side, and can rotate.

The center of the palm is slightly lower than the rest of the hand. For example, if you place your arm straight on a table, palm down, you will notice that your wrist does not touch the surface of the table. You will notice that the wrist rises where it connects to the hand.
The area of the thumb is significantly larger than the area at the base of the little finger. The hand is wider at the base of the fingers than at the junction with the wrist: however, closer to the wrist it is higher. Now pay attention to your hand: the palm is longer than its back. The thumb is attached to the palm by an independent and highly mobile ball-and-socket joint, which allows it to actively move independently of the rest of the hand. The palm consists of elastic and soft areas - pillows. The surface of the fingers and the entire palm are covered with many pads. The fingertips are pointed, the middle finger - the longest - is the highest point of the hand. The pads on the fingertips are pointed so that they are directed towards the middle - towards the middle finger. If you measure the length of your thumb from the top side, it will be equal to the length of your middle finger. The thumb is more powerful than the rest. The components of the fingers are more square in shape than it might seem at first glance; on the last square is the nail, almost triangular in shape, with bulges on both sides, forming the place where the nail grows. You will better remember the structure of your hand if you study the structure of the skeleton of the hand, after which problems with drawing your hand will never arise again.

Knowledge of the structure of joints, their movement and limitations in movement is very important. The first joint of the thumb and the first two joints of the remaining fingers are hinged. They can only move up and down, but not sideways or rotationally. When you spread your fingers, the topmost knuckles of each finger bend back. The lower knuckles of the fingers will bend forward, while the upper knuckles or fingertips cannot be bent even at right angles. Note that the top two hinge joints can only bend at 90 degrees. The lower joints of the fingers, like those on the wrist, are ball joints. There are a ton of hand positions and structures for you to learn. Even when you are drawing, you can use your free hand as a model. Place a mirror in front of you and this will give you more opportunities to study the positions of your free hand.

1. The first step when drawing a hand in motion is the position of the fingers and hand. Draw the hand in motion and determine the approximate position of the hand.
2. Then highlight the volumetric areas - divide the brush into parts, this will help you determine where the convex and where the flat areas are.
4. Add shadows at the end.

Remember this lesson, buy an anatomy textbook and study it. You could study the structure of a hand forever, and you might never be able to draw a hand in the same position twice. Every time you practice drawing a hand, you learn something new. Remember, your hands are just as important as your face. And they require the same attention and close study.
I hope you find this tutorial helpful.
Happy work!
The image of hands, or rather hands, is quite a difficult task. Even many successful artists, with craftsmanship and landscapes, avoid compositions involving hands. Therefore, having set yourself the task of learning to draw hands correctly, you should understand that this is a long and painstaking work. First of all, you need to study the structure of the palm, the physiological basis - the skeleton. The best way to do this is to draw from life.

Many people refuse to learn to draw. Fears that they will not be able to overcome difficulties, that they are not talented enough, prevent them from even trying to master basic drawing skills. They are looking for reasons and culprits, because it is easier to give up on an idea than to sweat a lot. And it's really sad. After all, you should understand that the learning process will not be easy. Some lessons are easier and it only takes a few hours of practice to get satisfactory results. And some aspects cannot be studied “at once”; you need to work long and hard before the first positive results appear. Both in life and in drawing, it is easier to give up obstacles than to stress and move on.

In order to start drawing you will need: regular drawing paper, HB and 2B pencil, eraser. The first sketch is best done with a subtle HB pencil, and to further add tone and detail we use the 2B markings.
Step by step instructions
Turn the paper over horizontally and divide it in half. Place your hand on one half and start drawing on the other. Imagine that your fingers are cylinders, your hands and wrists are geometric shapes. Thus, we can imagine the volumes that make up a human hand.

First, let's draw several straight lines repeating the axes of the fingers. Then we will install the top of the middle finger, little finger and thumb. We draw a connecting line between the extreme points of the axes of the thumb and little finger to help calculate the distance and make it easier to evaluate in further calculations of the distance between the joints.
The sketches made may seem like nonsense, and you may have a question: “How will a hand come out of these lines and dashes?” Remember that even great things begin from small things, and it is impossible to correctly build a palm without referring to the physiological structure.


Draw the thickness of the fingers along the marked ellipses so that thin cylinders are formed.

Erase the dark construction lines and smooth out the image and add fine details such as nails, creases and wrinkles.
Then, using an eraser, select light colors and shades, erase the excess lines that remain from the sketches around the hand.
Remember that the attitude with which you start work determines the success or failure of your venture.


