How to properly string a six-string guitar. How to change strings on an electric guitar
The INFORMATION presented in this post requires careful, thoughtful reading. The author is not responsible for damage to the instrument or musician due to inattentive reading of this material or their misinterpretation.
Replacing strings....
Faces this problem every guitarist.The guitar needs to replace strings quite often. How much? It depends on how you use it and what strings you use.
Replacing strings is a necessary procedure, but not a very pleasant one.
In addition, despite the apparent simplicity, in the process of replacing strings you can make a number of mistakes that can have a bad effect on the sound.
PATIENT
My acoustic guitar. Parker P6E. Active electronics (piezo + magnetic pickups).
We'll probably talk about it separately later.
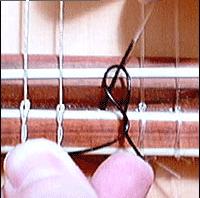
Now the most important thing is the method of attaching the strings.

This is how the strings are attached on most metal string acoustic guitars.
It is very important to understand the principle of string attachment, otherwise problems may arise.
Schematically, the principle of attaching strings looks like this:

Obviously, as the string moves upward, the metal washer at its end will slide up the clamp, clamping it more and more tightly into the groove. This way, neither the string nor the lock can pop out as the tension on the string increases.
In order to pull out the latch, it is enough to loosen the tension and push the string down a little - this will reduce the pressure created by the washer at the end of the string and you can easily pull out the latch.
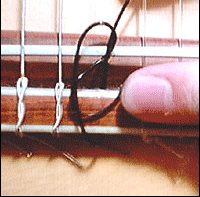
If this fails, it makes sense to resort to auxiliary devices (pliers, wire cutters, scissors - but they must be handled carefully so as not to damage the guitar). You can use special devices - such as a string spinner.
After the strings are removed, you must carefully examine the guitar:
A deck that needs to be cleaned of dust in hard-to-reach places. 
And the neck - we clean it from dirt under the sills and monitor for possible damage from nails. Damage from fingernails should make us think that the nails on the left hand should still be trimmed regularly. 
The choice of strings is a personal matter for everyone. There is no friend for the taste and color.
When choosing strings, key parameters 2:
1. Type of coverage.
2. String thickness.
Type of coating - silver, bronze, phosphorus-bronze, etc.
The brightest sound is phosphor-bronze.
Thickness - measured in fractions of an inch. And it says the actual number is 0.011 - the eleventh strings. 0.013 - thirteenths.
Usually the thickness of the sixth string is also indicated - 11-56 or 11-52. 11 - thickness of the first string 52 - sixth.
The thinner the strings, the easier it is to play, but at the same time, the stronger the strings beat on the frets, the guitar sounds quieter, softer, and has worse sustain.
My sweet spot is 11 strings. These strings are perfect for my guitar.
I played a Taylor guitar with 11 strings installed on it. But they just didn’t swing it (a folk guitar with a huge soundboard) - it just asked for 13 strings.
In any case, search.
My search landed on Elixir. It’s not a cheap pleasure, but it’s worth it:
Causes:
- excellent sound;
- durable;
A distinctive feature of these strings is the polymer coating on the winding, which does not significantly affect the brightness of the sound, but reliably protects the strings from corrosion and moisture.
There are two types of polymer coating for acoustic guitars:
= Polyweb
= Nanoweb
I use Nanoweb - it is a very thin, almost invisible coating.
Polyweb - even longer lifespan, but the sound is not very bright initially.
If someone plays something else, I won’t try to convince you otherwise.
Changing strings must begin with 3 and 4 strings. They are approximately equal in the load created, and most importantly, they are located in the center. This makes it possible to properly distribute the load.
We insert the string into the hole on the deck, secure it with a clamp and pull it towards ourselves.
You need to feel how the washer moves correctly along the clamp and begins to fix the string. This will prevent you from having trouble when you're tightening the string and the lock pops out of the body and you're trying to push it back into place.
This is especially true for the 5th and 6th strings, which create the maximum load.
This is especially true for the 5th and 6th strings, which, due to their thickness, when tensioned, try to push the latch out of the groove.
First, we apply a fixing tension so that it does not dangle.
Install strings 2 and 5.
Then 1 and 6.
In order for the strings to wrap nicely around the peg, you need to leave a reserve.
I usually give something like this:
But everyone determines for themselves by eye how much is needed for winding on a peg.
Congratulations. The strings are installed.
Depending on the tailpiece and how often you use them, the strings on an electric guitar may need to be changed more often than on an acoustic or steel-string guitar. While professional musicians prefer to change their strings monthly or more frequently, most guitarists should consider replacing their guitar strings every 3-4 months. The process of changing strings on an electric guitar is quite simple, although it requires some skill.
Steps
Part 1
Removing old strings- In rare cases, special holes or twisted patterns may be located near the strings on the guitar. Do not cut the strings until you have thoroughly inspected everything.
-
Loosen the tension on the old strings. Twist the pegs until all the strings are completely loose so you can unwind them completely and then pull them out. You will know that the string is saggy if it sounds deeper when plucked. You can, of course, just cut the strings, but this method reduces the tension gradually so that you can use the old string if one of the new ones breaks during the replacement process.
Pull the strings out of the tailpiece. On a regular tailpiece (Fender Strat or any other string-through guitar), simply pull the strings through the back of the guitar's body. To make the process easier, carefully insert the strings through the hole to make it easier for you to grip them. Grab the string by the small, ring-shaped metal edge and slowly pull it out of the guitar.
Take a lint-free cloth and wipe the guitar with it. Take this time to remove all dust, debris, and dirt from the neck of your guitar. This is done so as not to accidentally stain the new strings, give your guitar a neat look and make it faster to play. For a deeper cleaning, purchase a bottle of fret cleaner from your local musical instrument store.
Part 2
New string tension-
Turn the tuning pin hole to face you. This hole should point away from the string so that it is parallel to one of the frets. When playing the guitar, the hole points upward.
Pull the first string through the tailpiece and into the corresponding peg. Pull the string through the inside of the guitar to the outside. Typically, guitarists start by pulling the heaviest string, the low E. This should be marked as the "6th string" or the string with the highest gauge value (approximately 0.050). Insert it in the opposite manner than when removing the strings, and then insert it into the hole of the peg and pull it away from the guitar. Add 5-7cm more string length than the length of the neck so that it is not under tension until you start tightening it.
Grab the string at both ends of the peg and wind it into a snake shape. Try not to be too clever. Simply hold both ends firmly in your hands and twist them clockwise around the peg. If you pull out the string, it will look like the "S" in the Van Halen logo.
-
Twist the end of the string around itself to hold it in place. Grasp the end of the string and pass it under the string (where it enters the hole of the peg). Then wrap the string around itself and pull it tight towards the center of the headstock. You should end up with a loop of the end of the string wrapped around the rest of the string.
- There should be a small section of bent string right next to the peg hole.
-
While pressing the string lightly, begin to tighten it slowly. Press the string with your index finger 2-5 cm from the peg. Don't press it too hard, just hold it in place. Begin to slowly turn the peg counterclockwise. Make sure the string curls evenly around the peg.
- Use a tuner to get the correct tension. When in doubt, don't tighten the string too much or you risk breaking it.
-
Replace the strings if they become rusty, sticky, or start to go out of tune quickly. If you are a professional guitarist, you will need to change your strings quite often; Some musicians change strings weekly. If your strings have become limp and sticky, or you find yourself having to re-tune your guitar frequently, then it's time to upgrade your strings. If you haven't changed your strings in 3-4 months, now is the time to do it.
Note the position of each string before removing it. Unless you are an expert in tuning, you should definitely have an idea of what a guitar should look like. Take a photo of the strings or look at an image of your guitar online. While there's nothing complicated about it, you should still familiarize yourself with how to tension your guitar strings before you start replacing them.
Is it time to change the strings on your electric guitar? Well, let's figure out when they need to be changed, how to do it, what you need to understand before starting the replacement, how to adjust the height, and which ones to choose. What tool will you need? What types of string fixation systems are there and what is the peculiarity of replacement on different “machines”? Let's talk about everything in order.
Signs of “tired” strings
First of all, you should understand that strings are consumables that need to be changed once every 2-3 months if you play actively, and changed once every six months if you use the guitar “according to your mood.” This is required because they become “greasy” or clogged with dirt, the winding coating wears off, and in some cases they oxidize and rust. Accordingly, the sound also becomes less pleasant, dull, and in some cases the guitar no longer stays in tune and begins to rattle.
Types of tailpieces
Before we begin the replacement, let's clarify which version of the bridge (tailpiece, tailpiece) is installed on your electric guitar.
consider4 typesfastenings:
- Through the body (Tight-End, Gibraltar Standard bridge, Fixed bridge);
- tremolo machine (vintage tremolo system, FAT-10 tremolo bridge);
- two-sided machine (Floyd Rose, Edge-Zero, Edge tremolo bridge);
- fixation on the deck (Stop Bar, Stop tail).
How often you correctly replace the strings on your electric guitar will determine their ability to stay in tune, and, probably, their service life.
Tool that will be useful
- Nippers to cut strings for easier removal, and cut off excess “tails”;
- a set of hexagons for adjusting the neck and string height;
- a metal ruler with gradations from the beginning to adjust the height of the strings if they rattle or are too high;
- string winder. The thing is certainly not the main thing, but it will help you save time.
Before cutting the strings, be sure to loosen them! It is important! as the string may fly out and cause you harm. Follow safety measures, even though it seems like a trivial matter!
Removal
In all types of tailpieces, we simply cut the strings at the nut (behind the first fret of the neck) while holding them with our hand on the third fret so that they do not fly out and cause injury to you.
Then we pull them out through special holes in the protective plastic (if you have a tremolo machine) or from the back of the case.

If you have a Floyd Rose system, you will need a hex wrench to loosen the clamps on the bridge. In some Zero Pro systems (analogue of Floyd Rose from Ibanez, such machines are often found on Cort guitars) the strings are clamped together with clamps (string tips that allow you to hold the string in the bridge, in this case you will have to unscrew the bolt holding the clamp until the end). Read below on how to remove them.

Used strings are not suitable for re-installation, but they can be useful in crafts or at home.
Preparing the Electric Guitar
After you have removed the strings, tighten the bolted connections on the neck and body. Tighten them securely, but without fanaticism. Also carefully watch what to twist and what not. For example, you don’t need to turn the pickup height adjusters, even though it looks like an ordinary bolt. It is also not recommended for you to turn the machine's tremolo adjustment bolts.
The photo below indicates that you can twist without harm

Impregnation of the lining
The next step is to soak the fretboard with lemon oil. This is required to ensure that the pad lasts longer and prevents the pad from drying out and cracking. If the neck is varnished, you do not need to do this. Impregnation also has a beneficial effect on the sound of the guitar. You can find napkins soaked in lemon oil in almost every musical instrument store. We recommend taking napkins from Ernie Ball. There are 6 of them in one box. The cost is approximately 150 rubles or 2 USD.
After thoroughly soaking each fret of the neck, set the guitar aside for 40 minutes to allow the oil to absorb. Wipe what is not absorbed with a dry, clean cloth.
Lubrication of mechanisms and sills
Take some oil, ideally for sewing machines, but regular motor oil will also work. Apply a small drop, using a syringe, to the saddles and the saddle of the guitar. This will prevent the appearance of burrs and extend the life of the tool fittings. This is especially true for budget guitars, where all components are made from cheap materials. But don't add oil, it's not necessary.
Start installation
We have prepared the instrument and it’s time to string your favorite electric guitar. Since tailpieces are different, we will describe how to change them for each type separately.
Important! We wrap the strings on the pegs in a lock! In this case, they hold the line much better, not yielding to lock pegs.
Tying a lock on the strings

We did not describe each step, since from the photos and videos below you can easily understand how to do this. But if you have any questions, write in the comments, we will definitely help you.
Through the body, tremolo or stop bar fixation
On all these tailpieces, they should be changed in the reverse order from removal.
- Thread through the holes;
- Tension the first and sixth strings (to prevent neck deformation);
- We stretch the remaining ones according to the 2-3-5-4 pattern (this will make it easier for you, and the neck will be more intact);
- We bite off the excess length (besides the fact that it is not aesthetically beautiful, dangling strings can be dangerous to your health or the health of your loved ones.);
- Tuning the guitar.
Movement Floyd Rose, Edge Zero, Edge Pro and others like that
Owners of an electric guitar with such a machine can be envied and sympathized at the same time. With the possibilities that a double-sided machine provides, there are a lot of problems with how to change strings. But it's okay! Grab your hex wrenches and wire cutters and let the replacement begin!
- To begin with, use a hexagon to unscrew the clamps from the nut of the fingerboard, if there are any;
- Next, loosen the strings and bite them off, although to change them you can simply unscrew them from the bridge;
- Loosen the latches on the bridge and remove the strings;
- We bite off the clamps on the new strings, thread them into the bridge and fix the hexagon;
- We stretch in the order 1-6-2-3-4-5, tie with locks;
- Tuning the strings on an electric guitar;
- Using the lever of the machine we make several braces, then we adjust the electric guitar again;
- We set the micro-adjustment on the bridge to the center;
- We tune the guitar again;
- We lock (twist) the threshold.
Getting the perfect sound
If you use strings of the same gauge as before, then additional tuning will not be needed. But if the strings rattle or are too high, it’s worth straightening the neck or tightening the springs. Also, height adjustment will be required.
Neck adjustment
The neck is adjusted by an truss rod, access to which may vary depending on the model and manufacturer. It is mainly located in the “head” of the fingerboard and is often hidden by a decorative cover.

The neck is adjusted by tightening or loosening the truss rod clockwise or counterclockwise. 
The neck is considered smooth if, when the string is clamped, at the first and 17-19 frets (depending on the guitar), the strings lie flat and do not rattle. There is no play on the 12th fret, but if you pluck it, it will sound a little. Or you can place a metal ruler on its edge and check that all the frets are evenly aligned with the edge of the ruler.
Bridge Height Adjustment
Depending on the type of bridge, the height adjustment will be different. In some places, it is enough to tighten the support screws, and in others, raise or lower the bridge saddles. All this is done for comfortable playing and for adjusting the height if they rattle.

The height should not exceed 2 mm at the 12th fret (measured from the top of the fret)
Setting up the scale
What is a scale? This is the length of the string from nut to nut, and at the 12th fret is its center. If the center is shifted, then the accuracy of the tuning is lost, and if a pure “E” should sound at the 12th fret of the first string, then with a knocked down scale there may be a “D” or “E bimol” note. Accordingly, the system floats on all other frets.
Scale adjustment is carried out using bridge saddles, which are tightened or relaxed with a screwdriver or hexagon.
For precise tuning, you will need an electronic chromatic tuner, which will be used to adjust the scale length.
- Connect the tuner;
- We rebuild in standard order;
- We clamp on the 12th fret and pull it;
- If the tuner arrow deviates from the norm, then tighten the bolt. We look at the arrow, the indicator has improved - we turn it in the same direction, if it has worsened - in the opposite direction;
- Repeat until you get the most accurate sound.
How to adjust the scale, see the video below
//www.youtube.com/watch?v=CO8DWiHuMN8
//www.youtube.com/watch?v=AlXjqmT5g8s
We hope that now replacing strings will be easier for you. We tried to put the most important ones in one post, now it will be much easier for you to change the strings on your instrument, tune it, and enjoy the wonderful sound
Complete guitar tuning (Warning! Contains profanity! 18+)
Many are already familiar with nylon strings. And they know very well that they don’t have “hammers”
(special small balls, thanks to which the strings are held on the tailpiece - bridge.)
For such strings, a special knot has been invented that needs to be tied around the bridge.
In fact, there are several nodes, one of which I remember well. This method is a little more complicated than others, but more versatile and accurate in the end.
It’s easier to show you clearly using the photographs below. The third black string is taken solely for better visibility. :)
1. Insert the tip of the string into the hole in the tailpiece and drag it about 10-15 centimeters (look at the photo).
2. We tie a knot at the end of the string, the closer to the edge, the better. 
3. We take the knot and wrap the string in a ring, passing it under it (as in the photo).

4. Pass the end with the knot into the resulting ring, thereby forming a loop around the bridge. There is no need to tighten it.

5. Retract the tip of the string with the knot again, as if trying to wrap it around the loop a second time. (look more closely at the photo)
6. Wrap it around the loop a second time to form a loop, wrapped twice around its axis. (the photo explains it more clearly :))
7. Place the tip with the knot under the tailpiece (bridge) and slowly pull the free end of the string. At this point, you need to try to keep the end with the knot under the bridge. (photo to help)
The principle of attaching strings to the shaft of a tuning machine is similar to attaching them to a stand - the string must be clamped with a tightening loop. The harder the strings are pulled, the stronger the loop holds. Of course, the turns around the shaft are also of great importance, since this is all the frictional force that additionally holds the string.
There is nothing special to write about dismantling the old strings - they unscrewed it, pulled it out and threw it away. To rotate the tuning mechanics, it is very convenient to use special twisters, which you can buy, or you can make yourself from ebony, amaranth, Indian rosewood and mahogany.
Unfortunately, the mother-of-pearl button at the end of the handle is not visible. Changing guitar strings with such a twister is a pleasure.
String installation order into the guitar pegs is not of fundamental importance, but it is more convenient to start with the 1st and 6th strings, moving in order, then the already tucked strings will not interfere with installing the next ones. In other words, the order of the strings is: 1st, 2nd, 3rd and also 6th, 5th, 4th.
A few more tips before we look at how to thread the strings:

Fastening the string to the pegs, forming a knot
Keep the string slightly under tension so that the knot on the stand does not unravel. The string is threaded once or twice (for the fifth and sixth, once is definitely enough). There is no need to wind too much string onto the shaft so that the turns are piled on top of each other. 

Now wrap the free end around the string and start winding. The string should begin to wind along with its tail. A couple of overlaps is enough. Remember to pull the string by hand until it becomes taut on its own. 

After the tail has been crossed several times, move it to the side opposite to the direction of winding and place the turns of the string neatly one after another. 


