Beautiful painted Christmas tree. Drawing a Christmas tree: ways to draw a Christmas tree, a step-by-step master class on drawing a Christmas tree with children
We know how to draw a Christmas tree step by step since school. But to be honest, as a child we ignored many lessons. It is not surprising that as we get older, we respond to our child’s requests to draw a Christmas tree with excuses. This article will teach you how to draw beautiful spruce even those who do not have special artistic skills.
Drawing trees is actually very simple and exciting activity. Unlike portrait painting where it is important to place accents correctly, branches on trees can be drawn in chaotic order, and they will still look natural. A few tips on how to draw a spruce will help us in our work:
- Use a slate soft pencil to create a sketch, since at the end of the work these lines will need to be removed with an eraser. Choose domestic pencils marked “M”, and European pencils marked “B”.
- To avoid smearing the drawing while working, place a piece of clean paper under your hand. This way, the wrist will remain clean, and you won’t have to correct the sketch.
- If you place your fingers closer to the end of the pencil, you will get an accurate drawing, but the strokes will be harsher.
- When you draw a spruce from a sketch, don't be afraid to go beyond it. This way the tree will turn out much more realistic, because there are no branches that grow only to a certain length.
- The most convenient way to work with paints is to use a special palette. But if you don’t have one in your arsenal yet, you can’t pick up colors from a jar. best idea. Then pour some paint on the extra blank slate. This way the shades will not mix with each other.
- Make sure that the paint does not flow down the brush. Having collected excess mascara, it is better to gently blot the brush on the edge of the jar or palette.
That's all, it's time to move on to practice. Stock up free time, pencils and blank paper.
The painted spruce is a universal tree in every sense. You can use it to decorate a postcard, make an applique, or simply hang a good drawing on the wall. Evergreen spruce fits perfectly into summer landscape, and with toys and gifts on the branches it will complement the New Year's picture. This photo tutorial will teach you how to easily and beautifully draw a Christmas tree with a pencil step by step.

Required materials:
- a simple pencil (you can immediately use colored ones);
- A4 size sheet of paper.
Process description:


It is generally accepted that it is very difficult to work with paints, so inexperienced artists are reluctant to take on such drawings. This master class will dispel all your doubts and tell beginners how to paint a Christmas tree step by step.
Required materials:
- corner brush;
- white pencil;
- paints of two colors: green and white.
Process description:

Spruce? It is very difficult to find a person who has never drawn this tree in his life. But if you don’t know how to do this, our article will teach you this simple task.
Spruce is a symbol of the holiday!
Spruce is something that everyone certainly associates with the holiday, the New Year! This evergreen coniferous beauty becomes a real green fairy for children, delighting them on the morning of January 1 with gifts hidden under the branches. Does your child ask you to draw a Christmas tree? Or maybe you need to make some kind of composition with it for children's party or a matinee in the garden?
We will be happy to provide you with several simple master classes that will teach you how to draw a spruce step by step.
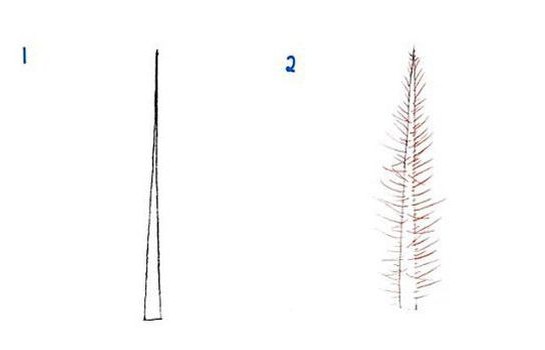
Method number 1: from top to bottom
The first method, which we will consider in our article, will be based on drawing a tree from its top. Learn to draw such a spruce. And then it won’t be difficult for you to create an entire forest on a piece of paper!
So, how to draw a spruce, starting from its top? It's very simple!

Method number 2: from bottom to top
The first method of depicting a spruce is not bad, but, you see, it is much more convenient to draw from the bottom up, and not vice versa. This makes it much easier to adjust and plan the height of the tree.
How to draw a spruce from bottom to top? Now we'll show you!

Method number 3: as easy as shelling pears!
How to draw a spruce in the simplest and most unpretentious way? We know it and will definitely share it with you. Using this method, even a small child can draw a Christmas tree.
How to draw a spruce branch
But what if you don’t need the whole tree, but, for example, only one branch? Well, we'll tell you about that too. Arm yourself with a pencil and paper, let's get started!

The drawing is ready!

Now you know how to draw a spruce branch yourself. You can even teach this, for example, to your child.
Using the methods described above, you can branch coniferous tree or draw the spruce itself with a pencil, felt-tip pens and even paints. Tool in in this case doesn't really matter. Draw, create yourself and together with your children.
Take a sheet of paper or album, a pencil and an eraser. Ask your child what he will use to decorate the hedgehog and prepare pencils, markers or paints with a brush.
Tell your child the rules of how to work with paints.
- Prepare and moisten the paints with clean water;
- mix paints on a palette (white paper), not forgetting to wash your brushes;
- evenly cover the surface of the background and characters in the composition;
- at the end of the work, wash the brush, do not leave it in a jar of water, but wipe it with a cloth;
- After finishing the paint, put the pencil in boxes or in a pencil case.
How to draw a New Year tree


Step-by-step instructions "Step by step" on how to draw a Christmas tree.

1. Draw a triangle. Now draw a star on the top of the triangle. Leave enough space to add the rest of the tree.

2. Draw the top of the tree, which consists of three branches, as shown in the picture. Don't try to draw too accurately, not quite straight lines will look better. The ends of the branch lines should join the star.

3. Now add two more rows of spruce branches. Moreover, in each subsequent row of branches one more is added. Thus, row 1 - three branches, row 2 - four branches, row 3 - five branches.

4. Then simply draw a bucket under the tree and attach it to the tree using two lines, which will be the trunk of the spruce. Add two lines down the center of the bucket as a ribbon as shown. Erase everything auxiliary lines.

5. Draw a bow on the ribbon and draw a ball on each branch. Give the star at the top of the tree a sparkling effect. Our Christmas tree is ready! Well done!

6. Now you can start decorating.
Whatever your child draws, be sure to praise him and hang the resulting masterpiece on the wall so that the child feels like a real artist.
How to draw a Christmas tree
We offer a Christmas tree option that you can decorate as you wish.
Send us the resulting drawing by e-mail. Please indicate I.F. child, age, city, country where you live and your baby will become a little famous! We wish you success!
The furry beauty of the Christmas tree is a real decoration - winter and main symbol, so it is often found in children's drawings. And since it’s easy to draw a Christmas tree,
If you organize your work in stages, then it will be useful for everyone to learn the basic principles of drawing it.
How to draw a Christmas tree step by step with a pencil
Before drawing a Christmas tree, you need to mark the sheet with a pencil, marking a vertical line on it, running approximately in the center, and on it - transverse stripes: one - approximately in the center of the sheet, the other two - below it (at a distance of about one fifth and two fifths from the bottom edge). On the upper part of the vertical strip you can immediately mark the top of the future spruce.

Using these stripes as a guide, we draw a contour. We choose the simplest option - voluminous fluffy paws with a wavy bottom edge.

After that, we decorate our Christmas tree - we hang toy balls on its branches, and decorate the top with a five-pointed star. We put a traditional one under the Christmas tree.

Often the work is done - we learned how to draw a Christmas tree step by step with a pencil. Now we begin to fill our picture with color. First, cover the entire sheet with a layer of translucent blue watercolor.

When the paint dries, we arm ourselves with green watercolor pencils and begin to paint the needles. We make some of them lighter, and some of them a darker shade. Distribute the light tone closer to the edge spruce paws, dark - to their tops.

Red watercolor pencil We paint the Christmas balls, leaving their center unpainted.

Now we cover the unpainted middle with lighter pencil strokes.

We make the star bright yellow, the gifts blue. We do not color the ribbons on gifts.

Take some gold paint and cover the edges of the star with it.


We arm ourselves with green gouache and begin to cover these contours with it - like spruce branches with needles.

First, cover the entire contour with light green gouache.

And then we highlight the lower edge of the spruce paws with dark green gouache.

Apply dark paint in strokes to create the feeling that needles are growing on the branches. For the top edge of the branches, use a shade slightly lighter than the one used for the bottom edge.

So we gradually paint the entire Christmas tree.

We arm ourselves with yellow gouache.

And we draw a bright garland on spruce branches.

We complement the decoration of our Christmas tree with colorful ones.

And with splashes of white gouache we paint snow around it.

From below we denote snowdrifts with sweeping, long strokes.

This Christmas tree is also ready to travel by mail to find its recipient!

Herringbone gouache drawing
Choosing suitable way drawing, pay attention to what colors the child likes best - if he likes to work with watercolors, use the first method, and if with gouache, use the second.


