How to draw the winter sorceress. We depict nature from the earth to the sky
Drawing winter with preschoolers: step-by-step master classes, a collection of ideas.

Drawing winter with preschoolers
In this article you will find step-by-step master classes on drawing with children preschool age winters in different techniques:
- drawing winter with gouache,
- we draw winter using the grattage technique,
- painting with salt.
Master classes will help teachers and parents conduct drawing classes in kindergarten, children's studio and home.
Master class 1. Drawing winter with gouache with preschoolers
Author of the master class: Parfentyeva Vera, technology teacher, head of the children's club artistic creativity, reader of "Native Path". In the article, the photo shows drawings of children - students of Vera's studio.
Materials and tools for drawing
To complete a winter drawing, you need to prepare for your child:
- album sheet,
- paints (watercolor or gouache),
- brush (you need a wide flat brush),
- round brushes No. 1 -2, 4-5.
Age of children
This drawing can be drawn by children aged 5 years and older (senior preschool and primary school age.
How to draw winter with children: step-by-step description
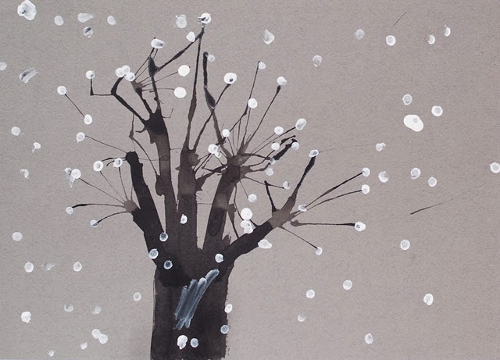
Step 1.Prepare the background. To do this, you need to apply several strokes of blue, red, yellow, purple (can be green) paint with a wide brush. Then put on the brush white paint and do color stretching. To desired receipt background in which one tone passes into another.

Step 2. We draw the outlines of the trees.
— Apply white paint to a round brush No. 4 or 5, and holding the brush vertically, first mark out the contours of two trees in the center of the sheet (or do it using the poking method). The trees consist of three tiers in the form of a month-like figure or “cloud”. Start drawing with lower tier. Make the middle and upper tiers smaller relative to each other.
— Mark round “clouds” for the bushes on the sides of the trees.
— Using the poking method, fill in the inside of each “cloud.”

Step 3. Draw snow caps on the trees.
Mix white and black paint on a palette to make a light color gray and also accurately make a gray tint on the white “clouds” (shadow on the snow caps).

Step 4. We draw trunks and branches of trees and bushes.
Using brush No. 1 or 2, draw thin lines on tree trunks between the tiers of the crown and trunks of shrubs.
Paint the tree trunks with black paint, carefully so as not to touch the crowns.
Draw branches from the trunk.

Step 5. We draw snow on tree trunks and snowdrifts.
- Apply thin lines along the trunks of trees and shrubs with white paint.
- Under the trees, outline the contours of the snowdrifts with a No. 5 brush and fill the “drifts” with white paint.

Step 6. Drawing falling snow.
Paint it with white paint finished drawing spray by moving the brush over the brush to imitate falling snow. How to draw falling snow “spray” You are shown in the photo.

Our drawing is ready. Try to depict winter in a drawing! Good luck in your creativity!

And below is an example children's drawing for this master class. It was drawn by Nastya (7.5 years old).

Drawing winter with children using scratch paper technique
Drawing a winter picture with salt: technique
In the video you will see the drawing technique using the example of a snowman. But you can do the same with an image winter tree, houses, clearings, forests.
How to draw winter with gouache: step-by-step video for children 6 years and older
Summary: Children's drawings on the theme of winter. How to paint winter with paints. How to draw winter with a pencil. How to draw winter step by step. Drawing of a winter landscape. Drawing winter's tale. Picture of a winter forest.
In winter, adults and children spend a lot of time at home, so there are more opportunities to get creative. Winter is very beautiful time year. Try to convey the beauty of this time of year in winter drawings. We will share with you simple techniques drawings, with which you can teach your child to draw on your own beautiful drawings on the theme of winter. From this article you will learn how to make voluminous snow paint and learn how to draw winter pictures using the spray technique. When drawing pictures on winter theme we will use all kinds additional materials, and not just a brush and paint. You may not even suspect that you can draw winter using plastic film or salt, bubble wrap or shaving foam.
1. Winter drawings. "Volume snow paint"
If you mix equal amounts of PVA glue and shaving foam, you will get wonderful airy snow paint. She can draw snowflakes, snowmen, polar bears or winter landscapes. For beauty, you can add glitter to the paint. When painting with this paint, it is better to first with a simple pencil outline the contours of the drawing, and then color it with paint. After some time, the paint will harden, and you will get a voluminous winter picture.

2. Winter drawings of children. Using electrical tape in children's creativity
3. Winter drawings. Drawings on the theme of winter
If there is snow outside the window, you can depict it using a cotton swab.

Or use a brush to put snow on each branch.

11. Winter drawings. Drawings on the theme of winter
An interesting idea on the topic of children's winter drawings was proposed by the author of the Homeschool Creations blog. She used putty to paint snow on the transparent film. Now it can be applied to any winter pattern or appliqué, simulating falling snow. They put the film on the picture - it started snowing, they removed the film - the snow stopped.

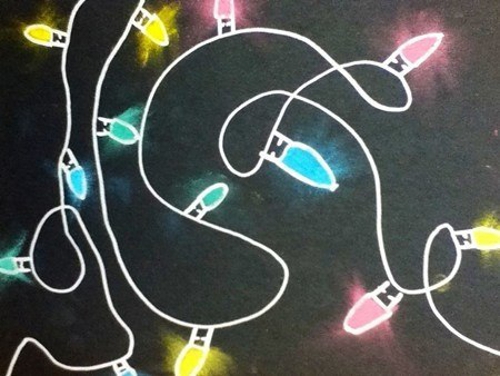
12. Winter drawings. "New Year's lights"
We would like to tell you about one interesting unconventional technology drawing. To draw New Year's garland as in the photo, you will need a sheet of thick paper of a dark color (blue, purple or black). You will also need regular chalk (the kind you use to draw on asphalt or a blackboard) and a light bulb stencil cut out of cardboard.
On a piece of paper, use a thin felt-tip pen to draw wires and light bulb sockets. Now apply the light bulb stencil to each socket in turn and outline it boldly with chalk. Then, without removing the stencil, smear the chalk on the paper using a piece of cotton wool or directly with your finger to create rays of light. You can replace chalk with colored pencil graphite chips.
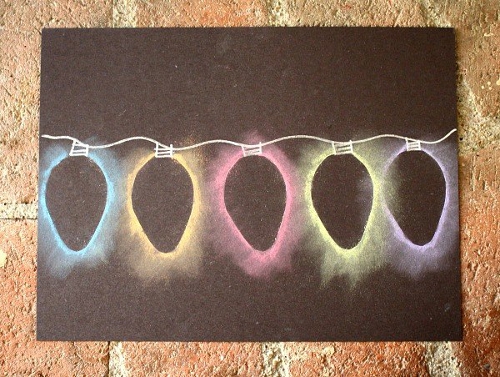

It is not necessary to use a stencil. You can simply paint over the light bulbs with chalk, and then gently rub the chalk into different sides to make rays.
Using this technique you can draw more winter city, for example, or the northern lights.

13. Drawings of a winter fairy tale. Winter forest drawings
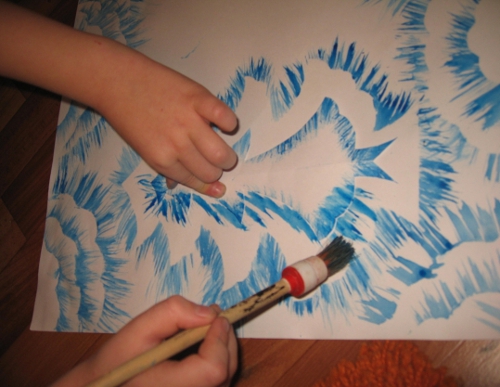
On the website Maam.ru already mentioned above you will find interesting master drawing class winter landscapes using templates. You will only need one base color - blue, a coarse bristle brush and a white drawing sheet. When cutting out templates, use the cutting method from paper folded in half. Look how great the drawing is winter forest turned out to be the author of the picture. A real winter fairy tale!

14. Winter drawings. Drawings on the theme of winter
You are probably very eager to find out how the wonderful “marble” Christmas tree in the photo below was painted? Let's tell you everything in order...To draw this original drawing for the winter theme you will need:
Shaving cream (foam)
- watercolor paints or green food colorings
- flat plate for mixing shaving foam and paints
- paper
- scraper

1. Apply shaving foam to a plate in an even, thick layer.
2. Mix different shades of green paint or food coloring with a little water to make a rich solution.
3. Using a brush or pipette, drip paint onto the surface of the foam in a random order.
4. Now, using the same brush or stick, beautifully smear the paint over the surface so that it forms fancy zigzags, wavy lines, etc. This is the most creative stage all the work that will bring pleasure to the children.
5. Now take a sheet of paper and carefully apply it to the surface of the resulting patterned foam.
6. Place the sheet on the table. All you have to do is scrape off all the foam from the sheet of paper. For these purposes, you can use a piece of cardboard.
Simply amazing! Underneath the shaving foam you'll find stunning marble patterns. The paint has time to quickly absorb into the paper; you just need to let it dry for a few hours.
15. How to draw winter. How to paint winter with paints
Concluding our review article on winter drawings for children, we want to tell you about one more in an interesting way, how you can paint winter with paints together with your child. To work, you will need any small balls and a plastic cup (or any other cylindrical object with a lid).

Place a piece of colored paper inside the glass. Dip the balls in white paint. Now put them in a glass, close the lid on top and shake well. As a result, you will end up with colored paper with white streaks. Do the same colored paper with white streaks of other colors. From these blanks, cut out the details of the applique on a winter theme.

Material prepared by: Anna Ponomarenko
Other publications on the topic of this article:
Our winter is so severe that soon pedestrian crossings will be made under the snow, and cars clearly need anti-gravity gadgets to fly above the snow level. I'll tell you how to draw winter with a pencil. So many holidays and fun, first Santa Claus with his big red hat will visit us, and his eternal girlfriend the Snow Maiden will also not disappear anywhere, she will come running covered in snow, late, as always. And we’ll just go outside, look at the snow, throw snowballs, and wake up near an unknown snow woman. Then we’ll go home, and there the whole table will already be set, the Christmas tree sparkles with a rainbow, whoever has a fireplace in the house is completely lucky. There is no better time to gather with family or friends in cozy warmth, dream about summer, reminisce old times. Let's try to draw one of beautiful landscapes which can be seen in winter.
How to draw winter with a pencil step by step
Step one. Let's draw a long path going beyond the horizon, right above it is a small but noticeable moon, and draw a horizontal line of the mountains.  Step two. Let's create a small winter town. We need several houses with sharp roofs, several trees and, in the very center, their leader - a decorated and shiny Christmas tree.
  Step three. Let's shade the entire mountainous area in the background, as well as the walls of the houses and the trunk of each tree. In addition, we will add a small snowman on the right side.
  Step four. Now the picture needs more vibrancy. Let's shade out the houses and mountains more closely, draw lines on the path, take a closer look at each noticeable tree, and draw a small fence around the snowman.
  Step five. Don't forget the moon. We turn it into a small luminous ball in the heavens, and also finish up with things on earth. And let's draw another large tree sticking out in the upper right corner.
  However, there are an endless variety of topics for drawing winter landscapes. For it is enough just to go outside and see the picture created for us by nature. Stay safe and have a great time winter time, don't forget about DayFun and keep drawing. Leave your wishes on the comments page, I will always be glad to see you. Come back often. A few more interesting lessons especially for you.
Already drew +5 I want to draw +5 Thank you + 31
Winter is a very cold time of the year. This is not to say that it is not as beautiful as spring, summer or autumn. Winter has its own characteristics and beauty. Snow-white snowdrifts, crispy snow underfoot and small snowflakes that fall straight from the sky. Well, isn't it lovely? Today we will find ourselves in a village in winter time year. A frozen river, roads covered with snow, small houses standing in the distance, and behind them the silhouettes of a winter forest. This lesson will answer the question of how to draw a winter landscape.
Tools and materials:
- White sheet of paper;
- Eraser;
- Simple pencil;
- Black handle;
- Colored pencils (orange, brown, light blue, dark blue, dark brown, green, dark yellow, gray).
Drawing a winter village landscape
- Step 1
In the middle of the sheet we draw two houses. It is worth considering that they will be in the background, so we make them small. The house on the right will be larger than on the left and has a window. They will stand in the snow, so we draw the ground line a little wavy.
- Step 2
Silhouettes of bushes and trees are visible on the sides of the houses. To the right of the house there will be two trees on a tall and thin trunk. We make the horizon line wider.

- Step 3
On background adding silhouettes of trees. We make them different, but at the edge the height of the trees should decrease. Let's draw the foreground a little, making a small indentation.

- Step 4
In the depression in the middle we draw a small fence, covered with snow. Add snowdrifts on the sides. The river will be placed in the center, so the snowdrifts should decrease in this area. And in the very center of the river (and the leaf) there will be a large stone.

- Step 5
In the foreground, trees will be visible on the sides of the snowdrifts. They will be completely bald, with only the trunk and branches visible.

- Step 6
Draw the outlines with a black pen. Using a black pen, we do not highlight only the background of the picture, in which the forest is located (behind the houses).

- Step 7
We make the front part of the houses orange. Draw the side part and under the roof with a brown pencil.

- Step 8
Under the house we will draw in blue and blue snow, adding a frosty tint to the design. The middle of the picture will be blue and the edge will be blue.

- Step 9
Trees, stumps and a fence should be painted in brown and dark brown. By right side let's add an orange tint to the trees.

- Step 10
We make the river blue in the middle, and blue closer to the ground. Draw the snow in the foreground in gray to give it volume.

- Step 11
We will draw the forest against the background of the picture in three colors – gray, dark yellow and green. We apply the color without specifying the contours. Since the trees are in the background, they will be slightly blurred.

- Step 12
We finalize the drawing by adding blue color to the sky. Now we know how to draw a winter rural landscape.

How to draw a simple winter landscape with a pencil step by step


Drawing a winter landscape with a Christmas tree and a snowman
- Step 1
First, using light pencil lines, indicate the approximate location of all objects on a piece of paper;

- Step 2
Start drawing the winter landscape in more detail. To do this, first outline the branches of the birch tree, and then draw the outlines of the forest in the distance. Draw a house, depicting its roof, chimney and windows. Draw a path going into the distance;

- Step 3
Draw a small Christmas tree next to the birch tree. And on the other side of the road, draw a snowman;

- Step 4
Of course, once you understand how to draw a winter landscape with a pencil, you shouldn’t stop there. You need to color the drawing. Therefore, outline the landscape with a liner;

- Step 5
Using an eraser, erase the original sketch;

- Step 6
Color the Christmas tree green pencil. Shade the birch trunk gray. Paint over the stripes on the birch tree, as well as its branches, with a black pencil;

- Step 7
Color the forest in the background green, and the house with brown and burgundy pencils color range. Paint over the windows yellow. Shade the smoke with a gray shade;

- Step 8
Color the snowman using pencils of various colors;

- Step 9
Pencils blue-blue shades shade the snow. Shade with yellow the places where the light falls from the windows;

- Step 10
Use gray pencils to color the sky.

- Step 11
The drawing is completely ready! Now you know how to draw a winter landscape! If desired, it can be painted with paints. For example, gouache or watercolor is perfect for this purpose! You can also draw a similar drawing with a simple pencil using shading. True, in this case it will not look so bright, festive and impressive.

Drawing a winter landscape with a lake

How to draw a winter forest landscape
Every season the forest is transformed. In the spring it begins to come to life, covering the trees with young foliage and melting snow. In summer, the forest is fragrant not only with flowers, but ripe berries. Autumn colors the trees of the forest in various warm colors, and the sun palely warms with its last rays. Winter exposes the branches of trees and covers them with a white blanket of snow, freezing the rivers. It's hard not to convey this beauty in illustrations. Therefore, today we will choose the last season of the year and learn how to draw a winter forest landscape using colored pencils.
Tools and materials:
- Simple pencil;
- White sheet of paper;
- Eraser;
- Black helium pen;
- Black marker;
- Colored pencils (blue, orange, blue, gray, green, light green, brown, dark brown).
- Step 1
Divide the sheet into four parts. First, draw a horizontal line in the middle of the sheet. In the middle horizontal line draw a vertical line.

- Step 2
Let's draw the background part of the picture. On a horizontal line we draw two mountains (the left one will be larger than the right one.) And in front of them we will make silhouettes of trees.

- Step 3
We retreat a small section down from the horizontal line (there will be a river here). Using a curved line we will draw the ground, or rather, a cliff.

- Step 4
We retreat further down and draw pine trees. Their feature is a long trunk and thin branches. At the base of the trunk we will add small snowdrifts. The trees on the left have some foliage.

- Step 5
Let's draw a deer in the foreground. The animal should not be too detailed, because the main task of the drawing is to show the winter landscape. Let's add more snowdrifts in the foreground.

- Step 6
Let's outline the contours of the drawing in the foreground with a black pen. There will be snow on the tree branches.

- Step 7
We begin to paint with color from the background part (top). We determine that there will be a sunset, so we draw between the mountains orange, then add blue and blue. We make the transitions between colors smooth, applying from bottom to top. The mountains will be gray, but adjust the contrast using pressure. We make the trees in front of the mountains uniformly green.

- Step 8
For the river we use the usual blue and blue. Closer to the mountains we add green and gray shade into the water to make it look more picturesque.

- Step 9
The trunk should be drawn using orange, brown and dark brown. The trees on the left have some leaves, which we'll make green.

- Step 10
Adding shadows from trees using gray pencil. Let's add a little coldness to the drawing by drawing the foreground in blue.

- Step 11
The body of a deer is covered with hair brown. And between the snowdrifts we’ll add blue color. So we learned how to draw a winter forest landscape.

How to draw a winter mountain landscape step by step
You can often see incredibly beautiful mountain landscapes on postcards or find similar ones on the Internet. The stone giants covered with snow are mesmerizing. At their feet stand blue spruce trees, frozen from the cold. And there was not a soul around, only a blue snow flicker. How can you resist skipping to the lesson and learning how to draw a winter mountain landscape pencil step by step? The lesson is perfect for novice artists who will be able to depict this beauty of the icy mountains the first time if they carefully follow the steps.
Tools and materials:
- White sheet of paper;
- Simple pencil;
- Eraser;
- Black marker;
- Blue pencil;
- Blue pencil.

Master class on drawing for children 5-7 years old with step by step photos"Snowfall"
Name:“Snowfall” Drawing with children 5-7 years old.Author: Anna Gennadievna Gordeeva, arts teacher, MBDOU "TsRR-kindergarten No. 172", Ivanovo
Description: a master class with step-by-step photos “Snowfall” will be useful preschool teachers, teachers primary classes, as well as parents. The work can be done with preschoolers 5-7 years old and elementary school students.
Target: drawing picturesque landscape"Snowfall"
Tasks:
Educational
Learn to draw a winter landscape; strengthen your skills in drawing trees; consolidate the ability to mix colors in a palette; improve the ability to use non-traditional drawing tools (cotton swabs)
Developmental
Develop aesthetic taste, sense of color, compositional skills, fine motor skills, coordination of movements.
Educational
Cultivate interest in changes in nature, accuracy, attentiveness, perseverance.
Materials and equipment:
Sheet A4
Gouache
Palette
Brushes No. 6, No. 3
Simple pencil
Cotton swab
Napkins

Work progress
December...The beginning of winter...I really want to wake up in the morning and see a white blanket of snow outside the window. Even though the sky is still dark and there is dampness in the air, there is still hope for a miracle - the first miracle of winter - snowfall!
He is always expected at all times. Poems and songs are written about him, paintings are painted.
A. Plastov "First Snow"

It was snowing all over the world.
I walked wherever my eyes led me -
Then he will turn to the village,
It will pass through the city.
And then, then into the woods,
On the coastal beach, sand,
To the hills, to the hills,
On trees and bushes...
Along the roads, along the paths,
He carried his snowflakes to everyone.
He carried and carried lightly and lightly.
Everything became white - white.
Everything shone with a gentle light,
And the night gave way to dawn.
The snowfall was walking, walking
And a little tired!
He got tired and stopped.
He gave away all the snowflakes!
Let him rest a little
He will come again later!
O. Shalimova
So, let's start drawing.
1. Draw the horizon line with a simple pencil.

2. Add white and black paint to the palette. Mixing them, we get gray color. We remember that we take first white, and add a little black to it.


3. Take a thick brush and paint the sky with gray paint up to the horizon line. Leave the bottom of the sheet unpainted. This is land covered with snow.

4. Now we lighten the sky near the horizon line to depict space. To do this, add a little white paint to the gray color to create a light gray shade.

5. At the horizon line, draw a stripe in light gray.

6.Take a thin brush and paint trees and bushes with black paint. We remember that when depicting trees, you can show not only the type of tree, but also its age and character.

7. We try to draw some trees far away and others close.

8. If desired, use a thin brush to paint flying birds, birds (cat, dog) on the ground.

9. While the trees are drying out, gently, with a light touch
Use a cotton swab to draw snowfall, and then use a thin brush to paint snow on the trees and bushes.

10. Cotton swab Using a light gray color (it remained in the palette) we depict a path of footprints in the snow or the tracks of a bird (animal).

11. Our landscape is ready.


