Gel polish coating technology at home. Applying gel polish to nails: step-by-step instructions with photos. Step-by-step instructions for performing a shellac pedicure.
Gel polish is an excellent alternative to regular nail polish with a number of benefits. Firstly, gel polish is easy to apply and does not smear. Secondly, it is resistant to damage and adheres to the nails for a long time, and also helps to strengthen them. Due to their properties, gel polishes are widely used in manicure and pedicure. We offer you three educational videos of gel polish manicure that will be useful for beginners.
How long does the treatment take?
Marine and beautiful nails are the right care after nail modeling. For full first You should wait about 2 hours for treatment, as a result of which the treatment can be increased or decreased according to the efforts.
How often is treatment needed after treatment?
The natural nail continues to grow, creating a gap that is regularly filled to ensure beautiful nails. Follow-up treatments should be carried out at intervals of 3-5 weeks, depending on the growth of the natural nail.How elastic are artificial nails?
Artificial nails are approximately 60 times more durable than natural nails. This doesn't mean you are indestructible. You should get used to the new length of your nails. Special attention should be given to auto-tuning as well as creating beds. As a rule of thumb: Don't give your art nails anything that you wouldn't expect from your natural nails!
Gradient manicure with gel polish
To perform a gradient manicure, you will need the following materials: Kodi Professional gel polishes 46 and 134 shades, LED lamp, sponge and topcoat.
We perform a gradient manicure in this way:
- Apply lilac gel polish 134 shades in two layers, drying each of them in a lamp.
- On the palette we mix gel polishes of 134 and 46 shades. Take a small piece of sponge and pick up some gel polish. Apply it to the edge of the nail in several layers, drying each layer for 30 seconds.
- Cover the resulting manicure with top coat.
Watch the video tutorial for step-by-step ombre manicure.
Can artificial nails cause fungus?
Artificial nails are subject to the same conditions as natural nails. If you grow it exactly like natural nails, fungus cannot develop. Find the exact cause before starting treatment. See several doctors. Make sure the actual cause is determined accurately before starting treatment.
An acetone-containing nail cleaner dissolves the plastic in artificial nails. Therefore, you should always take care to use an acetone-free nail polish remover. Can you swim with artificial nails in sea water? Unlike harsh household cleaners or other chemical substances, sea water is not a problem.
French manicure with gel polish
To perform a French manicure you will need the following materials:
- iron pusher, thin brush for French manicure;
- file and buff;
- LED lamp;
- dehydrator, primer;
- gel polishes Kodi Professional No. 15 and 7;
- finishing gel and moisturizing cuticle oil.
Creating a beautiful French manicure using gel polishes consists of the following steps:
What do you need to buy?
Are artificial nails taking over natural nails? In the case of conscientious and professionally competent work, natural nails are largely unaffected. The nail is minimally removed with only slight modification of the surface using a thin nail file. Care must be taken to ensure that the natural nail is processed as little as possible using files and other tools. Artificial nails should never be forcibly removed, otherwise a significant portion of the natural nail will be "torn" along with the artificial nails.
- We begin the mechanical preparation of the nail. We push back the cuticle using an iron pusher.
- Then we clean the area near the cuticle with a nail file. Using a buff, we remove the gloss from the natural nail. We also go over the tip with a nail file.
- We degrease the nail twice and apply a dehydrator. Then apply primer to the tip of the nail.
- Apply the top coat to the entire nail using rubbing movements and dry in an LED lamp for 30 seconds.
- Apply gel polish shade 15 and place in the lamp for 30 seconds. Then apply a second layer and dry it too.
- Apply a small amount of white gel polish to the palette. We paint the tip of the nail with it using a special thin brush. Dry in the lamp for 30 seconds.
- Cover the top with finishing gel from the tip of the nail to the cuticle. Place it in a lamp. Finally, apply moisturizing cuticle oil.
Are artificial nails harmful? The products we offer are subject to comprehensive testing and are dermatologically harmless. Almost all materials are developed from medical dental technology. In principle unlimited, but you have to recycle regularly - every three to five weeks. The gap between the nail skin and the artificial nail due to the natural growth of nails must be "filled" with gel or acrylic, causing the nails to be recycled and recycled for the occasion.
You can simply let the artificial ones grow "naturally". Care should be taken when cutting sharp edges. Another possibility is to carefully apply the gel layer. It is always noted that the natural nail is not damaged. When professionals speak, is it often difficult for a person to understand technical language?
Quilted nail design with gel polish with rhinestones
To perform an elegant quilted manicure with rhinestones, you will need the following materials: top coat, Kodi gel polish 20 tones, LED lamp, manicure thread, rhinestones and superglue.
Performing nail design with rhinestones consists of the following steps:
- Apply top coat to your nails.
- Apply gel polish 20 tones and dry the nail in a lamp. After this, remove the dispersion layer.
- Next, take the manicure thread and glue it onto the nail, creating intersections of the stripes. Coat the top of the nail with varnish 20 tones and dry. Then we remove the applied threads and get a pattern.
- Cover the nail with top coat. We take gel superglue and put dots in the places where the rhinestones will be attached. Attach pebbles on top. And that's it, the manicure is ready.
Watch video tutorials and learn how to create the perfect manicure yourself using gel polishes, even at home. Everyone can choose the option that they like.
Step-by-step instructions for performing a shellac pedicure
An artificial nail is a very complex covering or extension of a natural nail. Can be used for coating various materials. The materials used are also the method or type of artificial nails. There are three main methods.
- Acrylic technique.
- Fiberglass system.
- Gel technique.
This is an extension or strengthening of the nails without affecting the natural development or growth of your nails. We can also help with nail problems and help cow nails. What is the shape and length of the art - nails? You can choose the shape and length yourself. First you should choose a natural length. Let us advise you without obligation and you will receive your “personal” nails - according to your appearance.
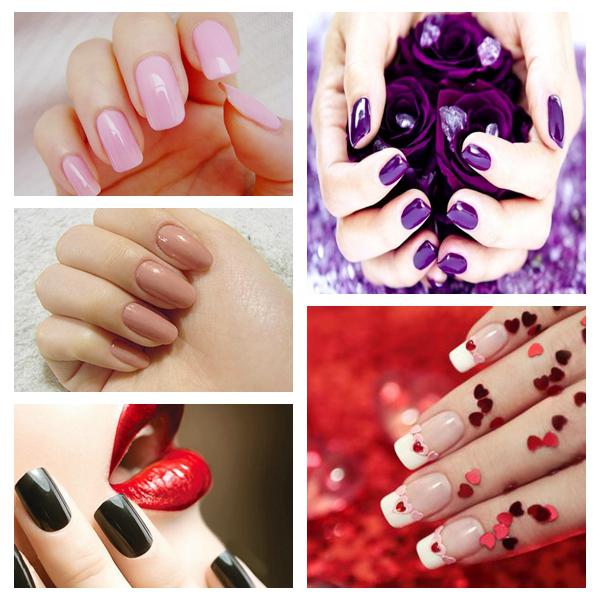
A modern woman cannot imagine herself without a beautiful manicure, with the help of which she not only maintains the well-groomed appearance of her hands, but also shows her individuality. Unfortunately, the coating on the nails does not last more than a week, in addition, it can smear before it has time to dry. Therefore, it is necessary to update your manicure very often, which is quite tedious. Gel polish coating helps solve the problem. The photo below shows what the nails look like after this procedure.
Does the model affect the natural nail? Not when everything is done. No, you can do whatever you did to your natural nails. You can study homework and gardening. However, when working with solvents, you should already protect your nails and, of course, your hands with your hands.
What should you observe before visiting a nail studio?
- Please do not immerse your hands 24 hours before visiting the nail studio!
- Soak your nails 36 hours before your nail salon appointment!
- Don't make an appointment at the nail studio if you're not happy!
- This may cause the refill and model to not stick properly!
- Just like with a constant wave and coloring at the hairdresser!
Applying gel polish is easy, and since a UV lamp is used for drying, you don’t have to worry about the coating smearing. In addition, gel polish forms a strong base for nails, which protects them from damage and allows them to grow faster. Decorative gel polish coating retains its properties for a long time appearance, does not fade over time, and scratches do not form on it. The technology for applying gel polish is simple, the main thing is to take into account some important points.
Your nails are cut with a file! Wear gloves while at home or in the garden, especially with sharp cleaning products! Never use your nails as a tool! Artistic nails are not a replacement for tools, even if they are 60 times stronger. Just grab your fingertips! Look for highways, zippers, beverage cans, drawers, buttons and telephone keypads. Apply nail oil regularly to your nail skin in the morning and evening.
- Use only nail polish remover without acetone!
- Use a cleaning brush to clean the bottom of your nails!
- Compose just your nails with the file we provided for you!
- Do not fold the edges of the pages!
- Never cut your fingernails or nails.
What is gel polish?
Gel polish has a unique structure; when dried under an ultraviolet lamp, it turns into a durable coating that is not subject to damage or abrasion. Currently, many companies produce gel polishes, the difference between which is the polymerization time, viscosity, amount of color pigment, etc.
The offer is large and difficult for a newbie to cope with. Please note that all ratings are based on actual feedback with clients and are as valuable as possible advantages, but also disadvantages. Enjoy! And here are our 5 favorites quickly.
Video lesson: Manicure. Gel polish coating. All stages and application techniques!
Shellac or even dry gel nails are optimal with this device. You'll quickly find the mode that suits you and your simulation. It is easy to transport and compact to build. So it finds a place in a small pocket or in a small corner in the closet.
Durability, strength, and simple application technology are the reasons why this type of manicure, such as gel polish, is becoming increasingly popular among women. The photo shows that the color range of such varnishes is quite diverse, from traditional to extraordinary tones.
Gradient manicure with gel polish
The white exterior gives her a noble appearance. He works so professionally that he makes a good figure in the nail studio as well as at home. Anti-glare screen ensures silent operation. The decisive advantage of this device is its excellent price-performance ratio.
You have the option to choose between three taps at the touch of a button. Between 5, 30 and 60 seconds. Maximum work time device is 120 seconds. The device uses new technology, which uses a dual light source. It has a huge advantage for you that all kinds of polishes and gels can be cured quickly using this nail dryer. The device works quickly, in just five seconds, for example, the gel polish is dried and the next nail can be removed.
The coating applied to the nails dries under the influence of ultraviolet rays in a lamp for two to four minutes. The drying time depends on the consistency of the product and the power of the lamp.
Advantages
Among the advantages of such a coating, one can note its durability compared to conventional varnishes, ease of application (if available special devices manicure can be done at home), durable texture, which helps strengthen the nail plate. The gel polish coating remains shiny, while correct application cracks and chips do not form on it, so there is no need for additional correction. Nails look natural after applying gel polish. In addition, the use of gel polish is not harmful to health, is safe for pregnant and lactating women, it does not penetrate the pores of the nail and does not affect the condition of the nail plate.
This is a professional device that can be used at home or in a nail studio. The device only needs 30 seconds to cool down between inserts. The device has a sensor that automatically starts as soon as you move your hand into the device. Then you can, but don't need to, use a timer. The device is compactly built, but has enough space. No problem if you have stronger hands or want to decorate your toenails. Thumb fits directly with the other fingers in the device and you don't have to wipe it off like many competitors.
The disadvantages include the complex procedure for removing the coating, as well as the relative high cost of such a manicure. But still, there are much more advantages, which is why many women choose gel polish coating.
What do you need to buy?
In order to be able to do such a manicure at home, you need to purchase a special set, which consists of gel polishes (clear and colored), an ultraviolet lamp, degreaser, bond, primer, top coat, nail file and polishing buff, orange stick, lint-free napkins. A gel polish coating kit can be found in a specialty store.
The nail dryer is made of high quality plastic and looks very good in white. So small and light it fits in every pocket. Since the device is not hot, you may quickly forget the time. It was decided that the device would provide sufficient space for the entire hand, that is, four fingers and a thumb or one foot. This is how you can flare out chic toenails with sandals in summer :)
The operation is child-friendly and intuitive. There is a hole designed to dissipate heat and thus protect the nail dryer from overheating. If you have a question, we have top-notch customer service at your disposal. The nail hardener is perfectly equipped.
When choosing gel polish, keep in mind that an inexpensive product may be of low quality and constant use may damage nails. Therefore, it is advisable to give preference to branded devices.
Without an ultraviolet lamp it is impossible to apply gel polish to your nails. The photo shows what such a lamp looks like.
To start the curing process, you can use a timer or automatic start, you only need to put your hand in the device. The light barrier then begins the curing process. The device is portable and weighs 211 grams, no heavier than a mobile phone.
With a 10-second dry time you quickly create a dry and stable surface. This feature is ideal for intricate designs that work on multiple layers. If the device is not used for more than three seconds, it turns off automatically. To interrupt the timer, simply press any key.
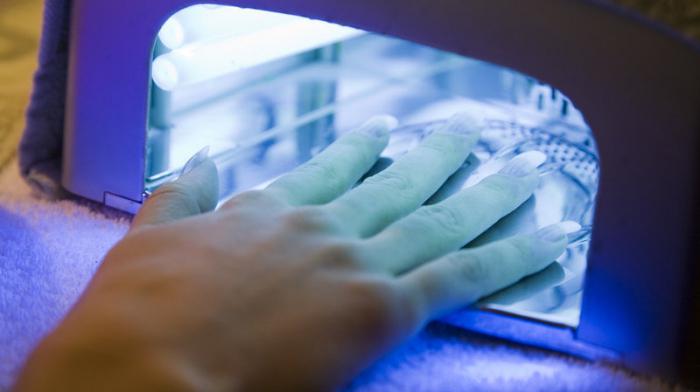
Its power must be at least 36 W so that the nail coating is securely fixed. Otherwise, your manicure may turn out to be faded and sloppy. The special lamp for gel manicure has a timer, which makes it convenient to track the time.
The impact wrench is carried. The cover protects your eyes from the light of the lamp. The cover can be removed. There is a comfortable cushion for the handrails. There is a fan that ensures that sometimes unpleasant paint odors disappear. The floor slab can be easily removed for cleaning. The cover underneath the nail dryer ensures the stability of the device, which prevents it from slipping and tilting.
For 11 days, Larisa Marolt sits in the jungle and has to pass almost every test - and still has perfectly manicured nails. Larisa Marolt and her outstanding colleagues stay in the Australian jungle for two weeks: a tough nervous test that also leaves its mark on the appearance, especially among the participants. After all, residents are only allowed to have two personal items in the camp - since most beauty salons were required to stay at home.
Wipe the nail plate with a degreaser. To save money, you can use regular medical alcohol for this purpose. Bond is necessary to dry nails. The primer provides better adhesion of the coating to the nail.
Manicure technique
The procedure consists of several stages. Let's look at each of them in detail.
1. Nail preparation
Covering nails with gel polish begins with their preparation. First of all, using a nail file, you need to give your nails the desired shape. For thin nails, the most optimal length will be a short one, which will allow you to maintain your manicure longer. Before the start of the session, you can make a relaxing hand bath with the addition of essential oils. Nails should be allowed to dry thoroughly, as soaked manicure will not last long.

Then you need to push back the cuticle using an orange stick. All nails are filed to the required length. Use a fine-grained polishing buff to remove the natural gloss from the nails so that the surface becomes matte. Delaminations must be removed very carefully, otherwise the coating will begin to chip off along with them. Particular attention should be paid to the edge of the nail plate, removing all cracks and detached parts. Then, using a brush, you need to brush off the dust that has formed during the process.
After this, the nails are degreased, being careful not to touch them until the end of the procedure to avoid chipping the coating in the future. A thin layer of transparent bond is applied to the nail plate, and then a primer. This procedure allows you to preserve your manicure longer.
2. Applying gel polish
Gel polish coating is a simple procedure, but you must follow some rules. First, the nails are coated with a base transparent varnish and placed in a UV lamp for 30-60 seconds. You should not touch your nails so as not to contaminate the surface, this may affect the quality of the manicure.
Then a thin layer of colored varnish is applied. It is important that it does not get on the skin around the nail, otherwise it will not last long. All excess can be easily removed before polymerization. Place the nails in the lamp for two minutes; if desired, you can repeat the procedure two or three times, then the color will be brighter. Do not apply the varnish too thickly; bumps and peeling may appear.

3. Applying top coat
If desired, you can apply any patterns or decorations under the top layer. Polymerization lasts 2-3 minutes. When applying the coating, do not forget to seal the end of the nail, which will give the manicure durability and keep it longer. At the end of polymerization, you need to soak a lint-free cloth in a degreaser and wipe your nails to remove the top sticky layer. To maintain gloss, change the napkin every 3 nails.
Then nourishing oil is applied to the cuticle to moisturize. This completes the coating of nails with gel polish. The photo shows what the nails look like after this procedure.
Now you can study business as usual, without fear of ruining your manicure.
How to remove gel polish?
After two to three weeks, the coating must be removed, since during this time the nail grows significantly, and this spoils the entire manicure. Gel polish coating is not so easy to remove and an incorrect procedure can significantly worsen the condition of the nails. The best option You will contact a salon where this will be done professionally. Under no circumstances should you tear off or remove the coating like a film, since along with the varnish you can tear off upper layer nail
To carry out this procedure at home, you need to prepare foil, cotton pads, a special coating remover or a regular acetone-based product, an orange stick.

First you need to wash your hands. Then a cotton pad is applied to the nail, which is pre-moistened in nail polish remover, wrapped with foil on top to avoid evaporation of the solvent. After 10-15 minutes the varnish softens. After massaging the nail plate, remove the cotton wool and foil along with the coating.
The remaining gel polish can be removed using an orange stick. If not all of the coating was removed, the procedure must be repeated. Do not remove any remaining polish, as this will damage the nail plate.
Possible problems
You can often hear complaints that the gel polish coating turned out to be unstable, lasting no more than a week, or began to chip off after a few days. If all points were taken into account and the procedure was carried out correctly, the reason may be individual characteristics nails You can try using gel polish from another company or switch to more expensive products.
For women who do not have enough free time to do manicures often, but at the same time want to have well-groomed hands, coating their nails with gel polish will be a real godsend and will delight you for a long time, maintaining an attractive appearance. In addition, for those who have brittle and weak nails, this method will help them grow to the required length.


