Open palm drawing. Anatomy to help
When drawing a person, Special attention should be given to both the face and hands. Firstly, besides the head, the arms are the most exposed areas of the body. Secondly, they are also expressive and mobile. Additionally, due to the complexity of the connecting joints, convex and flat parts of the hand, the hands can be, and usually are, the most difficult part when studying the structure of the human body.
The first mistake when drawing is having too small hands. And here the ability to draw a head comes to the rescue. If you know how to correctly build the proportions of the head, then you can assume that you already have the correct proportions for drawing a hand. If you put your hand to your face, the tip of your middle finger will be at the hairline, and the hand will end at chin level. Here's your main way to measure brush parameters.
I hope you now understand the importance of drawing skills. human body. If you can draw a human body, you can draw anything for two reasons: 1) you now know enough about the three-dimensional shape of the human body; and 2) if you place this body in a room with various objects, you can easily determine the dimensions of these objects in relation to the body. And you will also already know that all these objects have their own volume and shape.

Let's return to the topic - Building a hand.
The hand has two volumetric convexities: one at the base thumb(B), the second is the palm (the remaining part of the hand) (A). Double rows The finger bones, or carpal bones, are connected to the hand, creating one whole. The wrist does not exist separately, and it is not attached to the hand with a ball-and-socket joint, like in wooden dolls. The movement of the hand starts from the wrist. It tapers slightly at the junction with the forearm. The wrist can also be considered a universal connector because it moves in all directions - up and down, side to side, and can rotate.
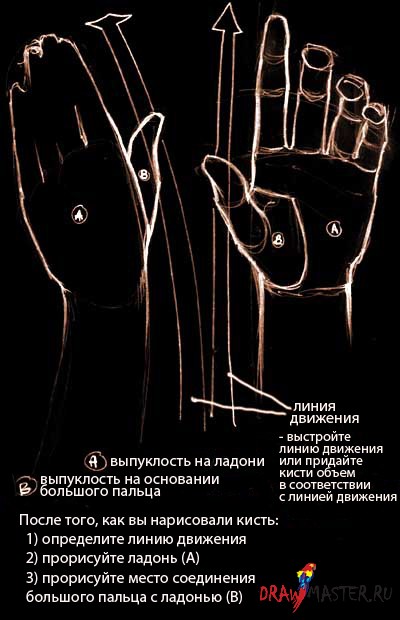
The center of the palm is slightly lower than the rest of the hand. For example, if you place your arm straight on a table, palm down, you will notice that your wrist does not touch the surface of the table. You will notice that the wrist rises where it connects to the hand.
The area of the thumb is significantly larger than the area at the base of the little finger. The hand is wider at the base of the fingers than at the junction with the wrist: however, closer to the wrist it is higher. Now pay attention to your hand: the palm is longer than its back. The thumb is attached to the palm by an independent and highly mobile ball-and-socket joint, which allows it to actively move independently of the rest of the hand. The palm consists of elastic and soft areas - pillows. The surface of the fingers and the entire palm are covered with many pads. The tips of the fingers are pointed, the middle finger - the longest - is the most high point brushes The pads on the fingertips are pointed so that they are directed towards the middle - towards the middle finger. If you measure the length of your thumb from the top side, it will be equal to the length of your middle finger. The thumb is more powerful than the rest. The components of the fingers have more square shape than it might seem at first glance, on last square The nail is almost triangular in shape, with bulges on both sides, forming a place for nail growth. You will better remember the structure of your hand if you study the structure of the skeleton of the hand, after which problems with drawing your hand will never arise again.
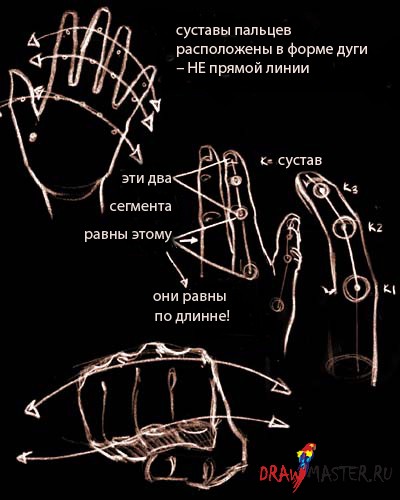
Knowledge of the structure of joints, their movement and limitations in movement is very important. The first joint of the thumb and the first two joints of the remaining fingers are hinged. They can only move up and down, but not sideways or rotationally. When you spread your fingers, the topmost knuckles of each finger bend back. The lower knuckles of the fingers will bend forward, while the upper knuckles or fingertips cannot be bent even at right angles. Note that the top two hinge joints can only bend at 90 degrees. The lower joints of the fingers, like those on the wrist, are ball joints. There are a ton of hand positions and structures for you to learn. Even when you are drawing, you can use your free hand as a model. Place a mirror in front of you and this will give you more opportunities to study the positions of your free hand.
1. The first step when drawing a hand in motion is the position of the fingers and hand. Draw the hand in motion and determine the approximate position of the hand.
2. Then highlight the volumetric areas - divide the brush into parts, this will help you determine where the convex and where the flat areas are.
4. Finally add shadows.

Remember this lesson, buy an anatomy textbook and study it. You could study the structure of a hand forever, and you might never be able to draw a hand in the same position twice. Every time you practice drawing a hand, you learn something new. Remember, your hands are just as important as your face. And they require the same attention and close study.
I hope you find this tutorial helpful.
Happy work!
The human body has many parts. As we have already discussed with you here on the site, drawing the body and its individual parts correctly is not so easy. To do this, you need to study and know the basics of anatomy and physiology. Very often children draw parts of the body and the figures themselves in a very simplified, one might say amateurish way. We want to teach you how to draw elements of the human body correctly, first of all from an anatomical point of view. Arm yourself with a pencil and eraser, grab an album and start the lesson. By following our tips, you will gradually learn the basics of this wisdom.
Stage 1. Draw the caracal lines of the person’s hand. First we will teach you how to draw a person's hand from the elbow to the fingertips. We build a straight line.. On the upper part we mark a point from which we draw five segments, from which in turn we draw five more segments connected at an angle to the first. This is the basis of the future hand. Then, along the main straight line, we begin to outline the line of the elbow and the forearm of the hand (this is the part of the arm from the hand to the elbow). The forearm widens from the elbow bend, then thins and passes into the hand (the widened part). After this we begin to draw the fingers. First the little finger, then the ring finger. We draw them along those lines from point 1 of the same stage.

Stage 2. Now we draw the middle and index fingers of the hand. Along auxiliary lines We give contours to the phalanges of the fingers. The hand is slightly bent, as if the person wants to take or hold something. Then we’ll draw the last, thumb. And further. On the fingers and palms we will show irregularities in the skin, depressions and tubercles, skin folds.


Stage 4. Now let's try to draw a person's hand separately. We build additional initial frame lines like this. Select a point on a piece of paper. From it we draw three features in different sides. At the end of the third line we put a point, and from it we draw segments connected to each other. It's like a skeleton of future fingers. Outline the hand itself smooth lines around these straight lines to the finger area. The hand is bent down. Then. Let's draw the thumb. First, we will show its thickened part, then the phalanges of the finger itself and the line of connection with the index finger. Then we draw the index finger and middle finger of the hand, outlining the skeletal lines of the starting point of this drawing.

Stage 5. Finish drawing the ring finger and little finger. They are barely visible due to the front toes. We show folds on the skin, tubercles, bulges and irregularities on the hand. Then we delete all the sketch lines and leave only the necessary ones. We paint the hand, shading some areas (play of light and shadows). We hope you learned this lesson well and were able to draw human hands.

Many will agree that drawing a person's face is not an easy task. However, among some artists there is an opinion that drawing a hand is even more difficult. What is more difficult to draw - a face or hands - I cannot say. Probably for some people. But what can be stated quite definitely is that drawing hands and fingers correctly is really difficult. But this is possible if you understand the basics of plastic anatomy and know the proportions. To do this, I have prepared a series of drawings with visual diagrams. They will help you understand key points, which you need to learn to pay attention to when drawing hands.
1. Brush size

The size of the hands is approximately equal to the face (not the head). If you measure from the wrist to the tip of the middle finger, then this segment will be equal to the distance from the chin to the top of the forehead. This is the size of an adult's hand. The younger the person, the smaller the hand will be relative to his face. In small children, the palms are equal to the distance from the chin to the eyebrows.
2. Skeleton and muscles


The shape of the fingers and the entire hand depends on the shape of the bones and muscles. You can verify this by looking at the given anatomical drawings of the hands.
3. Middle of the brush

During the drawing process, it is important to compare distances and check proportions. A good starting point for this is a line corresponding to the middle of the brush. Having outlined it, it will be much easier to avoid mistakes in the future. Therefore, at the very beginning of the drawing, you should not immediately draw fingers and details. It's better to outline general outline brushes, similar to a mitten. Then determine the middle. And then you can proceed to the details.
4. Middle of fingers

To ensure that the fingers in the drawing do not turn out crooked, you need to correctly determine the length of each phalanx that makes up the fingers: proximal, middle and distal. The following will help with this schematic drawing, in which the middle of the fingers is easily visible. Having determined the middle of each finger, further comparison of proportions will be much easier.
5. Thumb length

The thumb will end at 2/3 of the proximal phalanx of the index finger.
6. Length of index finger and ring finger

The length of the index finger is equal to the length of the ring finger. However, different people this ratio may be slightly different.
7. Little finger length

The tip of the little finger is at the level of the joint between the distal and middle phalanges ring finger. By comparing the length of the little finger to this level, it is easy to check your drawing for errors.
8. Nail length

The length of the nail of each finger is 1/2 the length of the distal phalanx of the corresponding finger.
9. Location of the metacarpophalangeal joint of the thumb

When a person looks at the hand, he simply sees some bumps and depressions. But the artist who studies plastic anatomy, behind each such “tubercle” he sees joints, ligaments, bones, muscles... On our hands (more precisely, hands) there are three key joints, “tubercles”, which are important for determining the size and further marking of the pattern. If you identify these three points at the beginning, then further drawing will be much easier, since you can start from these points. Therefore, to draw the thumb, it is better to start with its metacarpophalangeal joint (2nd point). And to determine its location, you need to remember that it is located approximately halfway between the metacarpophalangeal joint of the middle finger (1st point) and the head of the ulna (3rd point).
10. The hand fits into the circle

The hand fits easily into the circle. Therefore, you can draw hands using a circle as an auxiliary line.
11. Concave brush shape

On the inner, palmar side, the hand has a concave shape, repeating the shape of a ball. The hand is not flat.
12. Fingers slightly curved towards the center

The fingers have a subtle bend. They are curved towards the middle of the hand. Fingers are not absolutely straight.
13. The bends of the fingers on the palm and outer sides of the hand are at different levels

The phalangeal joints of the fingers form folds of skin. These folds on the palmar and outer sides of the hand are located at different levels.
14. The shape is based on geometric shapes

From the above figure you can see that by dividing the hand into geometric shapes, it will be easier to understand its shape.
15. Model of the hand, corresponding to the main anatomical features
To learn how to draw hands, you need to be able to see the main shape among many little things. Be able to see the nature of the form. To do this, you can imagine the hand in the form of volumetric geometric shapes. Just as in the drawing of the head, artists use a model called “chipping,” so in the drawing of the hand, you can use the given diagram. Such a conditionally schematic image corresponds to the main anatomical features. It will help novice artists understand the concept, and therefore draw hands more confidently.
Summarizing the above, we can add that beginners should accustom themselves to pay attention to the proportions indicated in this article. If you constantly compare values, compare sizes, then the drawing will be easier and will become much more competent.
Although the proportions of the hands may differ depending on individual characteristics human, these differences are unprincipled and insignificant (for example, the length of the index and ring fingers may vary). Therefore, the proportions and features outlined in this article generally
Perhaps no aspect of the drawing is accompanied by greater disorder and presents less adequate material for study than the drawing of the hands. Much of this trouble is caused by running around looking for material instead of looking at your own hands. You have the best source of information available at all times. Perhaps you have never thought of them in this sense. The hand drawing should be based largely on yourself. After all, any teacher cannot explain to you more than you can learn by carefully studying your own hands.
The study of the hands, in addition to studying their anatomical structure, consists mainly of examining the dimensions various parts compared. The fingers have a certain length relative to the palm; The junctions of the fingers are in a certain proportion in relation to the whole finger. The palm has width and length. The distances between the joints on the outside of the fingers are greater than those between the folds on the inside. The length of the longest finger from its base to the third knuckle at the back is actually half the length of the back of the hand from the tip of the finger to the wrist. The tip of the thumb reaches almost to the second joint of the index finger. The length of the palm is equal to the length of the face from the chin to the hairline. You can take these comparison measurements on yourself or someone else.
The hand is the most flexible and adaptable part of the anatomy of the body; it can grasp an object of any shape and comparable size. This flexibility also poses a challenge for the artist, because the whole hand can take different positions. But still, the mechanical principle of the hands remains constant. The palm opens and closes and the fingers curl inward toward the middle of the palm. Nails are a very convenient exercise for learning how to work your fingers, as they need to be grasped accurately and firmly; you take the pin with your fingertips; take the hammer with your fingers and palm. The back of the hand is more or less resistant to the back pressure of the fingers, and is used in pushing (it is quite difficult to bend the fingers back). The hand is the most perfect mechanism we know for achieving a wide variety of goals. In addition to its perfection, the hand is more closely and precisely coordinated with the brain than any other part of the body. Many of her movements are controlled by subconscious reflexes; for example, typing and playing the piano.
Man began to use his hands before his brain developed and cultural level. An infant can use his hands effectively before he can think. The history of human advancement since ancient times is closely related to the adaptability of the human hand.
It is a fact that the hands and their movements require so little conscious impulse that it is surprising to realize from the outside. Now look at your own hands; You will see in the illustration how the hand automatically takes a shape convenient for grasping the object.
To draw a hand while constructing an object, you must first study the outline of the object, then observe how the automatic adjustment of the hand follows that outline. Watch your fingers before you grab and squeeze a peach or apple. The principle of the grasping mechanism is very important in hand drawing. Only by knowing this, how it actually works, can the hand be drawn convincingly. To draw a hand as you sketch a person, you must first study the outline of the object, then note how the position of the hand matches that outline. First, before taking and squeezing a peach or apple in your fist, you need to observe your fingers to notice how they behave before grasping. Reflex principle very important in drawing a hand. Only by knowing how the hand actually works can you draw it convincingly. The back of the hand can be drawn in three planes - the first for the section of the thumb up to the base of the index joint, and the other two along the palm, tapering towards the wrist. The back of the hand bends during most activities. Typically, the palm is made up of three blocks surrounding the inside of the palm - the base of the palm, the thick base of the thumb, and the base of the remaining fingers. The joint between the fingers and the thumb is a connecting joint, adapted to move the thumb inward towards the palm or pull it back at an angle of 900 to the palm. We must also carefully align the nails so that they lie on the same plane as the outer surface of the fingers and are an extension of the midline of each finger. Otherwise, the nail will be crooked, and you will not understand why.
Keep studying your own hands to learn about hands in general. The internal muscles are located so deep that they are not as important as the external forms. The only bones we see are the knuckles of the outer knuckles and the wrists. If you are drawing the palm in action, the fingers can be attached to the knuckles and aligned correctly quite simply. Study comparative finger lengths; remember that the thumb works primarily at right angles to the other fingers. Get rid of the idea that drawing hands is difficult. It's just very easy to get confused if you don't know how they work. Everything becomes much easier once you get the hang of it.
The most important thing to remember about the hand is that it is concave on the inside and curved on the outside. The fingers grow so tightly that even liquid can be held in the palm. The hand served to primitive man With a cup and spoon, he scooped up a handful of things that he couldn’t take with his fingers alone.
The thumb muscle is perhaps the most important muscle in the hand. This muscle, supporting or opposing the rest of the fingers, gave a person the ability to make a very strong grip, capable of supporting even the human body. This muscle helped a person hold a spear and club. Just as animals often depend on the strength of their jaws, so man depended on the strength of his hands.
Once you become familiar with the structure and proportions of the hand (Fig. 77 - 85), it will be easier and more convenient for you to depict the features of women's hands, the hands of babies, children, and the elderly.
Figure 77. Anatomy of the hand. 
Note the tendons located on the back
side of the palm that extends towards the fingers. They perform
huge function: with their help you can compress and unclench
palm, and also move each finger individually.
The muscles that control these tendons are located
in the forearm. Fortunately for artists, most
tendons are hidden under the skin and muscles, and are unnoticeable.
In children and adolescents, the tendons of the hands are not noticeable; they
appear in old age.
Figure 78. Blocks forming an arm 
On the back of the hand, the bones and tendons are located close to the skin; those on the sides and on the inside of the palm are additional. I have outlined these surfaces in such a way that it will be easier for you to become familiar with them. Note the thick fleshy “pads” in
the base of the thumb and the base of the palm. A pad is present at the base of each finger, and together they encircle the top of the palm. The muscles of the fingers protect the bones. Due to their elasticity, they
provide good coordination of movements, just as good tires provide grip on the road. There are no muscle pads on the outer side of the palm,
but the outer surface of the little finger is well protected by the muscle, so much so that it can withstand quite swipe, especially when the fist is clenched.
Figure 79. Hand proportions 
Next important thing– curved lines that can be drawn through the fingertips and knuckles. If you divide your palm in half along an imaginary line, you will have two fingers on each side. The tendon of the middle finger roughly bisects the outer side of the palm. Note also that the thumb grows almost at right angles to the other fingers. They can be moved perpendicularly from and to the palm, while the remaining fingers are compressed and unclenched parallel to the palm. The knuckles of the fingers are located slightly above the folds on the inside of the fingers. Draw imaginary curved lines: the curve crossing the base of the fingers will be gentle, those crossing the joints will be steeper, and the steepest line will be the line crossing the tips of the fingers.
The middle finger is the key finger by which we determine the length of the arm. The ratio of the length of this finger to its joint at the back is slightly more than half the length of the arm.
The width of the palm is slightly more than half the length of the inner side of the palm. Forefinger reaches approximately the length of the nail of the middle finger, the ring finger is approximately equal to the index finger. The little finger only reaches the top joint of the ring finger.
Figure 80. Building a hand 
Figure 81. Inner part of the palm (fossa) 
In the picture above, notice how carefully the turnout is marked in the middle of the palm. Also note the curve encircling inner side palms. Hands never look natural and capable of grasping until artists understand this feature. All these hands look like they are holding or grabbing something. The loud flapping sound is produced by the sudden compression of air between these two pits in the palms. A hand that doesn't look capable of grasping or clapping is poorly drawn. Examine your own hands to be sure.
Figure 82. Constructing hands in perspective 
Figure 83. Hand in action 
Figure 84. Joints 
Figure 85. Drawing your own hand 
Figure 86. Female hand 
Women's hands, like their faces, differ from men's mainly in smaller bones and more delicate muscles, and generally more rounded surfaces. For greater grace of the hand, the middle finger should be about half the length of the palm; oval nails also add grace. Even though female hands thin, they can shrink a lot and be tenacious.
Figure 87. Fingers tapering towards the ends in motion. 
Figure 88. Study a lot different poses hands 
There is only one sure way to learn how to draw hands - it is to do many, many sketches. When drawing hands, more than anywhere else, their position is important. Straighten your fingers along your palm before examining them in detail. The arms are almost never completely straight and flat. Carefully examine the space between your knuckles. Most time we see them not in direct projection, but in perspective, as shown in chapters 82-85.
Figure 89. Baby's hand 
Babies' hands are studied separately. Their main difference from the hands of adults is that the palm is thicker in relation to the smaller fingers. The muscles of the base of the thumb and the base of the palm in young children are relatively very powerful. Babies can pinch and grasp something equal to their weight. The joints on the outside of the arm are completely hidden by muscles and are marked by dimples. The base of the palm is often surrounded by a thick crease. The base of the palm is much wider than its width at the base of the fingers.
Figure 90. Study of baby's hands 
Figure 91. Children's hands 
A child's hands are intermediate between those of an infant and a teenager. This means that the thumb muscle and base of the palm are thicker than in an adult hand, but not as thick as in a child's hand. The fingers grow relative to the palm in the same way as in adults. The whole hand is smaller, a little thicker, and more dimpled, and the joints are certainly not as prominent as in adults.
Figure 92. The proportions remain more or less constant. 
In junior school age the difference between a boy's and a girl's hand is small, but great changes appear in adolescence. The boy's hand is much larger, stronger, with more developed bones and muscles. The base of the palm and the joints of the fingers are more developed in a boy, while a girl’s hand is thinner and more delicate, with fewer bones. On the boy's hand, the nails, like the fingers, are slightly wider.
Figure 93. Hand of an elderly man 
If you have mastered the construction of a hand, drawing the hands of old people will be a pleasure for you. In fact, they are easier to draw than young hands, since the structure and anatomy are more clearly visible there. Main features: thicker fingers, protruding knuckles. The skin becomes wrinkled, but this should only be depicted in close-up.
The brush is probably one of the most complex parts bodies for drawing and causes a lot of trouble for illustrators. Let me remember again the book, where she admits that many artists spend half the time allotted for creating a sketch drawing hands. The artist Gustavo Fernandez once said that you can do good career only due to the ability to draw hands well and expressively.
To build a model of a hand, you can use the same principle: first the frame, then the flesh.
Four bones radiate from the wrist, the continuation of which are the fingers, divided into three phalanges. The middle finger is the longest, the index and ring fingers are approximately the same length. The thumb is attached to the hand at the wrist:

One of the most difficult aspects in constructing a palm is where the fingers are attached to it. The most convenient technique was given to me by Natasha Ratkowski: you need to designate your palm in the form of a segment of a coconut shell, immediately determining its volume.
You also need to draw balls in place of all the joints. The fingers are marked with cylinders of suitable thickness:

The conditional model thus obtained is outlined, in in the right places The phalanges of the fingers and protruding knuckles are indicated:


Using this principle, you can build a hand in any position. When tracing the base, you should try to give your fingertips and nails a beautiful natural shape. If the palm is clenched, you should draw folds that form in the middle. There is a muscle around the thumb that does not contract and is always indicated by an arch.
Cartoon hands are still easier to implement because they do not require such realism in the image, but there are still rules that will make them the most attractive. This collection contains all kinds of examples of drawing hands + drawing recommendations from various sources.
Christopher Hart "How to Draw Everything You've Learned About Cartoons":


Hands of the main characters of the animated series Homer, Bart and others.


