How to paint wings on your eyes quickly
“How to paint wings on your eyes?” - the most popular question for makeup artists today. Arrows have long been a trend, so learning how to make them is the desire of every fashion diva.
However, arrows have always been, are and will be in trend. This “detail” of makeup can work real miracles with the eyes, so mastering the rules of drawing arrows is a must.
Any makeup, as a rule, is a long-term affair. But you don’t always have time to draw every line. This is especially true for everyday makeup.
At the same time, you want to look perfect, which is natural. Therefore, how to quickly draw arrows on the eyes is a relevant topic for everyone who takes advantage of this detail in makeup.

It's actually not that difficult to draw arrows quickly without sacrificing quality. There are several proven techniques for this.
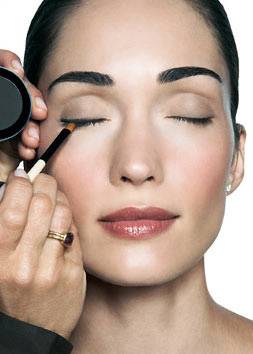
First technique: contour pencil and flat brush
- Prepare your eyelids. Using quick movements, distribute the base under the shadows. Its advantage is that, in addition to its direct functions, it dries instantly and the eyelid is immediately ready for lining the eyelids and applying shadows.
- Take a well-sharpened pencil and apply it to the upper eyelid to the eyelashes. The lead should run parallel to the lash line.
- Using short strokes or small successive dots, sketch out a thin line. The emphasis is on carefully drawing the roots of the eyelashes. Since the pencil lead is not so short, drawing in this way will not take too long.
- Using a flat brush, blend the lightly drawn line. Ready!
As part of this technique, you can do it a little differently, which will also allow you to line your eyes in a matter of minutes.
- Using a flat brush, take the pigment from the pencil and draw an arrow with patting movements. You can make any arrow this way.
- For a brighter and more expressive arrow, you need to do the same, only with a damp brush.
Second trick: eye shadow or pressed eyeliner
- Prepare the eyelids according to the previously described scheme.
- Apply shadows to an angled brush and shake off excess.
- Place the brush on the edge of the outer eyelid and use a tapping motion to form a “tail.” Then gradually move towards the middle. Depending on the style of makeup and the shape of the eyes, the arrow can be continued or left as is. For evening makeup, the second half of the eyelid - from the middle to the inner corner of the eye, you can line the line with bright shadows with tints. In this case, the shadows are applied from the middle to the corner and extended slightly towards the lower eyelid. Transition arrows – shade.
Third technique: pencil
- Prepare your eyelids
- Use a black eye pencil to work on the roots of the eyelashes. To do this, use the tip of a stylus to place small dots between the roots of the eyelashes. Thus, it is necessary to fill all the gaps between the roots of the eyelashes. In this case, the arrow does not stretch and no shading is required. This method visually makes eyelashes thicker even without mascara. The eye contour becomes more expressive.
Technique Four: Marker Liner
- Prepare your eyelids
- Use a black liner applicator to place three points: in the middle, near the inner corner, slightly away from it, and on the outer side of the eyelid, just above the lash line.
- Connect the three dots with liner strokes.
- If you need a wide arrow, then after the third step you need to draw a dotted line from the “tail” - to the middle of the eyelid. You should get a triangle.
- Color the triangle with a marker.
These techniques are optimal for anyone who cares about how to draw arrows on their eyes quickly and efficiently. It's worth a try to be sure.

Neat, even and identical arrows are obtained the first time - not always. It takes time to acquire a skill. But, there are options on how to make arrows beautifully without special skills.
In order to draw an even arrow with a clear tip the first time, you will need paper tape, thick cardboard and eyeliner.
So, we make arrows using tape:
- Cut two rectangular strips of tape and stick them on your hand, then remove them. This will help remove excess stickiness from the tape and thus make it safe for the skin around the eyes.
- Glue a strip to the outer corners of each eye. You need to glue it diagonally in relation to the corner of the eye.
- Take eyeliner - pressed, liquid or marker and draw the tip of the arrow. Then, from the tip, direct the eyeliner brush/applicator to the middle.
- Adjust all the lines so that the arrows are straight.
- Peel off the tape and see a perfectly smooth edge of the “tail”.
In this simple way you can draw a variety of arrows in length and height. You can use any eyeliner. If you choose a pencil, you should give preference to a soft pencil.
Making arrows using cardboard:
- Cut out a small square with perfectly straight edges from thick cardboard. You can also take any business card, calendar, postcard, etc. The main thing is perfectly smooth edges.
- Place a cardboard square on the outer edge of the eye so that an oblique line is formed from the lower eyelid to the upper eyelid.
- Using a flat brush and eye shadow or gel eyeliner, draw an arrow. First outline the tip, then smoothly draw a line to the middle and to the inside of the eyelid. Blend thoroughly. Remove the cardboard and repeat the same on the second eye.
As in the first method, we get a perfectly even arrow. This is a great way to learn how to draw beautiful arrows. By the way, this is very exciting, because you can experiment with materials and types of arrows.
When creating an arrow, all stages of its drawing are important. For example, a “tail”, which gives the mood and character of the arrow, and with it the whole appearance. Therefore, one more trick will be interesting.
How to make arrows with a neat “tail” in one movement?
- Start drawing an arrow from the inner corner of the eye with a slight indentation or from the middle of the upper eyelid along the eyelash growth line. Apply the pencil to the eyelashes, which will help to accurately draw the roots of the eyelashes without gaps.
- Before the arrow reaches the very edge, stop. Fix the pencil at this point and blink quickly. This movement will move the pencil in the desired direction.
- A neat “tail” - ready! If desired, it can be retouched, extended, and so on.
This is how you can very easily master the skill of drawing arrows using the available tools.

One of the most striking and special types of eye makeup is “Cat Eyes” makeup. It makes the image magical and mysterious. And what if not a mystery attracts the most.
This is one of those types of makeup in which arrows play a key role. Therefore, before you begin to perform it, you need to know how to draw eyeliner on your eyes. To draw “cat arrows” you will need skill. Acquiring the skill is not at all difficult, especially for such chic makeup.
Makeup “Cat eyes” can be done both using the pencil technique and using a variety of eyeliners.
So, for makeup in this style you will need:
- Eyeshadow base
- White matte shadow and white pearlescent shadow
- Contour pencil (black or dark brown), eyeliner
- Brushes: fluffy, flat
- Shadows of dark and light shades. If the pencil is black, then you need shades of gray shades. If the pencil is dark brown, you can take a palette of brick shades
- Mascara
Makeup technique:
- Let's make a backing on the eyelids. To do this, you need to apply an eyeshadow base. Instead of a base, you can use a corrector (apply a small amount to a fluffy brush and blend)
- Using a fluffy brush, apply a white matte shadow over the entire eyelid. We also apply it under the eyes.
- Using the same brush, apply white pearl to the moving eyelid. Shade everything well.
- Let's start drawing arrows. To do this, apply a pencil to the outer corner of the eye and draw a corner. Then you need to determine the direction of the arrow. To do this, use a short flat brush to draw the pencil line upward.
- Repeat brushing in the inner corner of the eye. To do this, first paint the inside of it with a pencil. Then use a brush to draw the pigment towards the nose.
- As a result, the eye is elongated and the direction of the makeup is set.
- Using a pencil, outline the moving eyelid with a thin line, trying to repeat the “arch” of the eyelash growth line.
- Now you can start creating a spot of color and shading the lines. To do this, shade the upper part of the corner of the eye with a pencil. The result should be a dark edge of the eye.
- Using a flat brush, we “catch” the pigment from the pencil-filled edge of the eye and stretch it along the eye socket (above the moving eyelid).
- Next we start filling with color. To do this, you need to take the darkest shadow from the brick/gray palette onto a small round pussy. Using a brush, apply this shadow over the pencil spot, pulling it up and to the side, and pulling it forward a little. This creates a smooth transition from pencil to shadow.
- Now take a lighter shade (peach, for example, for a brick palette) and begin to fill the inner corner of the eye with this color, smoothly dragging the shadow towards the middle of the eye.
- Pick up a brick color on a brush and apply it with point movements over the dark shadows at the transition border. This will allow you to create a harmonious arrangement of colors.
- Let's start lining the eyes with eyeliner. You can use any one that is convenient to use. For example, take gel eyeliner and thin pussy. The eyeliner is applied along the upper edge of the eyelash, completely following the pencil contour. Then extend the outline a little along the bottom edge to emphasize the direction of the outline.
- We complete the makeup by applying mascara to the eyelashes.
So, it’s not so difficult to do this fashionable makeup. During the makeup process, you can learn all the subtleties of how to make up the wings on your eyes using a pencil and eyeliner.
Video


