How to draw a person with an outstretched arm. Basics of Human Anatomy: How to Draw Hands
Well-drawn hands always enhance the entire illustration. Some artists specifically include hands in their subjects.
Anatomy
Most important fact- that the hands are concave on the palm side and convex on the back side. The bulges are so located around the circumference of the palm that you can even hold liquid in it. The hand served to primitive man cup, and by cupping his two palms in the shape of a cup, he was able to eat food that he could not hold with his fingers alone. Large muscle thumb- one of the most important in the hand. This muscle, in interaction with the muscles of other fingers, provides a grip so strong that it allows you to hold it in a suspended state. own weight. This powerful muscle can hold a club, bow, and spear. It can be said that the existence of animals depends on the muscles of their jaws, and the existence of man depends on his hands. 
It is worth paying attention to the powerful tendon attached to the base of the hand and how the tendons of the fingers are grouped on the back of the hand. These tendons can control both all fingers together and each one individually. The muscles that pull these tendons are located on the forearm. Fortunately for the artist, the tendons are mostly hidden from view. In children and young people, the tendons on the back of the hand are not visible, but become more noticeable with age. 
The bones and tendons on the back of the hand are close to the surface, but those around the palm and inside the fingers are hidden from view. There is a pad at the base of each finger. It protects the bones lying inside and creates grip on the object being held.
Hand proportions
Next important thing- This is a curved arrangement of the fingertips and joints. Two fingers lie on either side of a line drawn through the middle of the palm. The tendon of the middle finger divides the back of the hand in half. Also important is the fact that the thumb moves at right angles to the movement of the other fingers. The knuckles are located slightly in front of the folds underneath them on inside palms. Pay attention to the curve along which the knuckles are located and that the curve becomes steeper the closer the knuckles are to the fingertips. 
The middle finger is the key finger that determines the length of the palm. The length of this finger to the joint is slightly more than a half palm length. The width of the palm is slightly more than half its length on the inside. Forefinger almost level with the base of the nail of the middle finger. The ring finger is almost the same length as the index finger. The tip of the little finger is almost level with the last knuckle of the ring finger. 
The figure shows how to correctly determine the position of the palm socket. Also pay attention to the curve of the back of the hand. The hands will not look natural, capable of grasping, until the artist masters these details. The hands in the picture are depicted as if they were holding some kind of object. The loud sound of applause is produced by a sharp compression of air between the hollows of the two palms. Poorly drawn hands will look incapable of clapping. 


Women's hands
Women's hands differ from men's mainly in that they have smaller bones, less pronounced muscles and greater roundness of the planes. If middle finger make it at least half the length of your palm, the hand will be more graceful and feminine. Long fingers, oval in shape, will add charm. 


Man's hands


Babies hands

Children's hands are on their own good exercise in drawing. The main difference from the hands of adults is that the palm is much thicker compared to small fingers. The muscles of the thumb and the base of the palm are very voluminous, even small children can support their own weight. The knuckles on the back of the hand are hidden by the flesh and are visible by the dimples. The base of the palm is completely surrounded by folds; it is much thicker than the pads under the fingers. 
Hands of children and teenagers
The proportions remain basically the same. Aged primary school The difference between a boy's and a girl's hand is small, but great changes appear in adolescence. The boy's hand is larger and stronger, showing the development of bones and muscles. Girls' bones remain smaller, so they never develop large knuckles like boys. The base of the palms also develops more in boys; in girls it is much softer and smoother. Boys' nails, like their fingers, are slightly wider. 
Children's hands are a cross between the hands of a baby and the hands of a teenager. This means that the muscles of the thumb and base of the palm are proportionally thicker than those of an adult, but thinner in proportion to the fingers than those of an infant. The proportions of the fingers to the palm are the same as those of adults. The hand is smaller overall, a little fuller, more dimpled, and the joints are of course more rounded.
Hands of elderly people
Once you have mastered the design of hands, you will enjoy drawing the hands of older people. In fact, they are easier to draw than young hands because the anatomy and structure of the hand is more noticeable. The basics of the design are still the same, but the fingers become thicker, the joints are larger, and the knuckles protrude more strongly. The skin becomes wrinkled, but this wrinkling needs to be emphasized only when viewed from a close distance. 
Hand drawings


Hand drawings in painting
It's not hard to guess whose hands these are :-) 
In terms of colors, it is worth noting that the fingers and palms are slightly redder than the general skin tone of the hands. 


The human hand seems to be the most difficult to learn to draw, as it can take many shapes and express different emotions. Animation is no exception. You will have to learn to draw hands in different angles so as to show them in dynamics and attract the viewer’s attention to them. Don't underestimate the power of a well-drawn hand in animation - it will save your work from monotony!
What you need to know
In the comments to my courses, I was asked several times how I draw characters in different poses and with different expressions. The point is that with experience you will begin to develop your own drawing style. Without other people noticing, you will have your own little tricks. These tricks are the poses and expressions you'll use more often than others, as well as certain hairstyles and clothes you'll be best at drawing. This is quite common and professional artists resort to this secret all the time!
However, this is very difficult to achieve in hand drawings! Let's take the head as an example. The only moving part there is the lower jaw. We can change facial expressions, but the eyes, nose and mouth remain in place (at least in real life!) With the hand everything is different. With any new movement of the brush, everything changes radically. In fact, in a scene with dialogue, the facial expression may barely change, but the hands will move very actively and under different angles.
The goal of this activity is to turn a human hand into a cartoon hand, so let's not waste time learning the names of the bones and muscles of the hand. (On the Tuts+ platform, by the way, you will have extensive opportunities to learn this too). We, in turn, will try to find a simplified way to draw a hand in a way that is practical and effective.
1. The hand in its most simplified form
 "Mom, hi! I'm on the Internet!"
 The hand is made up of a variety of bones, especially in the fingers. This means that all fingers are of different sizes and can bend in different ways. different directions. For this reason, it is important that you learn to draw a hand in the most simplified way possible and be able to look at it like a small puzzle with a few key pieces. Let's try to divide it into blocks:
Step 1
Let's start with the back of the hand. Let's draw a simple semicircle:

Step 2
Now let's draw a triangle that is attached to one of its sides. Like this:
 Calm down: we are not drawing a cup of tea!
 Step 3
Above the triangle we will draw something resembling the tip of a knife.

Step 4
It's time to draw the fingers. IN mirror image draw the first shape at the top. "Puzzle from the hand" is ready:

Step 5
Great! All that remains is to fill in the missing details with soft contours:
 The outline of the thumb is the trickiest - it needs to be gently combined with the center of the palm.
 Note that the fingers have different formats due to differences in their sizes.
2. At a glance
You need to know a few more details of the palm. Let's take a look at them:
Step 1
Again we repeat the process above, following the basic pattern:

Step 2
Something new appears - the palm now looks a little more complex, and there is a characteristic differences that need to be taken into account. Fortunately, a few simplified forms are enough to show it.

Step 3
Now we can add outlines to complete the drawing with the necessary details.
 Please note that we end the sketch with soft, rounded lines. Think of the palm of your hand as a delicate sculpture.
 Profile view
When the hand is turned in profile, we can see the prominence of the muscle at the base of the thumb.

The more “childish” your drawing style is, the simpler and smoother your lines will be. Here are my little secrets that helped me understand that hands can be drawn based on simplified shapes. The most important thing is to strive for a style that will reflect personality and dynamics in the drawings at the final stage.
3. More shapes and a 3D hand
Now you can draw a flat hand for the rest of your life, right? If you want to draw hands with convincing depth, use the same technique above, just change the camera angle! Play with this technique until you feel confident.

To form your fingers, imagine them as cylinders stacked on top of each other. This technique will help us draw fingers from different angles, because with its help it is easier to “see” the hand in space.
 Hand or robot?
 The shapes into which a human hand can be formed are countless. When the palm is open, the same rules apply; when closed - others! The same thing happens when the hand holds an object, and it must adapt to its shape.
Let's learn how to draw a fist. A slightly different process, but in the end you will see that it all comes down to a simplified drawing of the main geometric shapes.

Step 1
To begin with, we simplify the bend of the little finger, draw something similar to the letter “u”.

Step 2
We kind of “wrap” the little finger around the letter “y”. Don't forget to highlight the curve that goes from the little finger to the wrist.

Step 3
We continue to draw fingers in space. This time we draw only three fingers. I'll explain why later.

Step 4
Lastly, draw the thumb and the protruding muscle at the base of the thumb.

Step 5
Fine! In a few steps we have completed a simplified drawing of a fist on one side. See how the shape of a fist can be roughly depicted using “boxes” different sizes.
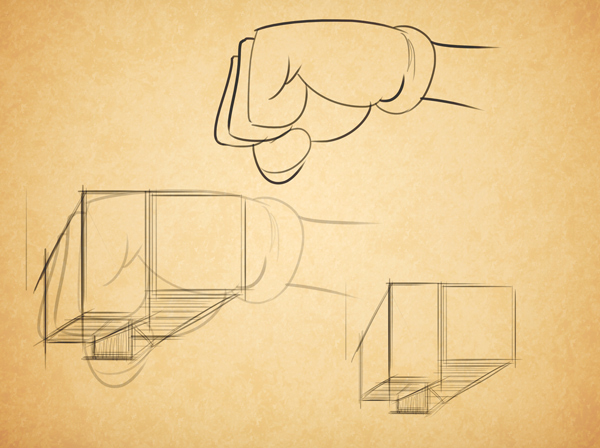 Notice how you can fit the outline of a fist into three-dimensional rectangular shapes in space.
 Obviously, if we try to simplify each hand position using various techniques, we will get tired quickly. So remember that real secret How to simplify a hand drawing - these are observations from life.
 View from the opposite side: simplified drawing.
 4. The Fab Four
It is common in animation to draw characters' hands with only four fingers. This allows, in addition to enhancing the character’s dynamics, to make the artist’s life easier. This way he doesn't have to worry about too many details.
 Hands with four fingers of different styles and sizes.
 Note: When using this technique, you will need to adapt your knowledge of a five-fingered hand to a four-fingered one. Concepts need to be adapted to achieve suitable and interesting result.
It is worth paying attention to your fingertips. In animation, the more rounded and movable the fingertips are, the more interesting and dynamic they are. When you create characters, think of their hands as if they were individual characters!
 See how this hand has its own character?
 Another good reason to draw hands with four fingers: in this case, you have the opportunity to increase the size of the fingers, which means making them more expressive! Whole line famous cartoon characters able to stand out thanks to this technique: The Simpsons, Bugs Bunny, The Flintstones and Mickey Mouse.
The Mystery of the Little Finger
One of the most big secrets The design of such a brush is to make maximum use of the little finger! If you place it at a different angle in relation to the other fingers, you will break up the monotony in the perception of your hand.

 Highlight the position of the little finger in the frame. See how the nature of the action changes with this technique. The viewer's attention is now focused on the main subject in the frame, and the character's personality is given a special twist.
 5. Talk to your hand
When we need to express emotions in an animation drawing, the role of hands is irreplaceable! Look at the images below: the hands visually support and echo the characters' facial expressions and body language.

- "I have an amazing idea!"
- "How do I look, honey?"
- "I can't believe...I'm being awarded an Oscar!"
- “I don’t understand anything... he was just here!”
- "Ahhh! My head is pounding!"
No matter how strange it may seem, hands have their own character! Not only do they maintain facial expressions and body language, they can express own emotions!
 Do you see the greatness in these gestures above?
 However, you will often find yourself in a situation where your hands should not distract attention. In this case they should be minor character. Characters in action scenes tend to be exaggerated more than characters in quiet scenes.
 Notice that in the dramatic scene there is little movement. There is no room for exaggeration here. Hands must emphasize the feelings of the characters - this is one of the most difficult processes in design.
 6. Test of knowledge
I have prepared a short test to test your powers of observation. Analyze the pictures below and try to determine what feeling the best way describes each. Can you guess everything correctly?
 Can you guess what the hand expresses in each of the drawings?
 Raise a hand!
Now you know all the secrets of the art of drawing cartoon hands, Congratulations!

Although hands are a very fun part of the body to draw, the ability to create hand designs in different styles is not so simple, and only with the help of hard training can you achieve natural results. Even if your goal is to draw for animation, it doesn't hurt to buy a good anatomical atlas to understand how the muscles and bones in the hands work. There is no need to memorize each one in detail. It is enough to understand how the hand works in motion. Remember that a character's expressions are much more important than what's underneath the skin.
One last tip: when you need to draw hands, place your own hands in front of a mirror, or just watch your hands. One of them will remain stationary while you draw (unless you've learned to draw with both hands at the same time!)

Artists are entitled to many benefits that will never exist. For example, coupons for free food, separate transport so as not to blend in with the gray mass in the minibus, or a personal butler. I’m not an artist myself, but I’m already starting to feel all the delights permanent job hands (in my case left hand). After drawing for a long time, not only the hands begin to hurt, but also the back, tailbone and other parts of the body subject to creative pressure. In this lesson you will learn how to draw a brush. And two at once: human and artistic. A brush is a means of transferring paint to paper, oil to bread and powder to the brain. This is exactly what it looked like Magic wand, when he went to study at a magic school for treatment. This weapon was created using a brush mass destruction like Malevich’s Black Square, which shows the ratio of the black population and the rest of the inhabitants of the Earth. Over time, the brush multiplied by spores among people and began to appear at social parties and in laboratories for the creation of chemical weapons.
After the invention of the automatic pen and the hydrogen bomb, the brush lost its position and moved itself exclusively to artistic field, where it suddenly became a means of creating masterpieces. Of course, being an artist does not promise great success, but sometimes there is money. What you can do with a brush:
- Chewing on it gives an influx of new brilliant ideas and also relaxes the nervous system;
- Draw the most famous painting in the world, or not to draw;
- Make a cache out of it and hide your stash;
- Use as a murder weapon;
- Poking it at someone (just not too much);
Let's try to draw it all.
How to draw a brush with a pencil step by step
Step one. I won’t comment, because there’s not much to say here. From the pictures everything is visible and clear.  Step two.
  Step three.
  Step four.
  I hope you enjoyed the lesson. See more similar ones

In this lesson, I suggest you draw a hand in its classic position - fingers open, palm down. You may want to draw a hand clenched into a fist or a hand palm up. Or draw connecting hands, as in the background picture. Either way, this tutorial will help you draw hands. Drawing a hand is very convenient because you draw with one hand and can draw with the other. First, carefully study your hand, pay attention to the length of the fingers, all proportions. You can even outline the hand if you are going to draw it at life size.
1. Marking the contour of the hand

Indeed, if you need draw a hand on the entire sheet of paper, then it’s easier to outline the outline of your hand, and then, using some tips from this lesson, just add small parts. If you need to draw a hand on a smaller scale, then first put two dots for the wrist and five dots for the fingers. Please note that it is not the index finger, but the middle finger on the hand that is the longest.
2. Straight contour lines of the fingers

The length of the fingers varies. They say that musicians have very long fingers. The nobles believed that long and slender fingers emphasized aristocratic origin. Maybe, but we will draw an ordinary hand, so divide the segment where the little finger will be in half, and draw a line from it, parallel to the previously outlined points. For the thumb, draw a rectangular outline.
3. Draw actual outlines of the fingers

At this stage, you only need to trace the straight contours of your fingers with a pencil and give them real shapes. Perhaps these preliminary contours turn out to be inaccurate, then the shape of each finger can be clarified separately.
4. General hand shape

At this step you can adjust the contours of the fingers. Make a deeper “angle” for the thumb, but you can leave the original contour, at your discretion. Mark the phalanges and remove unnecessary ones from the drawing contour lines.
5. The drawing is almost finished

First of all, paint your fingernails. Highlight the knuckles with a few strokes and you can say hand drawing finished. All that remains is to draw a few details in the next step.
6. How to draw a hand. Shadows

A person's hands have "wrinkles" or folds in the knuckles that stretch when the fingers are squeezed, make these areas darker. There is an area between the fingers that also needs to be highlighted. To make the hand look voluminous in the drawing, you can make some of the contour lines darker and thicker. In this case, decide which side the light source will be on. It may seem that draw a hand It's not difficult at all. Try to draw, and then compare your hand with the resulting drawing.
Let's try to draw a hockey player in motion, with a stick and a puck, step by step. You might even be able to draw your favorite hockey player or goalie.
This lesson is intended for those who already know how to draw well, since drawing a person is not easy. Draw a picture dancing ballerina especially difficult, since the drawing needs to convey not only the grace of human movements, but also the grace of ballet dance.
When drawing a person, you must see the whole future image from the expected lines and all you have to do is draw them. It is important not only to accurately “maintain” the proportions of these lines in the drawing, but to accurately draw the hands, eyes, and lips. They convey the mood and character of a person.
Portraits are the most complex look visual arts. Learn to draw a portrait, even with a simple pencil, requires not only time to learn, but also talent.
Human eyes are the most attractive and main part person's face. Since this element of the portrait attracts the most attention, it must be drawn very accurately. In this lesson we will learn how to draw a person's eyes with a pencil step by step.
Each person's nose has unique characteristics, so it is impossible to give precise advice on how to draw the nose of a girl, child or man. You can only make an abstract or, as they say, “academic” drawing of the nose. This is exactly the version of the nose that I suggest you draw.
Drawing hands is actually very difficult. There is an anecdote that still lives among the walls of art institutions, which tells about an artist who, in order not to be embarrassed, painted his hands in his pockets and his feet in the grass. Hands are also a three-dimensional form, and it is the volume that needs to be conveyed. But that's not the worst thing. The most difficult thing is to get the proportions right. Already in second place is the transfer of movement and anatomical features. I'm not belittling the importance of knowledge of anatomy, it should be. But if you don't keep the proportions right from the beginning, will not bring a positive result. For example, a sitter sits in front of you.
His hands are in the right position, in a certain angle. So you need to correctly grasp the position of the hand from the perspective. And for this, look for proportions.

The slightest inaccuracy and the “correct” picture will not work. And you notice this inaccuracy already halfway to completing the work, no matter how regrettable it is.
I'll try to explain it differently. To begin with, you probably need to look at the following figure:
It is not necessary to know what the bone is called. It is enough to understand that the hand is not an amorphous material, not an inflated ball - it is bones covered with muscles, ligaments, and skin. Remember the proportional relationships of the parts of the skeleton of the hand.

When you draw from life, your hand will probably be at an angle, which will complicate your task. It will be necessary to convey the proportions of the “picture” itself, taking into account the proportions of the hands.


You need to start drawing a hand not individually, but as a total volume. You outline the volume along with all your fingers and then “break it up” into sections, ultimately highlighting each finger.


If you take a ball in your palm, it will take its shape. It will be easier to understand if you do it yourself. Of course, the hand can take different positions, and its shape will change. But the basics must always be taken into account. This is how Bammes drew:
After outlining the shape and all the details, you can come to the rendering of light and shade. We first determine (in general) a light spot and a dark spot and apply a soft stroke over the shadow. And then we do everything according to the principle as described on the page.
Below are his drawings of children's hands. The hands of babies differ from the hands of adults in that the palm is more weighty and fleshy in relation to the fingers. The joints are practically invisible on chubby arms. This can lead to problems with misunderstanding; the baby’s hands may turn out to be “cotton-like.” Having already somewhat understood the structure of an adult hand, you need to move on to drawing the hands of babies. Schematically, a baby’s hand can be fit into a rectangle, close to a square, or even into a square.
Hands of older children. Slight differences begin to appear between the boy's hand and the girl's hand. The boy's hand is larger and stronger. Muscles and joints are better visible. Distinctive feature The girl’s hands are thicker, narrower, not muscular, the fingers are thinner, the nails are narrower. Joints and muscles are less visible. In drawing children's hands, the tendons are not transferred. They are still practically not expressed.


Women's hands have noticeable distinctive features from men's. Like everyone else in woman's face, the figure, and the hands themselves. They are drawn more delicate, with light rounded surfaces, more graceful. For greater grace of a woman's hand, the middle finger should be about half the length of the palm; oval nails also add grace. Joints are easily conveyed; they can be conveyed by hints, small dimples, like those of an infant’s hands.
Hands are difficult to draw, especially from perspective. Many artists believe that the ability to draw hands is the indicator of a master.


