City with black gel pen. How to draw on black paper: choose white pens
Used every day by office workers, school and university students, it is also an excellent drawing tool. Graphic arts gel pen has a great advantage: the drawing is clear and rich. Although, on the other hand, it will not be possible to erase incorrectly drawn strokes with an eraser. Since the prices for pens are low, drawing with them is quite profitable and economical. Decorative graphics made with gel pens can become an original and interesting addition to your home interior.
Where to begin?
For inexperienced artists who are just looking for their skills in drawing, black gel pens are perfect. They will help make the drawing refined and sophisticated. Graphics with a gel pen for beginning artists will not be difficult to perform, you just need to take into account some features.
Pressure
Exist different ways pressing pens on a sheet of paper. To get a continuous thin line, you need to use direct pressure. The pen is placed perpendicular to the paper and a straight line is drawn. This method is perfect for drawing contours. You can draw by pressing the tool at an angle. The result is dull strokes. If you draw lines in one direction in this way, you can create halftone transitions. Intersecting lines will help deepen and enhance shadow areas.
Paper and its structure
When using a drawing method such as graphics with a gel pen, you must also take into account the structure of the paper. When choosing smooth paper the lines will be clear and even. If you draw on a rough surface, the lines will turn out short and choppy.
Circuit
In order not to make irreparable mistakes in your work, you first need to draw a contour using a regular graphite pencil. Then minor mistakes can be removed with an eraser. This procedure must be done after tracing all the details with a pen. In this case, you need to wait until the drawing dries completely. The lines drawn with a gel pen are generally of the same thickness. It depends on the diameter of the rod. To draw lines of different thicknesses, you need to choose pens with different ball diameters. When drawing, it is better to use several gel pens, since different dyes have different densities. As a result, you can get lines of varying saturation, which will create a unique effect.
Patterns
You can draw anything using a technique such as gel pen graphics. The patterns, for example, turn out simply fantastic. When drawing patterns, you can allow yourself to realize almost any fantasy on paper. To make the drawing original and unusual, you need to use more than one gel pen. If desired, you can add colors to the pattern and take multi-colored gel pens. If the artist’s imagination does not allow him to run wild on paper and draw an exclusive pattern, then the Internet will provide a huge selection of various designs and ornaments. You can view such pictures, combine them, and ultimately draw something of your own, simply based on the selected pictures. Or just stop at one pattern and draw only that. In any case, the picture will turn out beautiful and interesting.

Some subtleties
The cores of gel pens are usually thick, which allows the artist to draw using an extraordinary dotting method called dotwork. Since colored tools always don’t draw very well, graphics with a black gel pen will be much richer and of better quality. It is important to remember that the gel paste tends to dry out quickly, so the stick must be used within a few weeks, otherwise it will stop drawing. Graphics applied with a black gel pen will lose some shine and color after 2-3 days from the date of drawing. You must draw lines on the paper very carefully, since it will be impossible to wipe them off. It is also important to remember that touching finished drawing This is not possible, because the gel may smear on the surface of the paper.

What else is important to remember?
Graphics with a gel pen should be applied in accordance with the position of the fibers of the sheet, that is, from top to bottom. The painted part should not be touched with your finger, otherwise you can change the saturation of the lines. It is best to choose high-density paper for drawing, and work with light pressure, because the gel paste has the property of “pulling” the sheet. If gross errors occur during drawing, which simply need to be removed, use white or other covering materials. We must remember that graphics with a gel pen require the precision and accuracy of the artist. Of course, the first time the drawing may not be of very high quality. But everything comes with experience. Over time, the drawings will become clear, and the confident hand of a master of his craft will be felt in them.
We are used to painting in black and white... Perhaps that is why white drawing on black or colored paper it looks especially impressive: breaking patterns and impressing. Although the same drawing, in black and white, will not seem as striking.
I fell in love with painting with white paints on a black background as a child. And thus she “hacked” a couple of drawing competitions - this decision was so unexpected for the audience. And now - when I got carried away - I prefer unusual combinations when choosing colors :)
Mandala gold on black:
Doodling silver on red

Zentangle white and black on orange:
But the most impressive thing still remains White color on a black background - regardless of whether you draw mandalas, zentangles or are just learning:
 Today I have 4 white pens in my “arsenal”. They are different and appearance, and a line that can be left on paper. This:

 In Minsk you can more or less easily buy Crown Hi-Jell Roller is a familiar gel pen, but with white ink.
Handles production Sakura are rightfully considered one of (if not the) best white pens for drawing on black paper. Masters all over the world, from the USA to New Zealand, draw mandalas and zentangles with their pens. For some time now, Sakura pens can be found in Belarusian stores. And once upon a time Gelly Roll I brought from Ukraine and Russia, Decorese They actually sent it to me from the USA...
Uni-Ball They are famous for their wide range of pens and liners, but I haven’t seen them in Belarus either. But with some luck, you can find them on AliExpress (if it’s difficult to bring from other countries).
Crown and Gelly Roll have a thinner line (meaning you can draw more graceful mandalas or zentangles):  But thanks to the thickness of the line, Uni-Ball and Decorese produce a more saturated and bright color. There is no need, for example, to draw a pen twice along the same line. Moreover, you can draw with them almost anywhere. For example, on stones:
Now you have a better understanding of white pens for drawing on black paper, which means you can already navigate a little in the range of these products yourself. Of course, there is much more choice on the same AliExpress: a simple search reveals dozens of types of white gel pens for drawing, in different price categories, individually or in sets. Choose, order - and draw!
If you have questions, feel free to ask in the comments or send by email.
If you are interested in what I am drawing with all this, you can look in my Instagram @bygirl, and if you want to quickly learn yourself, I collect pictures on Pinterest, and on Youtube videos with lessons and examples.
Tattoos drawn with a pen allow you to decorate your body quickly and painlessly. To create them, ordinary gel pens are suitable, which can be purchased at any office supply store.
Flowers on the shoulder blade drawn with a pen
How to make a tattoo with a pen with your own hands
- Before creating a tattoo, think about what exactly you want to see on your body. The design will last on the body for several days, so you should really like the image. Pictures can be searched on the Internet. Here you can easily find something that suits your taste.
- Try drawing your chosen design on a rough draft. Perhaps your artistic skills will not allow you to draw this picture beautifully and accurately. In this case, you need to simplify its design. If even after this you don’t like the result, it’s better to choose other tattoos with a pen, sketches of which can be easily found on the Internet.
- Choose a black gel pen to create a tattoo. Draw your chosen design on plain or parchment paper. You can also use tracing paper. You need to color the image very carefully so that the ink does not flow.
- Decide on a place for the tattoo. You can apply a temporary tattoo anywhere. If you want to transfer the image to the area of the back, neck or shoulder blade, ask a friend for help.
- Soak a piece of cloth in warm water.
- Place the paper with the design on the place where you want the tattoo. Press the damp cloth firmly onto the design and hold it there for 30 seconds.
- Carefully and very slowly lift the edge of the paper and make sure that the design is completely transferred to the skin. If necessary, hold the fabric for a few more seconds and then repeat the procedure.
- Remove the damp cloth along with the paper.
- Give the tattoo a chance to dry.
- Spray the tattoo with hairspray. This will keep the tattoo looking attractive.
 Tattoo made with a pen on the hand
Tattoos with gel pens can be changed every 2-3 days. And this is their great advantage!
Did you know? The design you like can be printed on a printer, and then simply outlined in ink and transferred to the body.
A few important notes
- If water or any other liquid gets on the tattoo, it will flow and leave a mark on the clothing. In this case, use a napkin to immediately erase the applied design.
- Stop using too hot water. This is necessary in order to avoid poisoning. It is possible in very rare cases, but it is better not to risk it.
 Signs on the fingers drawn with a pen
I have long wanted to get a tattoo, but I was very afraid of pain and unpleasant consequences. However, I found a way out - a temporary tattoo with a gel pen. It can be easily done at home. My first tattoo was a beautiful star on my neck. All her friends gasped with admiration and did not immediately believe that she was not real. Now I'm happy to do tattoos. I change the drawings every week.
Inna, Kazan
 Hand drawn flower
- If you have dark skin, you will have to keep the fabric on the paper for longer than 30 seconds.
- You must remove the paper very carefully so as not to smear the ink and get dirty.
- If you want to tattoo words, write them in pencil, then unfold the paper and trace each word with a pen. As a result, you will end up with “upside down” letters. Don't be alarmed, there is no mistake here! When you transfer the words to your skin, they will be “in their place.”
- If something goes wrong or you notice mistakes in words, simply erase the drawing. To do this, you will need a cloth soaked in alcohol.
- Pen tattoos, which have the same meaning as real tattoos, can be easily washed off with soap and water.
Pen tattoos, photos of which you will find below, are very diverse. Even a child can get the simplest tattoos.
Signs on the wrist in Russian
When I first heard about pen tattoos, I was skeptical about this idea. It seemed to me that such a tattoo looked somehow childish. But when my friend drew me a drawing, I was very surprised. The tattoo looked like a real one! Now I treat myself to new tattoos every week!
Elena, Tyumen
Important! If you don't have a printer or just don't want to draw the tattoo image yourself, purchase ready-made gel ink tattoos.
What designs are suitable for a pen tattoo?
If you are going to apply a tattoo with a gel pen for the first time, choose the most simple drawings– butterflies, flowers, geometric patterns, leaves, branches, etc. Once you get the hang of it, you can move on to more complex compositions - Feng Shui hieroglyphs, inscriptions, animals, birds, etc. Tattoos made using the Indian mehendi technique also look very beautiful. This option is more suitable for young girls. Mehendi will make their look feminine and mysterious.
 B&W poppies gel pen
If you decide to get serious about temporary tattoos, then you will probably be interested in special tools that make the job much easier. As a rule, they are handles with two writing ends. One of them is thin, for drawing individual details of drawings. The other end is thick. It is suitable for drawing the main elements of the image, as well as filling out the form. With this pen, the image can be applied directly to the skin. Irregular lines can be easily erased without damaging the skin. If everything is done correctly, then you can distinguish such a tattoo from a real one only upon close examination.
Video: girl draws a tattoo with a pen
How to learn to draw zentangle and doodling?
If you have not yet tried drawing using the popular Zentangle or Doodling techniques, then it’s time to learn them.
You may not create real paintings from your drawings, but you will definitely have an activity that you will turn to when you need to throw out the accumulated negativity and think about something good and beautiful.
This article contains information about zentangle and doodling drawing techniques. You will not only learn when and who first came up with the idea of filling a white sheet of paper with simple but effective patterns, and how drawing techniques differ, but you will also be able to develop your hidden abilities.
What is Zentangle and Doodling?
People have adopted the Zentangle technique a long time ago. creative professions for creating amazing and mesmerizing drawings, filling out the pages of notebooks and sketchbooks.


Even art therapists use interesting patterns during their trainings. Patterns drawn on cards with a gel pen can be seen on the Internet, or you can create wonderful drawings yourself.
Advantages of drawing using zentangle and doodling techniques:
- Drawing is seen as a way to meditate
- You can take your mind off your pressing problems for a while
- you can see familiar things with fresh eyes
- an opportunity to reconfigure and get inspired for new projects
- is an excellent remedy for insomnia
- way to increase self-esteem
- drawing simple patterns calms and relieves stress
- a way to develop hand steadiness, eye, improve handwriting
- attention is increased and fine motor skills are developed
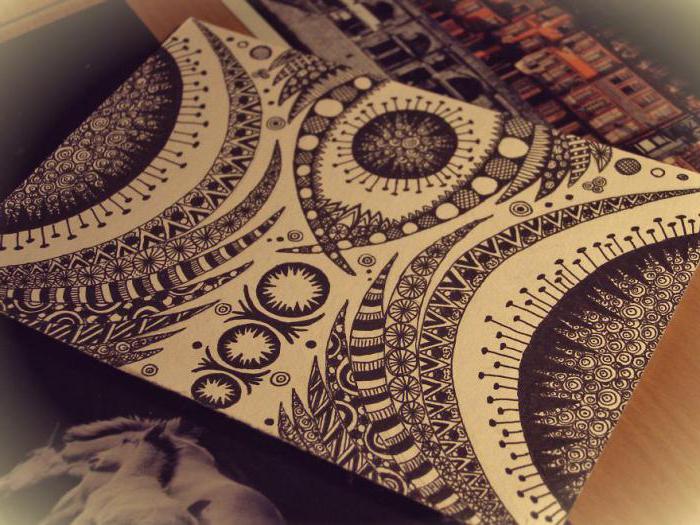
The photo below shows spectacular black and white and color patterns drawn using the Zentangle technique.


So, what are they? beautiful works art in miniature?
Zentangle- these are those drawings that are created unconsciously while waiting, or simply to relax and calm down.


Having studied some of the features of drawing patterns, you can not just move a pen over a sheet of paper, but transfer unique abstractions onto white paper squares.
Drawings using the Zentangle technique are characterized by repeating motifs. The Zentangle technique got its name in 2006 in the USA from two words:
- "Zen" is one of the Buddhist sects
- "tangle" - means tangle, interweaving

Doodling- these are the same doodles that people do so well of different ages: from small to large. A drawing using the doodling technique consists of simple shapes and curved lines.
With this technique, you can start drawing without any knowledge or skills. After all, the main thing that helps to create an interesting pattern is the ability to act intuitively.


Drawing using the Zentangle technique is different in that it requires significant concentration of attention to complete. Draw patterns on square cards, the size of which 9x9 cm.


 Cards can be cut out of thick paper, or you can buy ready-made ones at an artist store
 Zentangle can be drawn in a notebook by drawing a sheet of paper into squares with sides 9x9 cm


You can draw a regular sheet of paper into squares. Each square contains a separate composition. There is another option for making drawings: several small ones are drawn in a large square.
Curved lines inside the squares determine the boundaries of future patterns and figures, combining them into one composition.
In each pattern, you need to highlight and show the shaded area. Shadows and highlights in the drawings will emphasize the depressions, create the illusion of three-dimensional patterns, and help make an unfamiliar world attractive. Tonal contrasts will make the world recognizable.
Examples of patterns:


Zentangle drawing for relaxation, inspiration and pleasure
Drawings using the Zentangle technique are what we draw on paper while sitting at a meeting, at a lecture, during a protracted telephone conversation. Doodles and dashes help not to lose concentration and overcome drowsiness.
If you are emotionally exhausted or tired, a marker, felt-tip pen or regular pen will distract you from pressing problems: you will start creating without thinking about anything. mental energy at such moments is not wasted, and therefore the information received continues to be processed and assimilated.


A few patterned squares add up to an interesting finished piece without requiring any special drawing skills.
Today, elements of zentangle or doodling can be seen on various elements decor. Strange and intricate figures are combined into bizarre surreal plots.
What is the meaning of meditation while drawing using the Zentangle technique?
- To make a drawing beautiful, you need to be able to focus on the moment “here and now.” And this is only possible if total immersion into the drawing process.
- Automatic hand movements on paper become conscious over time.
- Spontaneity is gradually replaced by thoughtful composition.
Drawing techniques in zentangle and doodling style
There are certain rules for zentangle designs:
- The pattern is made in black and white colors
- the pattern is limited to a square frame inside a card of a given size (9X9 cm)
- lines are drawn randomly inside the frame, dividing the square into sectors
- the sectors formed after drawing the lines are filled with bizarre random patterns
- the plot of each composition is abstract
Drawings using the doodling technique are performed intuitively; there are no rules when performing them. Zentangle, unlike doodling, is created in such a way that the pattern is complete and complete from any side and from any angle.
To draw using the Zentangle technique you will need the following materials:
- thick watercolor paper
- liner (capillary pen), marker or regular
- ball pen
- simple pencil
Various and unique patterns are created according to one scheme:
- Cutting tiles from paper classic size in Zentangle (9x9 cm).
- We draw the lines: put four dots with a pencil at the corners of the tile, stepping back a little from the edge. We try not to press on the pencil so that later we can easily get rid of the lines.


- We connect the lines with one solid line. You should not use a ruler for this or try to draw the line evenly: some carelessness will give a special charm to the tile with the drawn pattern. This way we set boundaries for further work.
- The next step is to create “zones” inside the square for future patterns. They will not be scattered in chaotic order, but will create a complete picture.

- When the Zentangle patterns begin to turn out, you can skip this step and start drawing without preliminary “marking”.
- How to mark a square into “zones”? Drawing lines without lifting your hand from the paper. In the photo you can see what such lines look like.


- Now you need to fill the empty space between the lines with patterns. We sketch segment by segment. This is what it looks like:


- There is no specific sequence that must be followed: fill the segments with the pattern as your imagination tells you. Leave some areas unpainted; this will not affect the overall picture.


- When you think that the drawing does not require adjustments or additions, erase the pencil lines you drew earlier.
- Be sure to add shadows by determining the location of the light source. Without shading, the eye will not glide across the picture and attract attention.
- Having decided where the light will fall on the pattern elements, let’s add hard pencil and blend the painted borders well.
- Shade the sides of the filled segments, giving the image three-dimensionality.
The shaded patterns “Pebbles”, “Leaves”, “Peas”, “Balls” look especially impressive. If your shadows don’t work out or are too dark, you can erase them with an eraser or lighten them.
Zentangle patterns are given in this section. You can make changes to them or come up with your own. However, if you are just learning how to draw zentangles, then it is better to use classic pattern templates.


When drawing, we turn the Zentangle tile around its axis to make it easier to draw lines. You can indicate where the bottom of the picture is by putting a signature on one of the sides.
Drawings in the style of doodling with a pencil step by step for beginners
- Drawings using the doodling technique do not require compliance with any rules and there is no need to cut out tiles. You can simply print out the outline of the animal, geometric figure, plants and fill the empty space with patterns.
- You can draw a square or oval in the center of the sheet, and then call on your imagination to help and draw whatever comes to mind. Draw pigtails somewhere, add a spikelet somewhere, or let the ribbons coming out of the mouth of the shell intricately intertwine.
- You simply add oblique lines to your creation, combine arbitrary elements in a circle, draw the contours and get a unique picture.


Let your hand move randomly or determine direction and draw simple repeating patterns from within.
You will learn how to draw using the doodling technique by watching the video.
Video: Doodling pen
Zentangles step by step lessons: learn tangles
To fill the tiles with patterns, you must first make drawings of tangles - patterns. You can practice drawing tangles and only then start creating zentangle designs.
Below are some easy tangles for beginners.


 Some beautiful variations Cadent pattern for your inspiration


Video: drawing tangles
Video: 24 Doodling Patterns, Zentangle Patterns
Zentangle - manicure
Beautiful patterns have become popular not only among artists: doodling is used to create unusual, fashionable manicures.
A whole work of art on the nails new technology will complement the image and help make it harmonious. In addition, even the girl who has long given up on designing her own nails can apply an ornate design using the doodling technique. After all, many people believe that they cannot draw anything.


What do you need for a simple but effective nail design?
- search the Internet for a suitable template that you can repeat
- disassemble the pattern into its components and practice performing it step by step on paper
- start sketching the pattern, carefully transferring lines, circles, petals
- Don't worry if some of your lines are uneven: doodling can hide many mistakes!
- If you take a closer look at the nail design in the doodling style, you will be convinced that there is nothing complicated in these designs.


The process of creating a manicure includes several stages:
- covering the nail with primary color varnish
- applying a pattern with varnish of a thinner consistency
- Instead of varnish, you can use acrylic paint to paint patterns
- secured with a top coat that adds extra shine
What tools will you need?
- special thin brush
- If you don’t have a brush, you can use a toothpick or a pen
The photo shows available materials that can replace special tools. You can see how thick the strokes are when using them.


- Start with a circle at the base of the nail plate, gradually moving further: draw a second circle above the first circle, then petals that spread to the sides and fill the empty space with dots or strokes.


Video: Zentangle for Beginners
Zentangle - simple and interesting way creating beautiful graphic images using repeating elements and ornaments. Almost anyone can use it. This activity develops attention and Creative skills, and also perfectly lifts the mood. Zentangle is a method known throughout the world; it is used by people of different ages and with different interests.
This technique does not require complex materials. For work you will need paper, pencil (for the initial drawing) and black gel pen (liner).
Liners - these are pens, but with water-based ink, so they can draw fine, beautiful line. They are convenient because there are liners of different thicknesses on sale. Thin lines are suitable for detailed drawings, bold ones for large planes. Liners are sold at any office supply store.
The advantage of the Zentangle technique is that you don’t have to be afraid of making a mistake and making an uneven line. So you have a great opportunity to draw right away without a pencil.
To make it easier for you to learn the Zentangle technique, I will add several ornaments that you can use in your drawings. I came up with most of them myself.

Do you want to create small masterpiece using zentangle technique? Then let's go! Today we are drawing animals.
How to draw a fish using the Zentangle technique
1. First of all, let's think about placing the fish on the paper. We use light planes (ovals) to denote the body, tail and fins of the future fish.

2. Now we clarify the contour of the fish’s body, draw the fins and tail. At this stage, you can finish drawing the fish’s face: plump lips and eyes.

3. The fish is ready! Isn't it so difficult? Now use lines to divide the body, fins and tail of the fish into strips. Why, you ask? Each of these strips will have a special ornament - you can come up with it yourself, or choose it from my examples.

4. When the pencil drawing is completely ready, trace the outline with a black pen or liner. After this, you can safely start coloring the fish using the Zentangle technique. Let's start with the smallest fin. Decorate each strip with a different original ornament.
Pay attention! It is not at all necessary to exactly repeat the ornaments that I drew. Add originality and your own personality to the drawing. You can change the order of ornaments, come up with your own, etc.


It is important to know! Some patterns may be repeated several times-that's even good.
Pay attention! Some patterns can be made darker, while others-lighter. This difference is possible due to different densities, or line thicknesses. It is important to alternate light and dark patterns for contrast so that the design does not turn out too light or dark.


6. If the fins and tail are ready, proceed to drawing the body of the fish. Decorate each strip with an exclusive ornament!
Advice. Don’t be afraid to fantasize and make mistakes, this gives your work a special personality. Try to draw all the ornaments without a pencil, just with a black pen, so you will gain courage in drawing and quickly develop your creative abilities.


7. At this stage we move on to the face. Make it a little lighter than the body and fins - then the border of the body and face will be clearly visible.


8. Congratulations! You have mastered Zentangle for beginners perfectly. The fish is ready! Now you can complete the details of the environment: air bubbles in the water, algae, sand and stones. Don’t forget that the background must also be made using this technique for the picture to look harmonious.

How to draw an owl using the Zentangle technique step by step
1. First of all, on clean paper, lightly mark a circle that will be the owl’s body. Divide the circle with two auxiliary lines: the middle line of the body and the line of the eyes. These lines will help you better navigate the drawing.

2. Draw the outline of the bird’s body: slightly narrowed at the top, wide in the middle and very narrow at the bottom. Draw a triangular tail with a rounded tip at the bottom and small ears on the head, a little like horns.

3. At this stage we move on to drawing the face. Draw the owl huge round eyes so that she can see well at night, and a triangular beak between the eyes. Don't forget the wings. Mark lightly where they will be located on the right and left sides.

4. At this stage, draw the wings in detail, highlighting three planes in them, similar to feathers. Also add feathers on the tail and ears. Don't forget about little paws. Draw a twig for the owl so that she has something to sit on.

5. Now all that's left to do is add the details. Select the area of the face around the eyes and beak. And in the other part of the body, which will be the body, draw semicircular feathers.

6. Now trace the outline with a black pen or liner and move on to the ornaments. I started drawing the owl from its wings and ears.

7. Now you can draw feathers on the tail and eyes. Make the small pupil darker and add a light ornament around it. For example, for the eyes I chose lines with a circle at the end - such an ornament is somewhat reminiscent of natural ornaments in human eyes.
Make the lines near the pupils a little thicker and darker to highlight your eyes well. And the closer to the edge, the more you leave the paper white. Also paint the beak.


8. At this stage, paint the feathers of the body. There are a lot of them, so you will have to try. But the result is worth it. Don't forget that you can use your own ornaments.


9. The drawing is almost ready! All that remains is to finish the ornaments near the eyes. Make them lighter than the body feathers. However, near the eyes, let the lines be thicker and darker, this will highlight their outline well.

Congratulations! The owl is completely ready! All that remains is to decorate the branch and draw fantastic leaves.


