Simple pencil drawings for beginners cool step by step. What can be drawn with a pencil? How to draw a person correctly
- Pencil. The simplest and most understandable drawing tool you will need in any case. Even if you want to learn how to draw with paints, you will need a simple pencil to create a sketch. Not all pencils are the same. Some are designed for drawings, others for drawing, others for everyday tasks. Too hard pencils (3H, 4H and more) are better not to choose: they are easy to scratch and tear the paper.
- Watercolor. Water-based paint is known for its lightness, transparency and a wide palette of shades. However, painting with watercolor is quite difficult: you need to learn how to use its properties and have a good idea of \u200b\u200bhow the paint will behave on paper. On the other hand, if you put in enough effort, you will learn to draw in one of the most impressive techniques.
- Gouache. This is a dense matte paint that is diluted with water. It is perfect for the first steps in drawing. Due to the dense texture of gouache, dark tones can be easily covered with darker ones. This is very important, because then all the flaws and shortcomings can be corrected. Another one good news: gouache is inexpensive.
- Pastel (dry). These crayons are used to create drawings in soft colors. Due to its texture, the pastel is very easy to blend, which allows you to create beautiful transitions between shades. You should immediately prepare for the fact that your fingers and the table (at least) will be stained with dust and pastel crumbs. The finished pastel drawing is easy to smear, so the pigments on paper will need to be fixed with varnish or a fixative.
- Markers ("copies"). We asked illustrator and teacher Anna Rastorguyeva to tell us about this relatively unknown instrument. Because she draws with the help of markers and does it superbly. We are not talking about highlighters and not about simple felt-tip pens, but about alcohol markers, which, due to their basis, do not deform the paper and allow you to achieve smooth transitions between shades.
There are many manufacturers of such instruments, including Japanese, German, Chinese, Korean, and Russian brands. The price also varies - from 160 to 600 rubles apiece, so even a novice author can pick up a small kit to start.
The palettes of this type of markers are unusually wide, on average 300 colors each, so in order not to get confused, you can buy a ready-made set, usually selected for a specific topic: architecture, nature, manga.
What if I don't know what to draw?
If you don't know what to draw, but really want to - copy, draw and repeat after others. There is nothing wrong with that. On the contrary, it is a normal process. Take a picture that you like, put it in front of you and start.
Video instructions are helpful. Unlike advice in the style of "draw a circle, draw sticks, add details - you get a great canvas," these posts do not lie. You will see exactly how the drawing is created.
Remember: creativity is an international thing. Don't be afraid to check out the YouTube channels of English-speaking bloggers, even if you don't understand what they're saying.
Try starting with these channels:
- Proko. An absolute must-have for anyone who wants to learn how to draw. The artist clearly, simply, clearly explains the most difficult thing - how to draw a person. This is the base and the foundation, so the channel will certainly live in your bookmarks.
- Mark Crilley. The artist works in cartoon style, so those who want to learn how to draw cute, cute drawings will find everything they need here. The artist shows different techniques and in detail, frame by frame, demonstrates the simplest techniques for creating a spectacular picture.
- Sycra. The channel will appeal to everyone who loves japanese cartoons and wants to learn how to draw anime. Video lessons reveal the topic inside and out: body structure, facial features, costumes and everything.
- Bob Ross. Bob Ross is an American television legend. Perhaps the most inspiring program in the world was created by this man, who spent 11 years teaching people to create miracles on canvas. You may not understand what Bob is saying in a soft voice, but you can not resist the talent of the artist penetrating into you right from the screen.
In general, the choice of topic is the second fundamental issue after the choice of material. And here it is not at all necessary to be limited to traditional genres: portrait, still life or landscape. Nowadays, everyday household sketches are gaining more and more popularity. Like photos on Instagram, artists quickly capture exciting topics in their notebooks, publish them in in social networks learning and communicating together. Absolutely any object can become a subject of interest - from macro sketches of insects to detailed travel diaries.
Anna Rastorgueva, illustrator, teacher
"You can paint in 30 days" by Mark Kistler. One of the most famous books about drawing. As long-term observations show, after reading it and, importantly, following the instructions, everyone learned to draw.
"Discover the artist in you" by Betty Edwards. Those who doubt can immediately be informed: about 2 million of those who considered themselves "armless" have already learned to draw from this book. For those who don't believe in own forces and thinks that all artists know some secret beautiful pictures, we say: yes, the mystery exists. It is hidden in this book.
"A sketchbook that will teach you how to draw!", Robin Landa. As a teacher himself, Robin knows that students draw best on the pages of textbooks. This is where fantasy comes into play! So he created a book in which you can (and should) draw. And learn along the way.
I want to draw, but I don't have the time or extra money
 Eugenio Marongiu/Shutterstock.com
 The first step can be taken without much investment and effort. Download creative apps and get started now.
Tayasui Sketches. One of the most beautiful and simple applications with numerous tools will teach you how to draw in different techniques.
Bamboo paper. Drawing tablet company Wacom has developed an app for artists. Sketches, sketches and full-fledged drawings - this program will be needed at every stage of learning.
Zen brush. This application will not help in learning, but will set you in the right creative way. With a brush, you can draw characteristic strokes, and the finished drawing looks like a work of art from some distant eastern country.
We figured out the materials, the sources of inspiration too, the books were studied, and there are applications for the laziest. Your move - it's time to get down to business.
The main thing is to find what you really like. Dare!
Anna Rastorgueva, illustrator, teacher
Learning to draw animals is useful knowledge for children and adults. It will be useful first in kindergarten, school, and the second - to create knitted patterns, appliqués from fabric, decorating cakes.
How to draw a penguin?
See how to create this flightless bird.
For this you will need:
- simple pencil;
- eraser;
- paper.
Such beautiful drawings created with a simple pencil. Since then it will be possible to erase unsuccessful and auxiliary features and draw new ones. Therefore, do not press hard on the pencil.
- Draw a small circle - this is the head of the penguin. It is crossed by the oval body of this animal, but at the bottom make this figure straight.
- At the next stage, draw 2 rounded features - the first is almost parallel to the back of the head, and the second is to the left side of the body. If you then want to do the drawing in color, these features will help keep the face and tummy white, and some elements black.
- Next - we draw the underdeveloped wings of a penguin bird, two small ovals at the bottom of the body, which will soon turn into the paws of this animal.
- You will make them more realistic in the next step. To do this, draw 3 fingers on each paw. A small circle on the face will become the eyes of this bird, it will also acquire a beak.
- It remains to show that his fur is quite fluffy. To do this, make a few small dashes on the tummy, back, and back of the head. Draw a crest. Add eyelid and pupil to the eye.

Here's how to draw a penguin simply and easily. You will also create other animals using the same technology without any problems.
How to draw a pig?

- Draw an oval shape. In its lower part, draw a circle that will become the head of the pig. His piglet is depicted on right side this circle.
- Depict 2 of his front legs, one back, lop-eared.
- Designate the hooves, cheeks of the animal, make the outlines of his eyes. At the next stage, draw pupils in them, as well as eyebrows, mouth, nostrils.
- The twisted tail completes the image of the mischievous pig.
How to draw a donkey?
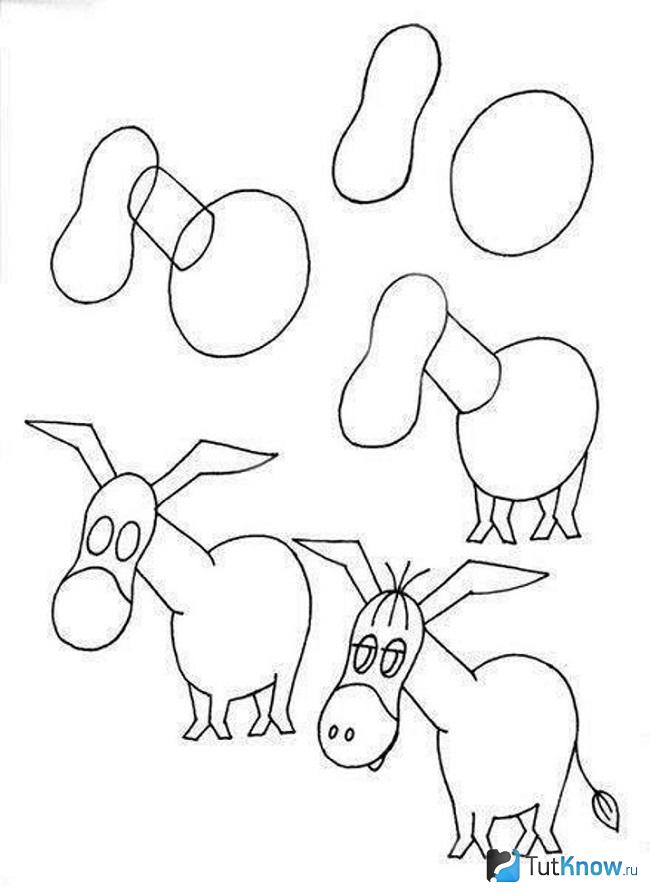
Having learned this, you and the children will be able to take up the illustration of the cartoon about Winnie the Pooh.
- First, draw a figure similar in outline to the number 8 - this is the head. The circle will soon become his body. These parts are connected by an elongated neck.
- Ears that look like small wings, draw next. The two oval eyes will get pupils and eyelids in the next step. Then draw the nose and nostrils.
- It remains to depict a bang, a tuft, the legs of a donkey and his tail.
How to draw a lamb?
The image of this animal can also be used for appliqué. But make a fur coat from fur or glue curls from segments of threads onto the base, twisting them.
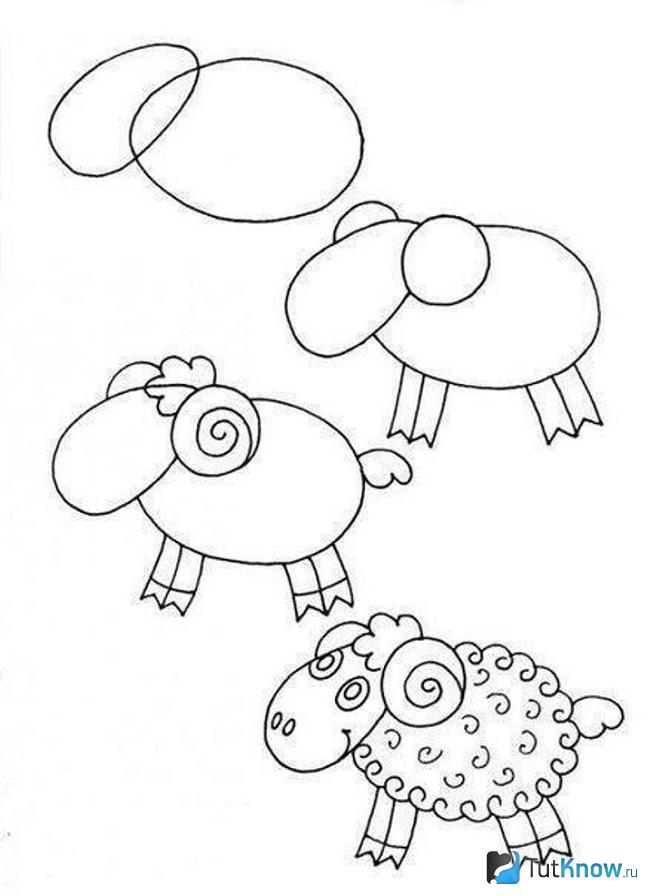
How such simple drawings are created in stages, the photos show.
- First, draw a small egg-shaped shape that will become the lamb's head. And the body is a slightly larger oval.
- To make it easier to draw the horn, first draw a small circle on the side of the head. And then draw a spiral horn in it. The second is located on background and not fully visible.
- Four rectangular legs end in hooves. Curly bangs will add charm to the animal.
- Draw his dreamy eyes, curly hair, nostrils, tail.
Rybka

If you are wondering how to teach to draw small child, then show him how this sea creature is created.
- Draw a semicircular line at the top and bottom, connecting them on the right and left. Draw the lips on one side and the tail on the other. Separate the junction of the face with the body with a semicircular line, draw a round eye on the muzzle.
- On the next step step by step drawing add an eyelid to the eye, depict two fins.
- It remains to draw the pupil, scales with wavy lines. Using small dashes, make the fins and tail more realistic.
How to draw a cat?
You will learn it in 5 minutes.

Draw a circle - this is a blank for the head. It is crossed by the ovoid body. Erase the intersection of these two parts with an eraser.
Draw the front and hind legs. Also, with the help of an eraser, remove the places where they intersect with the body. Draw a tail.
At the third stage, add ears to the cat, make the muzzle more protruding by drawing an oval at the bottom of the circle.
You already practically know how to draw a cat. It remains to erase the auxiliary lines, draw a small triangle inside the right ear, depict the eyes, nose, mustache, toes and the tip of the tail.
Winnie the Pooh
The hero of the cartoon of the same name and the book is quite easy to draw.

- First draw 2 identical shapes - they are a cross between a square and a circle.
- In the next step, erase the place where they intersect and add the front and hind legs to the hero.
- It's time to draw winnie the pooh muzzle and ears. Draw eyes, nose, claws. The mouth, like that of the cartoon character, is slightly on its side. Which adds to its charm and originality.
How to decorate a cake with fondant in the form of a picture?
To do this, you can use the image of any character that you just learned to draw or depict another character, for example, an owl.

To assemble such a cake, take:
- biscuit cakes;
- butter, custard or whipped cream;
- white mastic for the cake;
- food coloring in three colors;
- blackcurrant or raisins;
- water;
- silicone rolling pin;
You can make your own food coloring using blackcurrant, spinach, and beetroot juice.

The same dyes will be needed to give the desired shade to the mastic. But first you need to assemble the cake. Layering cakes with cream, put one on top of the other. Put the cake in the refrigerator for an hour, then roll out the white fondant, cover the cake with a sheet of this sweet flexible material.
Mastic will stick to it better if you first grease the cake with buttercream.
Trim off excess mastic, add more. It needs to be divided into 3 parts, mix a little food coloring into each. Roll out the mastic into a layer. Attach a template of an owl or any other character to it, cut it out according to this sample.
Dip a cooking brush in water, moisten some of the fondant on the cake, attach the owl blank here. Glue them all the same way.

Roll up round eyes from the remnants of white mastic. Place a blackcurrant or one raisin in the center of each to make the pupils. But pre-soak the raisins for 20 minutes in warm water to make them soft.

It is not necessary to make eyes on all blanks, perhaps some owls are turned back to the viewer.

Usually, a cake with mastic should be left in a cool place for a day so that it dries, after which it can be served.
This is how simple drawings will help decorate the cake. If you want to be the designer of your home, don't forget about accessories. And you don't have to buy expensive paintings. You can make them yourself, this will help the master class. Such canvases are created very simply, but they look spectacular.
DIY stone paintings for beginners

To create such a man-made masterpiece, use:
- smooth stones such as pebbles;
- shell "queen";
- artificial moss;
- transparent glue Titanium;
- thin branches of a tree;
- plywood;
- colored paper;
- paints.
If you are doing this for the first time, then it is better to first mark the locations of the elements with a simple pencil.
Designate where the lovers will be. Glue 3 almost identical flat pebbles to create a guy and his head with light pebbles.
For the body, head and legs of the girl, use one pebble each, make a skirt from the “queen” shell, after breaking off the “antennae” with pliers.
Such a picture is perfect for those who are relaxing on the sea or brought some shells and smooth pebbles from there from vacation. Such a panel will be a wonderful reminder of a holiday on the sea coast.
And you can take branches from a tree growing in the yard, but it is better to use dry ones. Treat them with pliers, removing excess.
Attach a relatively even trunk to a picture of stones with Titan glue. In the same way, glue small twigs that will become the branches of the tree. Cut out the leaves for it from green paper, and the birds from another colored paper.
Draw the elements of the tree, plants with paints. Glue the moss as grass, after which you can frame the work and start a new one.

This simple picture also created quickly. It will require:
- plywood or thick cardboard;
- frame;
- threads;
- flat stones;
- glue.
girl holding Balloons for the ropes, and they themselves are made of round pebbles.
If you are relaxing by the sea while walking along the beach, look for a heart-shaped stone, you will need it for your next romantic painting.

An oblong pebble will become the arms and legs of the characters, a round one will become their heads, and an oval one will become the torso. Glue a fancy dry branch down the panel - it will become the path on which the lovers stand.
Put a sprig of dried flowers in the guy’s hands or make them from colored paper. Such a picture of stones will be another pleasant reminder of the wonderful summer holiday on the south coast, like the other.

For each cat, you will need a pair of pebbles of the same color, but different in size, to make the body and tail. If you cannot find an identical color scheme, just paint the stones in desired color. When the coating dries, glue the blanks on a dense base, after painting it or gluing a sheet of light cardboard.
Draw ears, grass for cats. Glue branches that will become a tree and a couple of small pebbles that will turn into birds.

By the way, you can dwell on their creation in more detail. After all, creating simple drawings in stages, you will also depict birds.
How to draw birds in watercolor?
In just a few minutes you will be able to draw a jay. To do this, take:
- a sheet of thick paper;
- simple pencil;
- watercolor;
- brush.

This step by step drawing watercolor involves using blue and black shades in the second step. With paint of such colors, highlight the eye, breast, outlines of the back, tail, head of the jay.

Before that, you need to barely mark these fragments, at the next stage, select them more confidently. In light gray, draw the plumage of the jay.

On the next step, act even more confidently, because everything is working out for you! Create a background, let it be green bushes in the background, yellow flowers, the sky and a branch on which a bird sits.

The last stage is the final one. Make the bird more realistic by painting a few strokes of black and gray paint on its chest, side, and head. Highlight the background by adding a green, yellow watercolor. You can also draw a blue sky behind the jay.

Here's how to paint watercolor step by step. Now you can create simple canvases with a simple pencil, paint, and even using stones. Be creative, dare, and you will certainly succeed!
How to draw simple drawings for beginners, see here:
How to draw easily step by step and by cells?
Using a simple step-by-step drawing technique, even novice artists can draw beautiful animal figures. Here's how to draw a funny puppy.
And so with the help geometric shapes you can draw a cow.


The chicken that sits on the eggs begins to draw from the circle. Gradually draw the beak, eyes, wings and tail.


And after the chicken has hatched the eggs, you can draw chickens.

At first glance, drawing a bat seems difficult, but if you use the step-by-step drawing technique, then this cute bat will appear in your album in 5 minutes. Also two circles, but a larger one at the bottom, and a smaller one at the top will help draw a cat.

Birds are hard to draw, and parrots are even harder to draw. But three circles of the same size will help to cope with this task.


And so you can draw a mouse.

A very cute cat lady is drawn in pencil, the auxiliary lines are carefully removed and the cat is painted watercolor paints.

The drawing of an elephant and a horse can be drawn by everyone who knows how to draw circles, ovals and rectangles.


The difficult task of drawing a camel only seems difficult. But in the technique of phased drawing, nothing is possible.


Domestic animals sheep and pig are drawn a little differently. In a pig, the muzzle is first drawn, and then the torso. In a sheep, on the contrary, first the torso and at the end the muzzle.


A non-flying bird of the cold seas, a penguin and a forest bird, an owl, are drawn in stages and painted with watercolors.

Drawing a snail is easy to do if you draw a circle, then draw the body of the snail and finish the curl on the shell, eyes and antennae.

To draw a duckling, it is enough to draw an oval to the circle and finish the tail, beak and eyes and wings.


And so you can draw kids.

It happens that girls draw in albums, but do not know how to draw a face beautifully. Help will come simple scheme where the correct proportions of the face are observed.


You can not puzzle for a long time what hairstyle to draw for a girl in a diary, but simply choose the one you like and draw the same one.

Flowers in albums can also be drawn in stages. In order for the flower to have the correct shape, it is enough to make a circle or an oval and draw the center and petals.


Beautiful and easy drawings by cells for sketching in a notebook and a personal diary for girls 5 - 12 years old
The easiest way to draw on the cells. Of course, if you have a lined drawing. These cute kittens can appear in the diary if you draw them in the cells.


For pages in a diary about love, a drawing with a boy and a girl who exchange hearts is suitable.

Another drawing on the theme of love is not difficult to redraw, but very interesting.


A bear holding a heart will decorate the pages of the girls' diary, and the cells will help to draw it.


A smiling dog in flowers is suitable for those who like to communicate with dogs and draw them.

Drawings of girls in anime style will decorate the pages of the diary. They are easy to redraw in the cells and paint with watercolors or felt-tip pens.

The drawing is more complicated with a girl, a butterfly and a strawberry. However, if you carefully count the cells and draw on them, success is guaranteed.


An anime-style portrait of a girl in profile is also suitable for girls' diaries. The drawing is transferred to the cells, the color of the hairstyle and eyes of the drawn girl depends on the wishes of the owner of the diary.

Bear-boy and bear-girl will remind you that friendship happens both between animals and between guys.


Beautiful and easy drawings by cells for sketching in a notebook and a personal diary for boys 5 - 12 years old
Both boys and girls love to draw cats. Such a funny cat will appear in an album or notebook if you draw it in the cells.


Boys love to draw motorcycles. Even though they don't have a motorcycle yet. real life, but it can always be drawn in cells.


The space theme is also relevant for the drawings of boys and the astronaut cat may be to their liking.


Cell drawings are beautiful and easy for girls and boys: ideas, photos
A lion with a red mane, drawn in the cells with its fiery mane, will decorate any diary.


The whole picture can be drawn by cells. A lion, a zebra, a giraffe, an elephant and a hippo sit on it in dense thickets.


These animals can be drawn separately. Blue elephant for sketching by cells
And so you can draw and color a butterfly. She can decorate girls' albums.


If you finish the pond and reeds, you get a picture with funny frogs in the center.


A checkered fox cub can be drawn on fabulous pictures, or you can add flowers and grass and decorate a diary with such a picture. Tree for sketching by cells
A cheerful dragonfly will surprise you with bright wings.

VIDEO: How to draw a bee in stages?
Lots of beautiful, simple ideas funny pictures for drawing in Personal diary.
Easy, simple and beautiful in stages for beginners to draw in a personal diary with pencils
Many dream of having a personal diary. But some do not know how to keep a personal diary, what to write about. In this article, we will not only talk about how to decorate your personal diary with drawings, but also give tips regarding the content of your personal diary.
Important: A personal diary conveys the state of a person's soul. You can keep a diary if you want to speak out, understand yourself and your feelings, just tell the story of your life or certain episodes.
Keeping a diary is a purely personal matter. Therefore, there is no definite framework regarding how a personal diary should look like. It can be a huge notebook or a small notebook, you can make notes in any colors. In general, as your soul desires.
IN Lately it is fashionable to make sketches in a personal diary. If you don't know how to draw beautifully, it doesn't matter. We suggest you start with simple drawings. All you need is perseverance and a little diligence to draw a picture step by step.
You can see the options for pictures step by step on the topic “Love” below.

Teddy bear with a heart

Heart with wings

Two swans in love
Variants of pictures for sketching on the theme "Animals".

How to draw a cat step by step

Hedgehog drawing

Variants of sketches step by step on the theme "Flowers".


carnation pencil

A bit more simple pictures for sketching in a personal diary.

How to draw Winnie the Pooh step by step

Christmas tree

Video: Simple pigtail patterns for a personal diary
Black and white and small drawings by cells for sketching in a personal diary
We have not revealed yet main topic related to keeping a personal diary, namely: what to write about in your diary? So, here are some ideas for keeping a personal diary:
- The first thing that comes to mind is putting your personal experiences, events, emotions and feelings on paper. On the pages of your diary, you can be as frank as possible, because these are your personal secrets.
- It can also be described in chronological order events happening to you. It is desirable that they be bright and interesting moments. Believe me, in many years these records will make you smile tenderly.
- If you write poetry, you can write them in your diary. Great idea to preserve and perpetuate your creativity.
Important: Drawings in a personal diary can convey the state of your soul. For example, sadness, joy, love, anticipation of a holiday.
If you keep a personal diary in a notebook in a box, you can try to draw in the cells. Thanks to the diagrams below, you can easily master this drawing technique.

Pokemon Pikachu

Thumbelina


Strawberry

Winking emoticon

boy and girl

Monster High
Cute drawings for sketching in a personal diary
Important: A personal diary is a special notebook, it has been kept for many years. It is advisable to beautifully design a personal diary, for this you can use improvised means.
The first step is to design the cover. To appearance your diary has been kept fresh, the cover should be hard. In order not to bother, the easiest way is to immediately buy a notebook with a hard cover, and then decorate it. The following materials are most often used for cover decoration:
- Textile
- Lace ribbons
- Rhinestones and beads
- Clippings from glossy magazines
- stickers
On the first page of the diary, you can write a little about yourself, write statuses and quotes that you like, draw a cute picture. Cute drawings on the pages of the diary will enliven it, make it beautiful.

cute drawings for ld

Cute cat


Pictures for ld

cute drawings for ld

Drawings for sketching

cute cat
Cool drawings for sketching in a personal diary
If you decide to draw in your diary, try creating drawings that are relevant to the event you are describing. For example:
- Drank tea with girlfriends - draw a cup;
- There was a meeting with a lover - a heart;
- Waiting for a holiday - a gift;
- Good mood - rainbow.
As you can see, fantasy in this regard is limitless. Everyone has it individual approach to keeping a diary, we only give tips and advice.

Cool pictures for sketching

Drawings for a personal diary

cool drawings

Girl under an umbrella
Video: Ideas for a personal diary
Cool drawings for sketching in a personal diary
Important: Both color drawings and black and white look great in a personal diary. With help simple pencil you can create very deep and rich pictures.
You will be convinced of this when you see the pictures below.

Black and white drawings for sketching

Cheshire Cat


Some more cool color pictures.

Pictures for sketching on the theme "Food"


A cup of coffee

A piece of cake
Important: When to write in a personal diary? Your diary will be brighter and more interesting if you do not make entries "under pressure." It is better to record less often, but at the call of your inspiration.
Drawings for boys for sketching in a personal diary
Not only girls, but also boys can keep personal diaries. And if girls draw more feminine pictures in their diaries (shoes, love, flowers), then boys prefer drawings that are more characteristic male character. For example: cars, superheroes.
Pictures with food, animals, abstractions and many others are also suitable for sketching in the diary of boys.
Below is a selection of pictures for sketching in a personal diary for boys.
Pictures for sketching

Ideas for a personal diary for boys

Simple step by step drawings
Drawing ideas for a personal diary, sketchbook
Now a few words about where to keep a personal diary. There are several ideas for this:
- Carry a personal diary with you. If your diary is always at hand, you can write or draw at any time when inspiration strikes.
- Keep in your room. Probably, in your room there is a secluded place that only you know about. Some keep personal diaries in the linen closet, others hide them under pillows or a mattress.
- Turnkey diary. You can keep a personal diary in a notebook, which is closed with a padlock, and always carry the key with you.

Original drawing idea

Shoes - sketch for girls

Beautiful drawing for a personal diary

Unicorn, rainbow

girl face

cute ice creams
We hope that the collection of pictures for sketching will be interesting and useful for you. And soon you will decorate your personal diary with them. Keep your secrets nice! And finally, we suggest watching a video that contains ideas for pictures for a personal diary.
Video: Pictures for a personal diary
Who among us has not dreamed of becoming an artist at least once? Especially in childhood, many of us wanted to learn how to draw beautifully, and maybe even paint real pictures. But, as often happens, dreams were shattered by a banal lack of skills. Either due to a change of interests, or because of ordinary laziness, many lacked the desire and patience to continue developing in this direction.
So how to learn to draw with a pencil for beginners?
Like any creative occupation, the art of drawing contains many subtleties and helps to reveal to its owner not only creative potential, but also to realize their worldview in a beautiful form. These subtleties will be discussed further.
Stages and principles of training

Often, in order to fully learn how to draw, they resort to step by step learning and the practice of drawing various compositions of different plans. There is quite a big difference, if you are, for example, trying to draw a person, or trying to realize some kind of landscape on paper. That is why in this case it is very important to master the skills of drawing a variety of objects.
Another basic principle in teaching drawing is regularity. It is practice that is the decisive factor in the development of drawing skills. It would not be bad to make yourself a specific schedule for the week, according to which you could devote at least 20 minutes a day to this lesson. From this it follows that you also need to show some patience in such training.
What is needed to get started?
So, first of all, find yourself notebook with fairly large leaves. There should be at least 50 sheets. The second item in your preparation should be the choice pencil taste. There are a great many pencils, so in your case the best choice will be the one you are used to using. For example, it can be a pencil with a soft lead. Naturally, a little later, one way or another, you will have to buy necessary pencils to improve the quality of your work.
Get yourself a calendar too. Where you will celebrate not only the schedule of classes, but also your successes. At first, you will have to force yourself to strictly follow the schedule, but over time it will become part of your lifestyle and will bring great pleasure.
Try to picture something on the first page. Do not worry about high quality drawing. Through certain time, you'll open a notepad on the first page and be surprised at the difference between how it was and what has changed.

Basics
Many people think that drawing is a skill that depends only on natural talent, so they easily find excuses for themselves in the “not given” or “not working” format. But the point is not only in talents, but also in acquired skills. A person who can draw well without knowing the basic principles is a rare exception. Every business needs to be learned. Therefore, further we will consider the basic laws and techniques of drawing.
There are 9 basic laws of drawing, having learned which you will learn how to draw on a pretty high level. Let's discuss them.
- The law of perspective. Objects that the author wants to visually bring closer are distorted in such a way that one part of it seems closer than another part of it.
- Location of items. Objects that are at the bottom of the sheet appear much closer than the rest.
- size law. The object in the picture, which, according to the author's intention, should be located closer, should, accordingly, look larger than those that are further away.
- overlap law. An object that is in front of another becomes visually closer to us.
- Law of penumbra. The conditionally unlit part of the object, which is located on the opposite side of the light source, should be darker.
- Shadow law. To make the drawn object seem voluminous, you need to add a casting shadow to it, also strictly on reverse side from a light source.
- The law of contours. It is necessary to accentuate the contours of rounded objects to give them depth.
- Horizon law. The case when the horizon is drawn so that the depicted objects appear at different distances from the observer.
- The law of density. To make it seem that objects are at different distances, it is also necessary to draw near objects in more detail and distant objects in less detail.
Using these 9 basic laws in practice, it will not be difficult for you to switch to new level in drawing.

Also, in order to avoid simple mistakes, a beginner needs to follow a few milestones when sketching a drawing. Here they are:
Drawing from simple to complex
More or less known fact that drawing drawing is different. First of all, it means that drawing a person is far from the same as drawing, say, a tree. Different things require different approaches for perfect performance. That is why we will further consider in detail the technique of drawing various compositions.
Do not immediately take on complex compositions. Because in the science of drawing, the attitude with which you start working is very important. If you immediately took complex pattern, and you didn’t succeed, then a bad mood is guaranteed to you. You may even lose the desire to pick up a pencil for good. Therefore, in our training, we will go from simple to complex, gradually learning new drawing techniques. Let's start simple.

Draw geometric shapes
Since it will take quite a long time to search for suitable layouts of geometric shapes, we will be based on our imagination. For convenience, you can even download ready-made pictures of various geometric shapes from the Internet.
Cube
Let's draw a cube. Take this picture as a base:
Repeat all the faces and sides of the geometric figure. Do not forget that the back wall of the cube is proportionally smaller than the front. Now let's pay attention to the shadow.
Imagine that the light source is in front. This will make the front of the cube lighter and the sides darker. Shade the sides. Highlight the lines of the front corner with a pencil, and leave the rest thin. It will collect all the attention of the observer.
To make the figure unique, you can slightly distort the proportions. So we end up with something like this.

Cylinder

Draw a plane on which your figure will be located. It should not be in the air, because the shadow should fall on something. Find on this plane the ideal location for the central axis of your cylinder. Draw a vertical line straight up from this point. Draw ellipses around both ends of this line. Connect the lower and upper ellipses with the same vertical lines. The sketch is almost ready. For convenience, you can add a couple auxiliary lines. For example, in front, such a line can mark the border of the shadow. Draw a shadow outline on the horizontal plane where your shape is located. The result should be something like this:

When we're done with the frame, it's time shade the main parts of our figure. Again, given that the light should be in the exact opposite direction from the shadow, we mark by eye where the highlight will be. It is also worth considering that the glare on the cylinder will not form a spot, but a vertical stripe. We hatch with a darker shade the area from the shadow line to the rear border of the cylinder. Lubricate the hatching border to make the transition smooth. We shade the very shadow of the figure. Leave the top of the cylinder light.

Draw a sphere
Let's try to depict one of the basic geometric shapes, on the basis of which more complex objects will be drawn in the future. This figure is a sphere. She draws even easier than the rest. You need to draw a circle. Further, from the edges of this circle, you need to draw a few more concentric circles inside this figure. These circles may not be perfectly regular, in fact, they may take the form of an ellipse.
They will serve us in order to properly hatch. Refer to the picture below.

Shade the circles as shown. Draw another ellipse on the main plane. Shade this ellipse too to create a shadow. The sphere is ready.
Exercise
Try using the sphere drawing skill to draw more complex compositions, such as a plum. Notice what changes happened to the shadow? What happened in the end?
Answer
Shadow and light have changed places. As a result, the berry acquired the illusion of transparency.

So, we found out that drawing geometric shapes is not such a difficult task.
Based on a basic knowledge of geometry and the skill of drawing such shapes, you can create more complex compositions with their help.
Drawing utensils
The next most difficult step in pencil drawing is drawing dishes. However, the main difficulty lies in correct placement shadows, both on the subject and around it.
Let's draw simple vase. It will be great if you find a suitable example that you can study in advance.
At the very beginning, we need to designate the parameters of the subject using straight lines. Draw a small horizontal line at the bottom of the sheet. This line will be the bottom of our vase. From the center of the horizontal line, perpendicular to it, draw a vertical line. This line will indicate the height of the object. Draw another horizontal line at the top of the vertical one. If something is not clear to you, refer to the figure below:

As we can see, we will need another horizontal line marking the narrow neck of the vase. Draw her. Next, you need to draw ellipses with centers coinciding with the intersection points of the vertical and horizontal lines. They are needed in order to give volume to the vase.
The next step is to draw the outline of the object. For example, it could be like this:

The final step will be the drawing of light and shadows. This is done in the same way as with geometric shapes. Simply, first you need to decide what underlies each part of the object, a sphere, a cylinder, a cone or a cube.
Try to ensure that the outline of your vase is symmetrical on both sides.

Draw a cup
First, according to the proven method, we need to draw a vertical and horizontal lines. This time, the base of the cup will be much smaller than its mouth, and not the same. Draw ellipses for the top and bottom.


Plants
Unlike geometric figures and dishes, drawing various plants is a more difficult task than it might seem at the beginning. For example, in contrast to relatively simple items, in the case of flowers, bushes, trees and much more, it is better to always have a living example in front of your eyes. It is very difficult to accurately imagine so many different details and correctly display them on paper. Either it could be finished image original. With the degree of detail in the drawing, it is important to resolve the issue at the very beginning. After all, it can be as simple as possible, or vice versa, contain a large number of details.
Drawings by degree of detail:

Let's start drawing.
Make an initial sketch of your composition. If this is not one flower, but several, depict them so that the stems are slightly curved, and the buds look in different sides. Do not make all the lines perfectly correct.

One of the most interesting things is that the initial sketch can consist of geometric shapes, albeit a little distorted. Take a closer look.
What do you see? The picture contains at least a circle, ovals, a cylinder, a distorted rhombus and cones. This tells us that sometimes, even complex images on initial stage, can be drawn using simple shapes.
Start drawing details. Draw the petals and add irregularities to the petals. Add leaves to the composition. Focus on the original.
A tulip flower usually has about 6-7 petals that partially overlap each other.


If you pay attention, then note that the thickness of the stems along the entire length is the same. The leaves are long, with a sharp end, curved. The leaves wrap around the stem. Also pay attention to attaching the stem to the bud. This is noticeable on a flower turned back.
The final step is to add light and shadow. With light strokes, make more shaded areas inside the flower, as well as on inside leaves. Places where the petals intersect can also be slightly shaded. This will give the petals a translucent effect. Draw the stamens. They can be emphasized with a darker color.

As seen from last lesson, creating a simple composition is not a problem if you know basic fundamentals drawing, from simple to complex.
Draw an oak
Trees are often integral part different complex pictures. For example, these can be landscapes where numerous trees echo images of animals, which will be discussed later.
Take hard pencil. It will be needed in order to very weakly draw a general sketch of the tree. We will, as always, go from the general to the details.
Draw a tree trunk. Since we are drawing an oak, it must be thick. Draw branches from the tree trunk.


Add some leaf clouds inside the crown. It is necessary to leave empty areas on purpose so that some branches are visible.

Thicken the branches where they are not covered by leaves.

Start applying basic shadows. Before doing this, think about which side the light will fall on and how parts can be further shaded.


Draw the leaves. Add details to them and distribute the shadows correctly. Highlight a few leaves throughout the crown. This is to add volume to the picture. Oak is ready!

In the final image, it is not necessary to draw every leaf. You can simply thicken the contours of the leaves.


