Scheme of how to draw a real owl. How to draw an owl step by step with a pencil
In this lesson we will look at how to draw an eagle owl with a pencil step by step. The eagle owl belongs to the owl family. This is the most great view of the owl family and reaches 50-65 cm in height in males and 60-75 cm in females. Wingspan - 160-190cm. Eagle owls can hunt crows, pigeons and other birds, and can also eat hares, mice, worms, etc. Unlike owls, they can also hunt during the day. Remember, the eagle owl is not the same bird, it is different types, which differ in mass, in appearance, by hunting and by type of food.
Sketch out the shape of the eagle owl, as well as the head and guidelines for the location of the eyes and the middle of the head. The head is turned slightly to the left, so the line of the middle of the head is not in the middle, but deviated.

Sketch out the ears, the head itself, and the area around the eyes.

The cross determines the tilt of the head and the location of the eyes. Draw all the necessary auxiliary lines, otherwise one eye will be higher than the other. The cross is a simple and reliable way to draw heads (any kind) correctly. We outline the location of the bird's eyes and beak.

We draw a sketch of an eagle owl, specifying what it will look like and where the legs are. We draw ears. We outline the mask in accordance with the cross. Correctly outline the general proportions. This is not as simple as it seems - looking ahead, let's open little secret— it seemed to us that the eagle owl’s body was short, and at much later stages we had to correct this. Look carefully at the proportions.
Important: when drawing on the plane of the table (if the paper is on your table), you see the drawing from a perspective. It’s better to take a board and glue the paper with tape, and hold the board in front of your eyes at an angle of 45 degrees. It is precisely to avoid distortion that artists paint on easels.

We outline the shadows, this will make it easier for us to decide where the eagle owl’s wings are and where the legs are.

You can carefully shade the shadows. Dark places will be where less light reaches. The bird's muzzle and head are the brightest and most contrasting.
Important: feathers on a bird grow in certain direction, so you also need to draw them correctly. You cannot draw feathers that stick out at an angle to the eagle owl’s body, it will look unnatural. So that you don't forget about feathers, we have drawn arrows showing that they grow from top to bottom.

Our eagle owl drawing begins to be more detailed - we have drawn the eagle owl's head and eyes. Of course, we will return to them later.

We continue to draw with a pencil. Here we can emphasize more soft pencil eyes and a dark outline around the eagle owl's mask.

Draw the feathers of an eagle owl. Look carefully: on the eagle owl’s belly the feathers are short, like down, and on the wings they are long and hard, they allow the bird to fly. And all the feathers are colorful. Drawing colorful feathers is not easy, but it is a calm and peaceful activity. Don't rush, otherwise it won't be pretty. And don’t get hung up on one place - look at the picture as a whole. Otherwise, the owl will seem to be drawn in parts that are not connected to each other. Draw holistically, in different places of the picture, collecting everything into a single composition.

The most important thing is that the feathers lie according to the shape of the body. This means that even white feathers where there is shadow will be dark. Therefore, when drawing feathers, try not to make the eagle owl flat. Use pencils of different softness for different shades.


Finished drawing of an eagle owl.
Drawing master class: “Owl”
Kitsan Angela Ilyinichna, teacher of the State Budgetary Educational Institution “Gymnasium 1551”, MoscowTarget: development of cognitive interest and creativity children.
Tasks:
- teach children to convey the image of a bird in a drawing; -expand your understanding of the world around you; -develop aesthetic perception; - to cultivate attention, hard work, perseverance.
Description: work can be done with older children preschool age and younger preschool age, if you do not draw the details. The material may be useful to teachers, parents, and anyone who loves creative work.
Materials: a simple pencil, gouache, a sheet of white A-4 paper for drawing, a thin and wide brush.

V. Sokolov He has one concern - Continuous hunting. He is the terror of mice and voles. This eagle owl is very dexterous. So the robber flew and sat down on a large pine tree. Feathers on end, crooked beak, twirling smart head. The eye is a diamond and the hearing is sharp, the tenacious claw is cunning itself. Intensifies his clear gaze, Entered the night watch.
Work progress:
1. In the center of the sheet, draw an oval with a simple pencil. Since the eagle owl is the only and central figure, we draw an oval large size. The body is ready.

2. Add the head to the body, a small oval.

3. Draw triangular “ears” on the head.

4. Smooth lines connect the head to the body.

5. Draw a pine branch.

6.Add the tail and paws.


7.Draw the eyes and beak.

8. Let's start with the background. To get blue, mix blue with white. Using the brushing method we try to make the background non-uniform.

9. We paint over the body and part of the head with ocher.

10. Paint the pine branch with brown paint.

11.Mix brown paint with white and paint the top of the head. Using dark brown we separate the head from the body and highlight the “ears”.

12. Finalizing the head. We draw the eyes, eyebrows, beak.

13.Mix white paint With the resulting color yellow, draw feathers on the body.

14.While the body is drying, draw the bark on the branch in a lighter tone.

15. Paint the eagle owl’s paws dark gray.

16. We emphasize the feathers with white, and with brown we show the direction of the feather.

17.White dots and brown showing the rounded shape of the fingers. Paint the claws black.

18.Light brown paint over the tail.

19.While the tail is drying, draw pine needles on a pine branch. Place brown needles on top of the green needles.

20.Draw four tail feathers with black paint.


21. Using a thin brush, outline the branch with black paint.

21.The drawing is completed! The owl is ready!
Lesson for children “how to draw an owl” consists of 6 simple steps step by step drawing pencil cartoon owl. Once you've completed all the steps, you should have this cute owl that you can paint in any colors you like!
How to draw an owl step by step
The instructions will show you how to draw an owl step by step and then color it, creating a unique picture. Even if you haven't held a pencil in your hands for many years, you can easily cope with this task and teach your child.
Print Download

- Owls have symbolized wisdom and tranquility since time ancient greek goddess Athens, according to legend, always carried her owl on her shoulder.
- Owls create strong families, without being separated all their lives, investing a lot of effort in raising their owlets. For example, it has been noticed that some individuals bring small snakes to the nest so that the owlets not only eat, but also feel struggle and competition from childhood.
- Owls have excellent hearing and developed communication. The famous hooting of an owl means protecting your territory from uninvited guests.
- Owls love to sit in the rain, taking their time to take shelter from bad weather.
The wisest bird in the world is the owl.
He hears everything
But she is very stingy with words.
The more he hears -
The less he talks.
Ah, this is what many of us miss.
Boris Zakhoder
This is the poem we’ll start with today in our drawing lesson. Today we will find out! – have already been. Now the bird is more serious! The peculiarities of the behavior and lifestyle of the owl have led to the fact that many different qualities are attributed to it. When they are true, and when they are not so true. But nevertheless, the owl is a symbolic bird. The image of this bird is characterized by a connection with mystery: intimate, frightening, gloomy and nocturnal. Perhaps because the owl is nocturnal, sees in the dark and flies silently. This bird can turn its head 180 degrees, has a very “penetrating” look, and is practically motionless during the day. The owl symbol means wisdom, erudition, thoughtfulness, prudence and is often the trademark of organizations associated with science and education. Let's start drawing.
Step one. Let's start with the head. Let's place it in the very center of the sheet. In the center of the head there are auxiliary lines in the form of a cross: the level of the eyes, mouth and nose.  Draw a torso to the head. Swinging to the sides, we draw the lines of the wings. The wings must be symmetrical. Together they are somewhat similar to . We will draw short curved lines on the wings, then they will turn into feathers. Below the bird we draw a fairly large arc - the outline of the tail. At the bottom of the body we outline the paws with claws. Step two. Let's draw the owl's claws in detail. Inside the contour we will show the body, which converges to the legs. At a horizontal level we outline the eyes. And then we draw feathers all over the owl’s body: along the line of the wings, along the tail. At the same time, the feathers do not have to be the same and their size can also be different. For especially large feathers, draw a center line.
  Step three. On the main area of the large open wings we draw small curved lines representing the plumage. In some places we will show them more densely, in others less often. Look carefully at the owl's belly and try to do the same. Let's put a mark in place of the beak.
  Step four. Very important detail– . We draw the pupils and circles around the eyes themselves. Let's show the pattern on the top of the head and along the body.
  Step five. An equally important stage of the lesson. In the picture we got a lot small parts. Now you need to carefully erase all the auxiliary lines.
  Well, the owl is ready. Can be painted. Try drawing some more.
The lesson will focus on how to draw an owl using simple pencils.
First, we need to make a sketch with exact proportions and outline it in general outline. Next, we will produce different sections of the bird.
The lesson can be divided into two parts:
The first part is placing the proportions of the owl on paper.
We will start by studying the structure of the feathers and wings of an owl, then we will make a sketch, observing all the proportions of the bird.
The second part is shading the drawing.
We'll use a variety of shading lines to define the feathers and make them look realistic, depending on the location.
Finally, we need to make the tree branch look realistic by recreating the structure of the tree.
To work we will need:
white drawing paper good quality, eraser and simple pencils, I recommend 2H, 2B, HB, 4B, and 6B.
This lesson is recommended for artists ages twelve to ninety-nine, with basic drawing skills.
Also suitable for homeschooling and fine arts teachers.
Placing the proportions of an owl on paper.
To understand the structure of feathers and wings, we need a basic knowledge of anatomy. The next two pictures show the structure of a feather.
Many years ago, the pen was used to write various texts in books. There were no ballpoint pens back then and people wrote with bird feathers.
The writer dipped the tip of the pen into ink, and the pen absorbed a small amount of this ink, since the pen barrel has a cavity. Later, scientists created a ballpoint pen using the same principle.
Feathers vary in size and structure depending on where on the bird's body they are located.
Here are the types of feathers we have:
Tiny, soft, and fluffy feathers are located on the head, chest and legs.
Short and soft feathers of medium size, with narrow tips on the upper parts of the wing.
In the lower area of the wings, the feathers are elongated and wide, relative to the feathers of the upper area.
In the picture below, we can see the structure of a bird's wing. It shows very well where which feathers are located.

Drawing a sketch with precise proportions is the foundation of a drawing. If there are inaccuracies in proportions (the relationship of one component of the drawing to another or others), then no amount of shading can hide these imperfections.
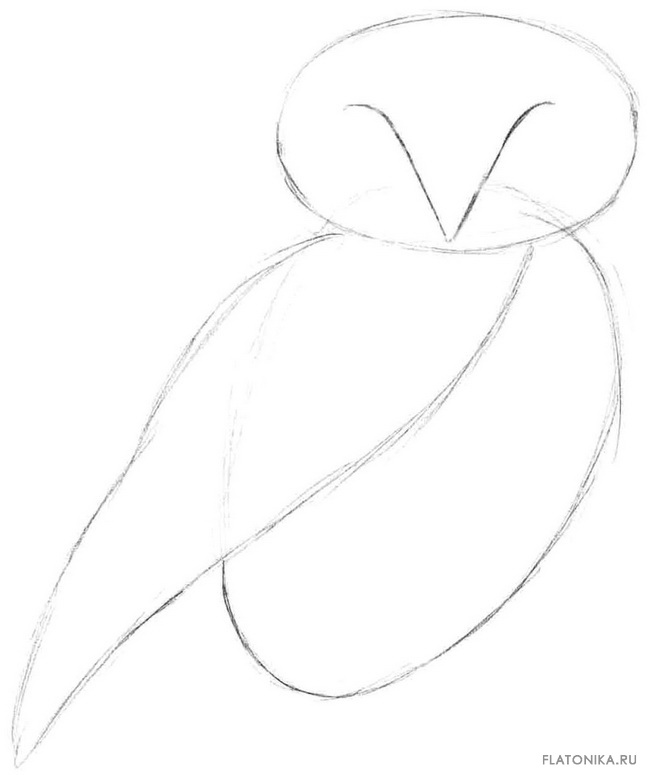
Using light movements, without pressure, draw an oval with a slight slope (as in the picture). This is how we designate the body of the owl. With this action we solve the riddle of civilization - what came first - the bird or the egg :)

When sketching, make sure that you position the drawn oval proportionally on a piece of paper. To further accommodate the entire bird.
The second oval will be the owl's head, we put it on the body of the bird.

From the base of the head, draw a wing in the lower left corner.

On the muzzle we draw a V-shape with curved lines at the tops on both sides. The tip of the tip will be the owl's beak, the rounded lines will indicate the location of the eyes.
 Add a small touch to the owlet's beak as shown.
Let's sketch a few feathers under the wing.
Add two ovals to the base of the body, thereby indicating the owl's legs. Notice that the leg on the left appears larger than the leg on the right. But if you look at the owl from the front, the legs will be the same. This happens because of.

Outline the owl's eyes. Notice that the eyes are halves of circles.
Add a piece of a tree branch for the owl to sit on.

Double-check the position and proportions of your sketch before you begin shading.
Shading the drawing.
In this part of the lesson we will be shading the drawing. Before shading the drawing, study where the feathers are and look at the direction of their growth.
The light source, in this figure, is located at the top right, so right side it will be lighter.
Using an eraser, remove any very visible sketch lines.

To show off the small, soft feathers on the head, we'll use curved hatching lines.
Draw a few, slightly curved, strokes on chest birds. On the wing we draw feathers of various sizes.
Notice that the feathers are shorter at the top of the wing than at the end of the wing. Add curved strokes to the legs to show the presence of fluffy feathers.

We must not forget that to draw feathers we use different hatching lines, both in length and tone. The edges are not sharp, but rather jagged, which gives a realistic look.
Also remember that the light comes from the right, so the feathers on the left are darker.

Add shading to the outer frames of the eyes using a 2B pencil.

Work on the eyes and leave a small spot of light on the right eye.

Take a 6B pencil to apply dark tones to the eyes. Shading the beak.
Finish the shading on the beak, leaving an elongated light stripe (reflected light).

To make it easier to do shading on the head, sharpen your pencils. You can add more lines with a sharp pencil.
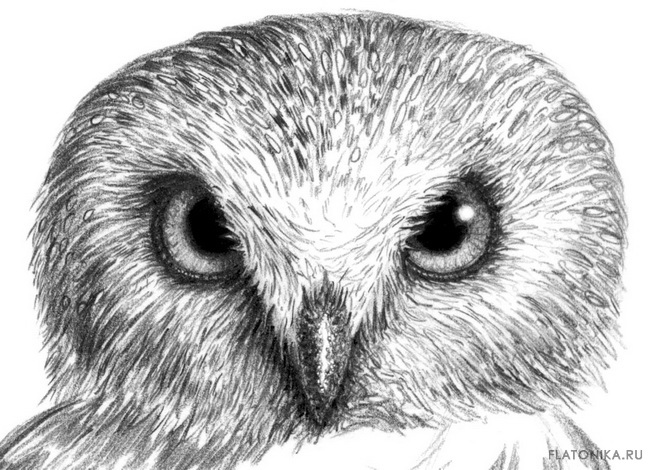
Use a 4B pencil to work on the darker areas. Use it to shade areas such as the upper eye area and the area under the bird's beak.
Add a few tiny oval feathers on the head as shown in the image.

To draw the soft fluffy feathers on the owl's legs and chest, you must have well-sharpened pencils and use short hatching lines.

We shade the feathers on the owl's tail, as in the bottom picture. Closer to the tail, you can work out the structure of the feathers in more detail.

We shade the feathers on the upper part of the wing.
Notice how the shading is lighter on the right and fades to darker on the left.
Also take into account that the shadow of the head falls on the body, thereby creating a darker background.

Use pencils of different hardnesses and different lengths of lines to reproduce the structure of the feathers on the upper section of the wing.
Please note that some areas are shaded in a light tone, this is to create the illusion of lightness of the feathers.


Let's add the finishing touches - work on the feathers and a small piece of branch in more detail.

Congratulations, yours owl drawing ready!
Please sign and complete the work!


