Drawing on the theme "Space" in the senior and preparatory groups: interpretations and features of the classes. Space adventures: drawing space in different techniques Drawings on the theme of astronautics
Congratulations to all on the greatest event in history! This morning, August 6, 2012 reached its goal and landed in the region of the Martian crater Gale - the Mars rover Curiosity!
Introduction: Where are we from and why are we the way we are? People never stop evolving. Human possibilities are getting better and better every day. Although the duration of our life is short, but with the help of modern technology, kids absorb new knowledge so quickly that it seems that a modern kid is a real scientist compared to people who lived two hundred years ago. Don't believe? I'll prove. At the moment, you, my dear readers, are near your monitor and, surfing the net, are looking for pencil drawing lessons, it is so? But in order to get them, you use a lot of knowledge and skills that were previously inaccessible to a simple person, for example:
- Fast typing on the keyboard
- Use of search engines
- Use of key combinations, sets of codes, ciphers
- Even for a simple VKontakte registration, knowledge of a certain algorithm will be required.
Are you still unsure? But today, at this particular moment, you have much more knowledge than advanced programmers 30 years ago! And you try to explain to your grandfather, who never used a computer, that it is possible to see Paris from a bird's eye view without leaving your home on Google Maps, or even cooler to take a virtual walk through the streets of the city. And this opportunity has become a common thing for us for a long time! I will return to my question. Who are we? Why can't kote know how to type on the keyboard, even though he lives with us? We are different. Maybe not even from this planet, not from this galaxy. Unsuccessful attempts to find out here on Earth no longer leave hope. Therefore, the most brainy people from our planet are trying so hard to explore the expanses of space. I'm sure the answer is there. Let's just wish them luck! Let's get back to drawing.
How to draw space with a pencil step by step
Step one. We draw a round shape for the planet and the outlines of the landscape.  Step two. Let's correct the contours of the planet and its satellite. In the foreground we draw two little men, these are astronauts sent to the moon.
  Step three. Let's add strokes.
  Step four. Let's draw a starry sky. Or, to be more precise, it is open space. In the middle of the lunar landscape we will draw several craters.
  Step five. And it remains to add some shadows. As a result, we got such a picture of space:
  I hope scientists will still be able to find life on this planet. And in the near future, we will fly to Mars not as scientific expeditions, but as if it were a vacation ticket, like Korben Dallas in the movie The Fifth Element. See the continuation of this lesson.
Drawing space with children: two step-by-step master classes on unusual techniques for drawing space with children.

Drawing space with children
Master class 1: draw space with children balloons
Today in this article you will learn a very interesting and unusual technique of painting with gouache balls. Yes Yes! Instead of a brush, the children and I will draw with balls! This technique allows you to get a very unusual space background on a piece of paper and is accessible even to the smallest children.
Children's age: from junior preschool and older.
Materials and tools
To work you need:
- landscape paper, but watercolor is better,
- a lid with sides from a cardboard box or a plastic disposable rectangular plate,
- colored paper
- glue stick.
- glass balls.
Where can I get glass marbles for drawing? Glass marbles can be bought in children's stores, art stores and florists (they are usually called "marbles", "marbles mix" and other similar names). Such balls are used for children's games and in floristry to decorate transparent vases, decor, compositions. You can use them as beads, plastic balls from children's sets. In the old days, glass balls were used from dispensers on a bottle of vodka (if you have one at home in several copies and it is possible to get balls from it).
Step 1
- Pick up the lid from the box (I took rectangular plastic plates).
- Cut a sheet of paper to the size of the plate.

Step 2
- Insert paper into a plate.
- Drop on paper a blot of pink paint diluted like sour cream
- Put in some glass beads.

Step 3
- Tilt the plate up and down, left and right so that the balls roll over the paint spot and spread the paint all over the sheet. At the same time, make sure that the slopes of the plates are not sharp, but smooth. The child needs to slowly change the tilt of the plate so that the balls do not fly out of the plate. This develops sensorimotor coordination.

Step 4
- Add a blot of blue paint to the sheet.
- Continue to roll the balls, getting blue lines.

Step 5
Add a black blot and continue to roll the balls until your space sky is ready.

Step 6. We depict a rocket.
In the previous steps, we drew the space background with the child. And now against this background we will make a rocket. It can be drawn (if you are drawing space with older preschool children) or done using the appliqué technique (if you are drawing space with younger preschool children).
How can you make a rocket or a spaceship using the appliqué technique against the background of space:
- Take the paper out of the plate
- Cut out a rocket from colored paper, stick it on a blank with a space sky
- Cut out the wings of the rocket, the fiery tail, stick it next to the rocket.
- Cut out circles, stick windows on the rocket
The picture of space is ready!
Here's what happened to the children - their work is shown in the photo below.
Nastya (4 years old) depicted a spaceship approaching the planet against the background of space.

In the picture of Lesha (6 years old), a rocket is depicted against the background of space.

And this is a drawing of baby Felix (3.5 years old). He himself painted the background of space with balloons and, with the help of an adult, cut out the finished parts of the rocket and pasted them onto the background.

Creative task:
- Think about what round objects can be used instead of balls to draw space?
- Create your own pattern of the cosmic sky.
- Dream up and compose your plot composition "Space expanses"
Master class author: Vera Parfentyeva, technology teacher, leader of the children's art circle, reader of the site "Rodnaya Path" and participant of our Internet Workshop of educational games "Through the game - to success!". In the article, Vera shared photos of her little students' drawings.
Master class 2. Draw space with children using the scraping technique
Age of children: senior preschool and junior school.
Scratching is a technique for scratching an image into a background. The word "grattage" comes from the French gratter - "scrape, scratch."
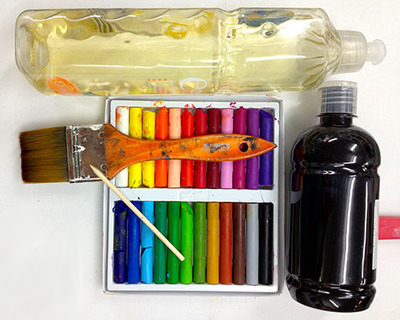
To draw space using the scraping technique, you will need very simple items:
- a thick sheet of white cardboard for the background,
- black gouache or black ink,
- colored wax crayons (if you want to get color images of contours),
- brush,
- dishwashing liquid,
- a toothpick for scratching.
Preparatory stage.
First, we draw a sketch with a pencil on a landscape sheet of paper, outlining where we will draw what. And then we prepare the sheet and scratch the images on it. How to do it:
Step 1. Prepare the background for drawing
- We take a sheet of white cardboard and paint it with colored wax crayons as you like. The entire sheet should be covered with colored multi-colored spots. Little kids will be happy to help you and paint from the heart!
If you do not have wax crayons, then color the sheet with ordinary colored pencils and then rub it with a paraffin candle so that the paraffin covers the entire sheet of paper.
- Mix 3 parts of ink or black gouache with 1 part of dishwashing liquid. We get black paint. We completely cover our sheet of cardboard with this paint. Let's dry.
Step 2. We draw on the background of the image of space: planets, stars, comets, rockets.
On the finished sheet with a toothpick or a sharp skewer, we scratch our drawing on the theme of space. It turns out very beautiful work!
Helpful Hints:
— You can use ready-made plastic stencils to trace drawings on the outline on the theme "Space". Even children of middle preschool age can draw on them. Older preschoolers and schoolchildren can scratch the drawing themselves, without a stencil.
- If you do not want to get a colored background and colored lines of scratched contours, but want to get white contours on a black space background, then use white cardboard. Rub it with a paraffin candle so that the entire leaf is completely covered with a slightly whitish coating. Next, completely paint over this sheet with black ink diluted with liquid soap. And you will get a background for scratching, which will give a black and white picture of space in the finished work.
Master class 3. We draw space with watercolors with ... salt!
You will learn how to draw space with watercolors from the video of the "Risovand IA" channel
Good luck with your creativity! We will be glad if you share the results of your creativity!
Get NEW FREE AUDIO COURSE WITH GAME APP
"Speech development from 0 to 7 years: what is important to know and what to do. Cheat sheet for parents"
Click on or on the course cover below for free subscription
Summary: Children's drawings on the theme of space. How to draw a picture for Cosmonautics Day.
On the eve of Cosmonautics Day, it will be relevant to talk about children's drawings on the theme of space. In this article we want to tell you how to draw space using non-traditional drawing techniques. Here we will consider drawings on the theme of space, made in the techniques of scratching, passe-partout, "spray". You will also learn how to draw an unusual drawing for Cosmonautics Day using shaving foam or bubble wrap. The techniques for drawing the cosmos described in the article are easy to perform and are available, including to children of preschool and primary school age.
1. Drawings on the theme of space in the technique of scratching
The word "grattage" comes from the French gratter - scrape, scratch, so another name for the technique is the scratching technique.
To draw a drawing on the theme of space using the scraping technique, you will need:
Heavyweight white paper (or cardboard)
- colored wax crayons
- black gouache paint or ink
- dishwashing liquid
- brush
- any sharp object (wooden skewer, toothpick, knitting needle, etc.)
Work plan:
1. Color the paper with freestyle colored wax crayons. Do not spare the crayons, they should cover the paper with a thick layer. Note: even a small child can handle this part of the work.

2. Mix 3 parts black gouache paint (ink) and 1 part dishwashing liquid. Spread the mixture evenly over the paper.

3. Let the paint dry completely. You can speed up this process with a hair dryer. And now the most interesting! Take any sharp object and scratch your drawing on the theme of space with it. The result will be an original work for the Day of Cosmonautics, made in an unconventional drawing technique, scratching

2. How to draw space. Drawing in the technique of "passe-partout"
This is a very unusual and fascinating drawing technique. First, as in the previous technique, you need to color a sheet of paper with colored wax crayons. As a result, you will get a bright, colored rug. After that, draw patterns of planets, flying saucers, space rockets, stars, etc. on cardboard. Cut out templates. On a thick sheet of black paper, lay out the cut out patterns in the form of a composition. Circle them with a pencil, then cut out the silhouettes with nail scissors. Note: This step must be performed by an adult. Now put a black sheet of paper with cut out silhouettes on the "rug" painted with crayons. Drawing space in the technique of "passe-partout" is ready. Link to original source.

3. Children's drawings on the theme of space. Painting with shaving foam
For children in creativity, the process itself is more important than the result. We, adults, are interested in the final product of our activity. Today we want to offer you a kind of coloring game that will satisfy the needs of both children and adults. The site games-for-kids.ru describes an interesting way to create a so-called. "marble paper" using regular shaving foam and paints (or food coloring). Using the detailed instructions for making "marble paper" described on this site, you can make beautiful drawings on the theme of space for Cosmonautics Day.

4. Drawings for the day of cosmonautics. Draw space to music
In 1914-1916 the English composer Gustav Holst composed the symphonic suite The Planets. The suite consists of 7 parts - according to the number of planets in the solar system (excluding Earth) known at the time of writing. We invite you to conduct the following interesting lesson with your child on the theme of space, on the eve of Cosmonautics Day.
Give your child a large sheet of paper and paint. Ask him to divide the sheet into four equal parts with a simple pencil. Now let him listen in turn to any 4 parts of the suite (for example, Mars, Venus, Jupiter, Uranus). Listening to each part of a piece of music, he must depict on canvas the emotions and feelings that this music evokes in him. Children usually like this kind of work very much. Here is what one of our students drew.

From the resulting abstract paintings, then it will be possible to cut out the planets and stick them on a sheet of black paper. The drawing for Cosmonautics Day is ready!


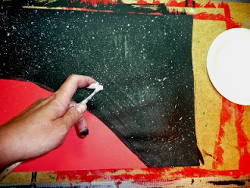
5. Drawings on the theme of space. Drawing space with a toothbrush
We suggest you make a drawing on the theme of space in the so-called. spray technique. Using a toothbrush, splatter white paint on a sheet of black paper. You will have a starry sky. Planets can be drawn with a sponge, smearing paints of different colors with it. Look what a beautiful drawing on the theme of space we got!


6. Children's drawings on the theme of space. Non-traditional drawing techniques
If suddenly you have a piece of bubble wrap lying around at your house, now is the time to use it for children's creativity. After all, with the help of this wonderful material, you can very simply paint the planet. It is only necessary to apply paint to the film and attach it to the drawing in the right place.

The planet in the figure below is also made in this non-traditional drawing technique. Additional prints were made using a cardboard toilet paper roll and a plastic straw. Also, when drawing this drawing on the theme of space, the so-called. spray technique.


7. Drawings space. Drawings for Cosmonautics Day
An interesting project for children on Cosmonautics Day was prepared by MrBrintables.com. On this site you can download and print a drawing of the moon. The moon is presented in three sizes: large (22 sheets), medium (6 sheets) and small size (1 sheet). Print the drawing, stick the sheets on the wall in the correct sequence.
Now invite your child to dream up who lives on the moon. Let him draw its inhabitants, their houses, transport, etc.

8. Drawings on the theme of space. Children's drawings on the theme of space
These charming aliens are drawn using such an unconventional drawing technique as blowing paint through a straw (plastic tube). What is this technique?

We apply paint diluted with water with a brush (or pipette) on a sheet of paper so that a stain of paint is obtained on the sheet. After that, we blow on the paint through a straw, it spreads in different directions and we get a spot of a bizarre shape. When the paint dries, we finish our alien with all the necessary details.
Oksana Podolsky
And we continue to work on the topic " Space": we introduce children to the planets of the solar system, their name, features, location, about the stars, their differences from the planets, the idea of the sun, which gives life on earth. To give children knowledge about human development outer space, about the meaning space research for human life on Earth. This time with the children of the older group they mastered non-traditional technique of painting with salt and gouache. Having carefully studied and examined with the children encyclopedias, posters on this topic, we set to work. Children on black cardboard paper painted contour of the sun and planets of the solar system. Next, PVA glue was applied to them, and large edible salt was poured onto the glue. They shook off the excess salt and started painting over the sun and planets. The children tried to accurately mark the colors of the planets. In this lesson, we develop the artistic and creative abilities of children, fine motor skills of hands, interest in artistic creativity, and bring up accuracy in work.


Related publications:
"Russian space". Project in the middle group dedicated to the 55th anniversary of Gagarin's flight into space Project type: Pedagogical Type: information-creative, playful, short-term Educational field: cognition Project participants: educators.
I want to tell you how the children and I drew the sun. The work uses an unconventional drawing technique - drawing with palms.
Synopsis of a comprehensive lesson for the middle group “Drawing by design. Drawing your favorite toy» Synopsis of a comprehensive lesson for the middle group "Drawing a favorite toy" (drawing by design) Objectives: to introduce children to the names.
At the drawing circle, the children and I continue to get acquainted with non-traditional ways of drawing. It is very interesting for kids, they create.
Experience shows that playing with layouts is in demand by children and contributes to their development. In the process of such games, creative initiative develops.
Objectives: development of children's creative abilities, identification of the creative individual potential of each child, his abilities.
Passport of the Cosmos project Cosmonautics Day. On April 12, the whole world celebrates Aviation and Cosmonautics Day. It's a special day - on this day.
This technique involves creating a pattern by leaving prints with various objects. For this purpose, a piece of napkin is suitable.
"Each atom of our body
was once a star.
Vincent Freeman
A week ago on our creative instagram @miftvorchestvo we launched a competition for the best assignment from the notebook "642 ideas of what to draw" . The task sounded simple - space. Many creative and creative works were published for the competition. You can see them all by the tag. We publish the best works and give a step-by-step master class on how to learn how to draw space.
The best works for the contest #642 ideascosmos

"If you can't fly into space, make it fly to you." Photo by @al.ex_kv.


“And when darkness sleeps beside you, And the morning is far away, I wanna hold your hand and guide you…” Parov Stelar ft. Lilja Bloom - Shine. Photo by @julia_owlie.

Are they really cool? 🙂

Step by step master class
If you did not participate in the competition, but also want to learn how to draw space, save yourself somewhere these step-by-step instructions on what and how to do to make it bright and beautiful.
1. In order to draw the Universe, only 3-4 colors are enough. At least that's how much you can start with. Important: watercolor sheet should be very dense so that it does not wrinkle from water and so that the paint spreads nicely and evenly.

2. The outline can be drawn with a hard pencil to indicate the area that you will wet with water. Wet some of the allocated space.

3. Apply paint to wetted area. Try to keep the outlines nice.

4. Wet the rest of the space with water and paint a different color. Selectively make bright inclusions throughout the pattern. The drawing must be wet so that the paint spreads beautifully.


5. After the drawing is completely dry, apply the stars. This can be done with white or yellow paint using an old toothbrush.


6. Some stars can be drawn more carefully.

Photo for the master class from kitty-ink.tumblr.com.
If you sprinkle salt on a wet drawing, then the structure of the cosmos will turn out to be even more interesting. Salt will absorb some of the paint, and shaking it off after it dries completely, in place of the salt there will be beautiful white dots and clouds.
On our creative Instagram @miftvorchestvo we will regularly hold competitions for notebooks "642 ideas what to draw", "642 ideas what to write about" and "642 ideas what else to write about" (new!). Subscribe to be aware of everything creatively interesting and creatively fun.
P.S. Did you like it? Subscribe to our new newsletter. Once every two weeks, we will send 10 of the most interesting and useful materials from the MIF blog.


