Paintings with flowers with your own hands. DIY paintings: painting with paints
Do you have a blank wall in your home with nothing to hang on? Do scarlet pillows on the sofa look lonely and require another bright accent? Just take a canvas and paint a picture that suits you!
We live in an era of triumphant abstract art, when about every second gallery work one would like to say that even a child could draw it. So why not put aside your fears and forget about realistic art for a while and create your own small masterpiece? Drawing is fun, and it’s simply impossible to draw an abstract painting poorly or incorrectly! All you need is a canvas, paints, courage, a few hours of free time and perhaps a nice group of collaborators to create a unique work of art, perfect for your interior. This is much more interesting than just buying a poster from IKEA! If you agree with us, we offer you a selection the best technicians and master classes for creating your own painting.
Gold and concrete
The most favorite color of everyone who undertakes to make a stylish painting with their own hands is gold. You just need to add a little leaf foil or just paint to any background, even a plain one. Gold looks good and not too provocative with an uneven gray concrete color.
Photo: JenniferFlanniganart / etsy.com
Sound waves
Horizontal jagged lines always resemble some kind of graphs or visualization sound waves, in general, something important, and therefore interesting to look at. To dilute the boring monochrome of the image, you can, like the author of this master class, add a little (or a lot!) of gold.

Geology
Have you noticed how beautiful the cuts of stones are? This is a drawing with a story, a story about changes in climate, relief, and wildlife. You can create your own beautiful specimen of the rock: simply take a vertical canvas and apply horizontal stripes of different widths and different colors to it. Invite the children to draw with you - let them come up with the story of a fictional world in which such a beautiful cut could appear.

Photo: BrennaGiessen / etsy.com
Peas
Polka dots are a magical pattern: you can paint them on anything and it will turn out beautiful. You don't even have to have a brush on hand - just make a stamp from a wine cork or the bottom of a glass. If you use thicker paint (as in this case), the pattern of the prints will resemble a coral pattern!

Colored peas
If you want something more complex, then make a print with a colored pattern. In this master class, in order for the peas to be even, they are cut out with a special hole punch and then pasted onto canvas.

Blot
One way to create abstract drawing- distance yourself from work as much as possible and let the paint do everything for you. For example, pour a large blot and then tilt the canvas so that the paint flows picturesquely down it. You can make such a picture together with your child; you don’t even need a brush for this.

Photo: CelineZiangArt / etsy.com
Stencil
Tested: any abstract spots look cooler if their edges are very smooth. This contrast effect can be achieved by painting through a stencil, or pre-reserving part of the canvas using masking tape, or applying white borders using a stencil later, as in this master class.

Scribble
Make squiggles of any color on any color canvas, inspired by famous works, or relying only on your own inspiration - there are no boundaries or laws here, doodle art is a very democratic direction! You can, like blogger Michelle, create many layers, achieving a complex texture, or you can paint with pure color on white. The main thing is to relax your hand and not forget that this is pampering, and a bad option can always be painted over.

Color samples
Pictures with careless horizontal lines look as if they were a sample of colors from the desk of a Pantone Institute employee or a palette from a fashionable makeup artist. The secret to success here, as blogger Julia demonstrates, is to leave plenty of white space and apply the paint in one motion. Colors can be any.

Ombre
Gradient, or ombre, is a very simple and very beautiful effect. To repeat it, you don’t even need a master class. Two paints - main and white, a brush or roller, five minutes of time spent, and the picture is ready. An excellent solution if your bright apartment has a bright accessory that requires color support.

Vanguard
There is nothing easier than making a print in an avant-garde style. Draw straight lines using tape, like in this tutorial, and use bright paint straight from the can. My only advice is to take the time to make a few sketches in advance.

Stamps
The most budget paintings They don’t even require the purchase of brushes: just take the first item that comes to hand and use it as a stamp. You will be surprised what stylish thing you can draw using an ordinary glass!

Impressionism
And the last painting idea for today is an impressionist canvas painted with large strokes. Artist Ashley Sturgill shows how to write a bright picture with gold accent.

Get inspired and experiment, and we will help you with this!
Decor completes the design of the home, but perhaps the most exciting and creative stage begins with it. In modern interior solutions, it has become fashionable to replace purchased elements with ones created with one’s own hands. The handmade technique is becoming incredibly popular. They not only make things for themselves, but also give them as gifts to loved ones, and especially talented craftsmen even sell their work. If open shelves can be filled with souvenirs brought from travel and cute little things (vases, figurines), then decorating the walls is sometimes confusing. Usually a layer of putty is applied to their surface, and then plaster or wallpaper. However, “solid” walls, even with beautiful coverings, still seem “bare” and create a feeling of incompleteness.
Do-it-yourself interior paintings will become an unusual decoration. They will transform your home environment and add a creative touch to your room decor. The most famous and complex painting technique that first comes to mind is painting. The art of painting images with paints is not for everyone, but there are a number of other options, one of which talent can awaken completely unexpectedly. Original pictures can be made from scrap materials: fabric, cereals, flowers, twigs, leather, beads, paper, accessories, threads. There are a lot of techniques for creating genuine masterpieces, and creative process so captivating that it will suck you into a whirlpool.
Where to start and where to look for inspiration
Are you excited about the idea of creating a painting? with my own hands, but you are completely lost and don’t know which end to untie this knot. Try going into the room where the canvas is supposed to be placed. The very furnishings of the room, its decoration should inspire the necessary thoughts or at least set the vector. Choose a wall where you will hang the picture. Rate color scheme, textures of materials, play of light. Close your eyes and try to draw a sketch in your imagination. If you stood like a pillar in the middle of the room, but still couldn’t come up with anything, then it’s time to turn to the works of other authors for help. Other people's art objects sometimes become a treasure trove of interesting ideas.
Study the technique, determine the level of difficulty of the work you like, select necessary materials. But, perhaps, the most important thing is to correctly assess your capabilities and talents as a decorator. If your level is below average, close to beginner, then it is better to test your pen on simple options. Desire alone is not enough; the complete package also includes talent and skill. If the latter comes over time after persistent practical training, then the lack of a gift cannot be completely compensated for by diligence. The muse, as you know, is a lady with character and does not come at the first call. The sacrament of her call does not require special rituals. Each person has his own sources of inspiration, but most of us draw it from nature: its smells, sounds and sights. Be it a tree, a flower bouquet, bird trills, the aromas of freshly cut grass, the play of sun rays on the glass or the tendrils of fog in the morning field. This source of inspiration is endless. You can fall to him constantly.


Ways to create a painting
There are a lot of methods for creating paintings. Every year new ones appear original techniques. Among the popular methods are:
- Silhouette paintings;
- Mosaic technique made from glass or eggshells;
- Volumetric compositions;
- Pictures made of beads, cabochons, shibori ribbons, crystals, sequins;
- Foam images;
- Illuminated decor;
- Images made from scraps of fabric, ribbons and accessories;
- Threads and cloves as a base;
- Compositions of grains, cereals and legumes;
- Eco-friendly products made from natural materials;
- Herbariums on paper;
- Embroidery.

This is a list of only popular methods, and the entire list of their names would not fit on several pages. Any material can be used in different ways, and each result will be completely different from the finished composition created using another technique. For most projects, you only need scissors, a utility knife, needles and glue. Basic set tools can be found in every home.


Light paintings look spectacular at night; they also serve as decorative lamps. Prepare a template with a picture. Each element is cut out separately and its contours are transferred to a sheet of plastic. It is not recommended to use completely transparent material, but a thick MDF sheet will not work either. Find an average option that will transmit light. The painting must have several levels for a three-dimensional effect, so the composition of plastic parts is split into layers. Styrofoam ribbons are laid between them. All layers are glued to each other and to the base. After drying, it is inserted into a frame. On the reverse side, a special groove is cut out for the wire. Then RGB tape is stretched around the perimeter. The groove is necessary for the controller output. The picture is ready; to appreciate its beauty, just turn off the light and press a couple of buttons on the control panel.


About twenty years ago these works became a new word in art. You will need wooden base, small nails, hammer and thread. First, of course, you need to apply a sketch to the canvas. Then nails are hammered along its contour. The distance between them usually does not exceed 0.5 cm. The closer the carnations are to each other, the fewer “voids” are formed in the picture. It is advisable to start with simple forms to get the hang of it. Then they take the first thread, carefully fasten it and begin to wrap each nail. Individual modules are made in different colors. Another technique uses thick woolen threads. They begin to glue them onto the base with the applied pattern. The end of the thread is attached to the center of the element and they begin to wrap it around it, forming concentric circles. The finished canvases are soft, voluminous and pleasant to the touch.


Stylish silhouette paintings
Perhaps this best option for those who can only draw flowers on the back pages of notebooks. Silhouette paintings are universal and look like classic styles, and to modern ones. They are made from paper, using paints or a marker. To make such an element, it is enough to prepare the source code. The sample is transferred to the canvas independently or duplicated from a template, and then painted over. In order to get a silhouette for the source from an ordinary portrait, you need to adjust the contrast settings in any simple Photoshop program.


To create eco-paintings, any natural materials are used: pieces of wood, twigs, stones, blades of grass, leaves, moss. The components are glued onto a thick base and placed in a frame. Triptychs consisting of several modules look unusual and beautiful. For example, the decor is based on three colors: gray, black and purple. Take dry branches and divide each one crosswise into three parts. The lowest “bun” is tightly fastened with thread. It is painted purple, glued to a black canvas and surrounded by a gray frame. The next module will be a little smaller. Inside the purple frame there is a second part of black branches on a gray canvas, which serves as a continuation of the previous composition. The last module consists of “tops”. The twigs are painted gray and placed in a black frame on canvas. purple. The triptych is placed vertically with an offset to one side. It is not recommended to cover such a composition with glass, as its relief looks natural and organic. Peculiar paintings Moss can be used to decorate a bedroom or living room. An art object will bring harmony to the room and make it more peaceful.


Working with paper is represented by many techniques. IN recent years Quilling experienced a real boom: creating images using ribbons twisted in a special way. The finished product turns out to be voluminous, and skilled craftsmen can recreate huge canvases with precision in small details. You can also make a relief coating from papier-mâché (soaked paper pulp). The canvas is painted on top and placed in a frame. The material is used to create individual elements using the origami technique, which are then glued to the base. Modular paintings made from small pieces of paper folded into voluminous triangles or squares using the same technique look great.


For products of this type, perhaps the shortest master class. All you need for the job is a base, cereals (you don’t have to limit yourself to legumes) and glue. A sketch of the drawing is applied to the canvas. Then its individual parts are coated with glue, and loose decor is placed on top of it. You can use not only chickpeas or peas, but also pasta, rice, buckwheat, coffee beans and even salt.


Foam sheets are made using two popular techniques. Both types use foam plastic exclusively as a base, for decoration which requires fabric. The first method will allow you to create abstractions that, with complex geometry, will emphasize the features of the interior. Solid pieces of fabric with various patterns are placed on a specially shaped polystyrene foam (usually square). The canvas is cut along the edges, which are wrapped to the back side of the base and secured to it (paper clips or glue). Such paintings do not need frames. Compositions of several canvases are usually displayed on the wall. Another technique, kinusaiga, will require more patience. A drawing is applied with a pencil onto the foam base. Start with simple ones geometric patterns. Then they draw along the contour with a stationery knife. Fabric scraps slightly larger in size than the element itself are placed on it. Their edges are pressed into the cuts with a thin, flat tool (metal ruler, nail file) so that there are no folds on the surface. After the simple picture is ready, you can try more complex images with “ragged” features.
Important to know. The Kinusaiga technique, as the name implies, originated in Japan. Usually, in this way, fabrics from old kimonos, which are not usually thrown away, were reused.


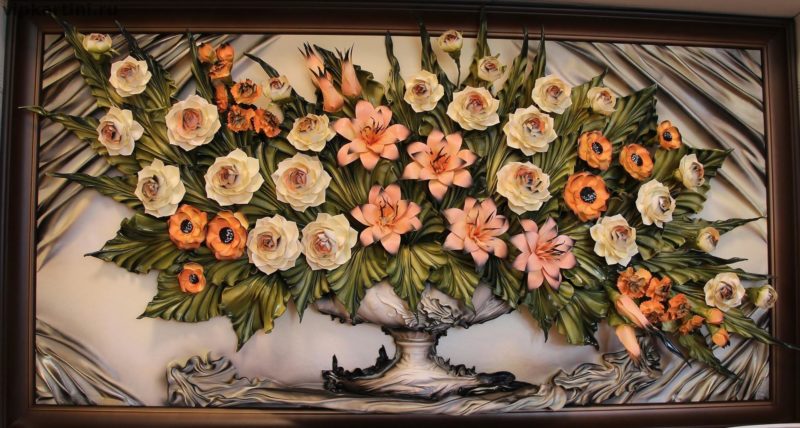
To create three-dimensional canvases, any materials with a relief are used. However, paintings made from silk ribbons, leather and foamiran look more elegant. The better the element holds its shape, the easier it is to create a composition. Leather can make very neat pictures. Individual pieces of fabric are simply glued to the base, while maintaining folds for volume. Luxurious bouquets are created from silk ribbons. The advantage of the material is its pliability: it is enough to secure the fabric in a certain position with threads, and it will preserve it. Some achieve volume by duplicating parts. Products are usually made from paper. Cut out two identical elements. Several foam “legs” are attached to the front side of one. They are glued to the underside of a second similar part. The result is a volume effect. This technique looks original in flat paintings, where individual areas become accentuated.


Almost everyone at one time or another collected maple leaves in autumn parks and dried especially beautiful flowers between the pages of books. Many people forgot about the “stash,” and years later the find, when accidentally discovered, reminded of the times of carefree youth. Flowers and leaves for the herbarium must be dried before the harvesting process. They are placed between layers of rice paper or napkins. The material perfectly absorbs excess moisture. Then the components of the future herbarium, surrounded by several layers of cardboard, are placed under a press. About a week will be enough for high-quality drying and leveling.

Flowers and leaves are attached to the base with decoupage glue. The composition depends only on the imagination of the creator. These can be bouquets of wild flowers, decorated with silk ribbons or abstract paintings. To keep the canvas longer, it is coated with a layer of varnish or epoxy resin. Decorative canvases with sakura flowers on branches painted in gouache look impressive. A similar painting can be used to decorate interiors decorated in Japanese style or minimalism.

Painting with beads and crystals
You won’t surprise anyone with products made of beads and glass beads. Jewelry made from them became popular thirty years ago. For work, it is better to purchase high-quality materials of the same size, which will help make a neat picture. The best are considered to be Yakut beads and Japanese tono. To create accent elements, it is recommended to use cabochons of appropriate colors. Semi-precious and precious stones are polished in a special way. As a result, they are convex, but with a flat base. Beaded pictures are embroidered. Instead of thread, it is better to use thin fishing line: it is stronger and more reliable. Crystal paintings are sold in sets. The standard kit includes crystals in individual bags with numbers, two types of tweezers, a tray for small parts, a special adhesive block into which a stick is dipped to press the “diamonds” to the canvas, and a canvas with an image printed on it. Each package contains instructions. The canvas is pre-coated with a special sticky layer that holds the crystals perfectly. The latter can be round or square shape. More often than not, the canvases are solid without voids, but sometimes they create brilliant drawings—the outlines of animals, birds, and people—against a spectacular black background. Finished work cover with a cloth and secure by running a rolling pin over the surface with force. The main advantage of paintings made from crystals: they do not fade, unlike embroidery, and will retain their original appearance even after years.

Bead decor should also be made according to a ready-made pattern. It can be found on the Internet or purchased in special stores for needlewomen.


Paintings on fabric
Fabric paintings are usually made from scraps. Work begins by stretching the base fabric onto a stretcher. The procedure is performed carefully, avoiding the formation of unnecessary folds. Then the drawing is applied to the canvas with a pencil. If you do not have the talent of an artist, then you can use a template. They even sell special sets where the canvas already has a pattern with numbered zones for individual colors. Then for work you will need scissors, thread, a needle and pieces of fabric. The shreds are cut out according to the shape of the element that will be “covered” with small margins and sewn to the base.


Conclusion
Paintings in the interior will become the center, the highlight of the setting. Originally designed decor cannot be used as a background; it will attract other people's views. Having tried themselves as a decorator once, many do not limit themselves to this and continue creative experiments. When the scale of the works goes beyond satisfying personal needs for decoration, they begin to be given as gifts to loved ones, and then even sold as original paintings.
Naturally developing as an art form, they have successfully reached our days. At the same time, in a modern designer interior today it is almost impossible to find classical landscapes with still lifes: the place of classical painting was taken by abstraction or highly artistic photography. It is with abstraction and modernism that interior painting is mainly associated, the task of which is to create a certain psychological background of the room, an appropriate mood for those present, as a rule, an atmosphere of peace and tranquility, or vice versa - office activity and energy.
The shift towards abstraction, it must be admitted, has brought painting much closer to to an ordinary person who is not involved in fine arts professionally or technically high level. Naturally, not everyone is able to realistically reproduce reality on canvas, with abstract art anyone has more opportunities to create their own mini-masterpieces. There are the most different techniques, sometimes you don’t even need a brush: you can come up with it yourself original way applying paint to a surface, you just need to practice and gain experience. 

The main condition for independently creating a picturesque interior element can be called the courage of ideas and determination in their implementation: when creating artistic abstraction, it is extremely important to free the mind from limiting cliches and, with a light heart and a steady hand, produce strokes, strokes, colored stains on paper, giving free rein to inspiration and imagination . If you succeed, the creative process will turn into a kind of meditation, giving rest to your head and nervous system, distracting you from everyday worries and disturbing thoughts. 


In principle, any flat surface, smooth or with a relief texture, can serve as a working surface for a painting. It would be quite logical to take the first steps on ordinary thick paper of the required size; cardboard and plywood are also suitable, which can be pre-painted in the required light (or vice versa, dark) shade.
Decorating the interior with paintings made with your own hands has become popular. Placing them on the walls of your apartment will add comfort, individuality and breathe a piece of your soul into the room.
Where to start drawing
First, you need to decide what you want to see as a result. You shouldn’t imitate other people’s ideas, it’s better to find your own. Think about what is missing in your home, feel the mood of the room in which it will hang. Any, at first glance not even real, fantasies have their place. Abstract images will add irresistibility to the interior, and posters in black and white will fit perfectly into modern design.
Having determined the style of work, you can begin to create a masterpiece.

Fabrication
Before applying the drawing, it is necessary to prepare the canvas. To do this, you will need cardboard and the fabric itself on which the image will be. A square or rectangle is cut out of cardboard, the size of the intended work. Fabric is cut out from this blank with an allowance of 5 cm. Then, the fabric is glued to the cardboard, and it should be stretched well. The corners are cut and carefully glued so that the fabric does not unravel.
You can use a simpler version of the base - cardboard painted with a roller with white acrylic paint. It must dry thoroughly before painting is applied to it. This will be the background of the picture.

Drawing
Before applying the drawing to the canvas, you should make a sketch on plain paper. It is cut out, applied to the canvas and outlined with a simple pencil. The outline of the drawing must be outlined with black paint.
Now you can begin to design the planned picture. There can be different methods:
- paint - the most common, the design is painted with multi-colored paints;
- cereal, coffee, cloth - the elements are placed in the picture and secured with glue.

Paint selection
You can use any paint: acrylic, watercolor, oil. The main thing is to combine correctly color shades colors, then the picture will look impressive.

Stencils
A stencil is an ideal device for creating an image using paint or a can of spray paint. You can also apply a design using a stencil using the graffiti technique, which is at the peak of popularity today. The best base for this painting would be cardboard or plywood, which is painted in a contrasting color. Such ornaments look original on a gold or silver background.
The use of herbarium elements instead of a stencil or openwork napkins looks impressive.

Photo printing
Modern and stylish interior can be created if you use paintings ordered from a printing workshop. Such workshops produce high-quality prints on any surface.
Family photographs in covers or frames fit perfectly into any interior; they can be color or black and white, placed in chaotic order or in the same plane. It is possible to arrange photographs as modular elements, which creates the impression of a single image.

Textile
Masterpieces in the patchwork style can be easily achieved using scraps of fabric, braid, and ribbon. Such paintings are made using the appliqué principle. The basis is textiles, dense in quality and not flashy in design (polka dots, stripes). The elements of the picture, on the contrary, are cut out of bright fabric. Using different colors scraps, you can get an original picture. And if you place it under glass, it will look stylish and impressive.
The combination of fabrics in one picture looks great different textures. And from materials that hold their shape (felt, corduroy, flannel), you can cut out elements of the design: a house, an animal, fruit.
These products are ideal for the kitchen or children's room. And a silk painting will be a decoration for the hall.

Modular paintings
Modular - these are several paintings with a similar plot or one drawing divided into separate elements that can be different sizes. Currently, they are popular as they fit perfectly into the interior of any room. You can make them yourself and arrange them at your discretion.
You should start by choosing a picture: landscape, abstract image or photo. Blanks can be printed on paper or canvas in a photo salon, and then cut into separate parts. The paper version is glued to plywood or chipboard, and the fabric version is attached to back side frame using a stapler. It is good to work on a fabric base using the batik technique.

If you create a drawing yourself, it is better to do it right away on individual elements. To make such a picture you will need:
- colored acrylic paint or waterproof marker - when drawing an image on paper;
- hacksaw;
- ruler;
- a simple pencil;
- foam sponge;
- sandpaper;
- tassels;
- polystyrene foam sheet (1 cm thick).
You should start working by dividing a sheet of polystyrene foam into the intended number of parts. To do this, you need to measure it with a ruler and cut it into modules with a hacksaw. the right size. Then sand the edges.
Now, all the parts are put together into a single canvas and the process of applying the image can begin. First, the background of the picture is made, the sponge is wetted in the paint of the intended shade. When the paint has dried, you can begin the drawing itself using brushes with paint, a marker, and applique.

Creating a three-dimensional painting for the living room
Three-dimensional paintings look impressive in the living room; they can be made to suit any room design. Options are available: leather, paper, and even coffee and pasta. The following technique is perfect for making such paintings:
- decoupage - decorating objects;
- quilling - creating a design from curled paper.
A picture made of textiles or foam rubber will look creative in the living room; it is easy to make an original multi-layered image from this material. The picture frame should be taken simple and decorated according to the interior of the room.

Most easy way- where plain paper is taken as a basis, onto which elements (butterflies, animals, flowers) made of various materials are glued.
If the hall is large, then a plaster image - a bas-relief - will fit perfectly. It is done directly on the wall and goes well with the overall interior. However, making such a picture is quite difficult. Skills in drawing and working with plaster are required. General recommendation There is no instruction on how to make a bas-relief; some craftsmen create it directly on the wall, others separately make elements from plaster, which they then fit into the overall image. If you have no experience, it is better to use a stencil.
Master class: Paintings for the interior
An unusual and modern solution is to decorate the interior with a 3D painting. They are fun to make and look impressive. There are different ways to make such products.

3d paper paintings
One of the easy ways is paper applique. To work you need:
- knife, scissors;
- pencils;
- not thick cardboard or paper white;
- PVA glue;
- frame with large sides, a candy box will do.
Step-by-step actions, using the image of a butterfly as an example:
- A rectangle the size of a frame is cut out of paper.
- A butterfly is drawn or printed on a printer and cut out.
- The resulting butterfly model is placed on the prepared white paper and traced with a pencil.
- The most difficult thing is to cut out the wings of the butterfly without touching the body.
- The wings bend towards the top and towards the middle, thereby adding volume.
- The blank with the butterfly is glued onto colored cardboard, which will be visible through the folded wings of the butterfly.
- At the end, the picture is placed in a frame and fixed with glue or a stapler.
This method can add volume to any drawing.

3d leather paintings
To create a 3D picture you don’t need expensive leather, pieces from old boots, bags, gloves, raincoats will do, but it is important that it is natural. To obtain the desired color you can use acrylic paint.
The technology for creating paintings from leather is similar to the technology from paper. Leather is a material that can be easily manipulated and whole bouquets of ornaments can be created from it. The tools at hand are the same as when working with paper. Operating principle:
- a sketch is made on paper;
- transferred to the skin and cut out;
- so that the leather elements become rounded and voluminous, they must be held over a candle;
- the base of the picture is made of fabric;
- leather pattern elements are placed on it and secured with glue.
You can use buttons, dried plants, and beads as additional decoration.

Multilayer 3d paper painting
Multilayer 3D paper paintings look beautiful; they are not difficult to make. You should prepare:
- deep frame;
- cardboard;
- album sheets - for copies;
- printer;
- glue;
- acrylic paint;
- scissors,
- acrylic varnish;
- laminate backing.
Having chosen a drawing, we get to work. It’s good if the picture consists of several elements that can be cut out. You must make at least 10 copies on landscape sheets. If used inkjet printer, then you need to apply varnish to the pictures, otherwise the image will flow; when using a laser, you can do without varnish.

The next stage is to cut out a base from cardboard, the size corresponding to the frame, and glue one drawing to it. The remaining images are cut out, but in different ways. Several copies (let's say a flower) are cut out completely: flower, leaves, stem. Others are just the flower and the leaves and just the flower.
Now the base for the laminate parts is cut out, and the elements are glued onto it. Then, these blanks are glued to common ground. The sides of the substrates should be painted in a color that matches the image so that they do not stand out.
The final stage is coating the painting with several layers of varnish.

DIY paintings for the kitchen from scrap materials
In the kitchen, homemade paintings look out of place. They add even more warmth and comfort. Eat different options making them, and any items that can be found at home are suitable here: buttons, seeds, cereals, coffee.

Pictures from cereals and seeds
This type of interior decoration is increasingly popular, it is environmentally friendly and inexpensive. These paintings look especially good in a rustic kitchen. Making a picture from cereals is not difficult. You will need several types of cereals, glue, cardboard and thick material.
First prepare the base. To do this, cut out a shape from cardboard future painting, and there is already fabric on it, with an allowance of a few centimeters for bending. The fabric is glued to the cardboard.
The intended design is applied to the resulting canvas. Now you need to spread out the grain or cereal; if necessary, you can paint it in desired color. After completing the drawing, you should glue all the elements to the canvas. This can be done using regular glue, but it is more convenient to use a silicone gun.

Crafts from cutlery for the kitchen
Spoons and forks made of metal coated with enamel are sewn onto the prepared base. This still life will fit perfectly into the interior of any kitchen.
If you take plastic forks and spoons, you can create a more original picture. Plastic objects easily stick to any surface and are easy to paint.
Fits perfectly into the kitchen french style decoration with cupronickel silverware.
A canvas with glued porcelain dishes will look aristocratic.
You can arrange objects arbitrarily or following a specific idea.

Paintings from buttons and plates
Buttons can be used not only for their intended purpose, but also to create original paintings. They can be glued or sewn. It’s easy to make different patterns, animal shapes, and flowers from buttons. Or you can use them as a background for an image; they are sewn onto fabric and all kinds of plates and saucers are hung on top. If necessary, paint with acrylic paint.

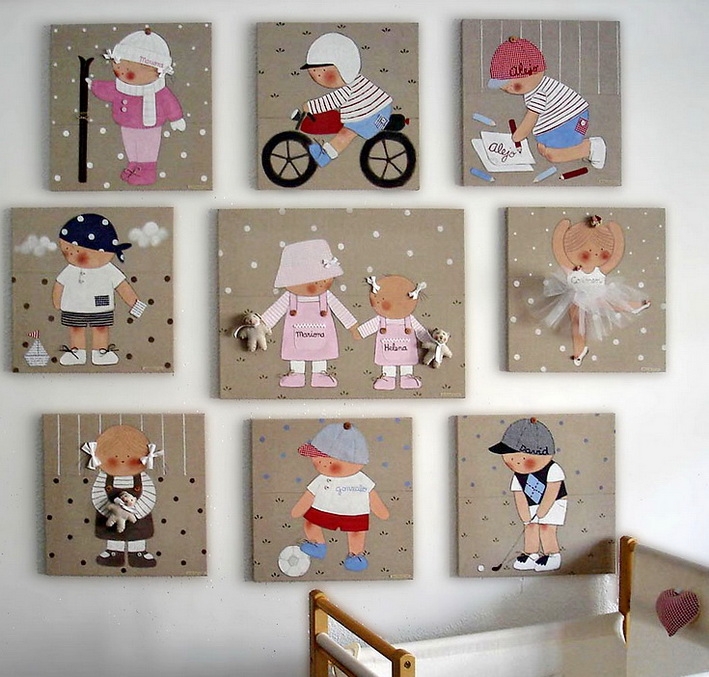
DIY paintings for the nursery
Do-it-yourself works will wonderfully decorate a child’s room, and they don’t have to be very complicated. When choosing a painting, you should take into account the design of the room, its color, the gender and age of the child, and his hobbies. Anything will do: a hand-drawn picture, an applique, a panel, a photo, maybe big picture or a modular option, the main thing is that it fits into the overall interior. Children's works framed will look original.
An excellent solution is a fabric version based on foam. To do this, you will need: a piece of foam plastic, shreds, pencil, glue, carbon paper, a sharp object to press the drawing.
The polystyrene foam is cut out to the required size, and the design is transferred onto it using carbon paper. The picture is pressed through with a sharp tool. The part on which the fabric will be placed is coated with glue, and the fabric is applied to it. It is pressed into the previously pressed outline, the excess fabric is cut off with scissors, and the threads of the shred are hidden inside using a ripper. Using this technique, it is easy to create different fairy-tale pictures.
DIY paintings - photos
There are many ways to create paintings; you can use any materials and objects for this. It all depends on your imagination and creativity. The photo shows possible ideas.


