How to draw arrows on your eyes using liquid eyeliner. How to draw arrows on eyes with drooping eyelids? Ideally shaped eyes and arrow options for them.
Lines on the eyes are one of the most popular makeup elements.. With their help, you can change the shape of your eyes, make your gaze more expressive, and also add extravagance and mystery to your image. That is why many young ladies are interested in the question of how to make arrows on their eyes.
For beginners, this activity may seem very difficult and overwhelming. However, patience and knowledge of the basic subtleties will help you master this makeup technique quite quickly.
You will learn how to make arrows on the eyes for beginners from our article.
Interesting to know! The art of creating arrows before our eyes originated in Ancient Egypt. There it had sacred meaning. Women and men lined their eyelids in such a way as to repeat the shape of the eyes of a cat, which was considered a sacred animal. To create the perfect pattern on the eyes, they used available means in the form of natural henna and clay.
To draw arrows on the eyes, you can use either liquid or dry eyeliner or a cosmetic pencil. For thin and bright arrows ideal option will liquid eyeliner.
But this makeup tool requires some skill and experience. Therefore, for beginners, a cosmetic eyeliner that should not be too hard is more suitable.
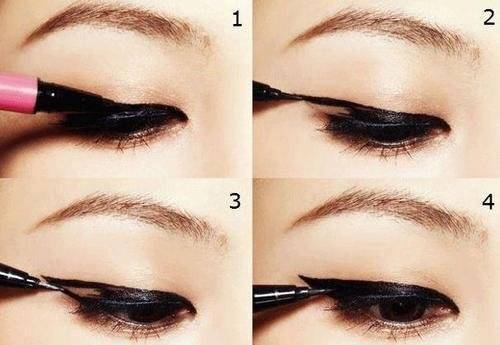
How to make arrows, step-by-step instructions for beginners
Before you start drawing the arrows, you need to prepare the skin of the eyelids. To do this, they need to be treated with a product that is used for eye makeup remover. Then foundation is applied to the eyelids. In order for the drawn arrows to last as long as possible, it is worth making a base layer.
You can use a special eyeshadow base, transparent powder, or light-colored eyeshadow.
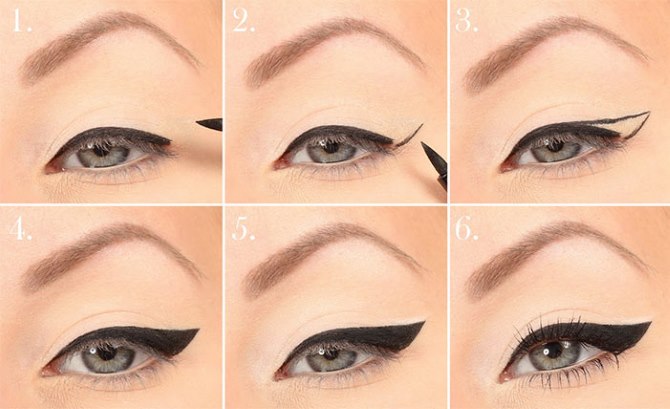
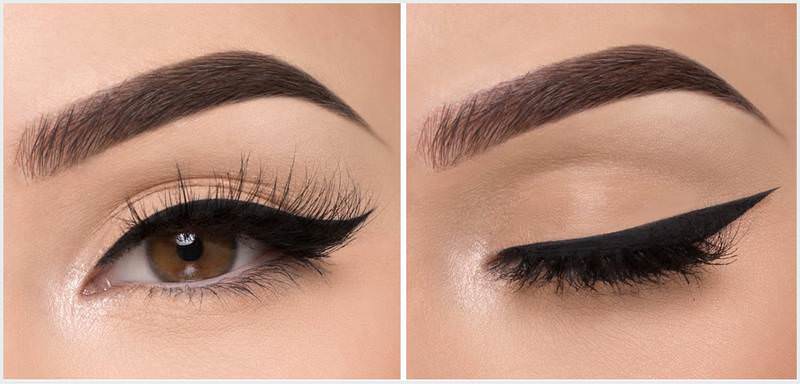
How to draw classic thin arrows
Thin arrows are considered a classic makeup element. This is a good solution for both daytime and evening look.
To draw perfect thin arrows, you need to follow these steps:
- For drawing arrows You need to choose a pencil with a sharp lead. If used regular pencil, then it must be sharpened well.
- Pencil lead must be applied to the center of the upper eyelid as close as possible to the eyelashes. Use extreme caution if you are new to makeup to avoid harming your eyes.
- Then draw it out with a pencil a thin line along the growth of eyelashes to the very edge of the eye.
- At the next stage you need to make a tail of the arrow, which starts at the outer corner of the eye. To do this, you need to draw a small line pointing upward.
- After the tail is ready, it must be connected to the main line of the arrow.
- On final stage you need to remove all unevenness with a damp cotton swab. It is not difficult, even for beginners, to master the art of makeup for girls.
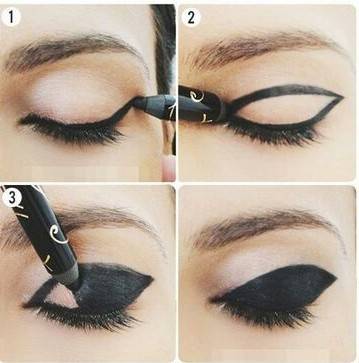
How to draw expressive wide arrows
Wide arrows will be the perfect complement to an evening look.
To create them you need:
How to Draw Double Arrows
Double arrows are a very unusual makeup element that will make the image bright and unique. Such hands can be made in Egyptian style, in retro style, or with the addition of several colors. 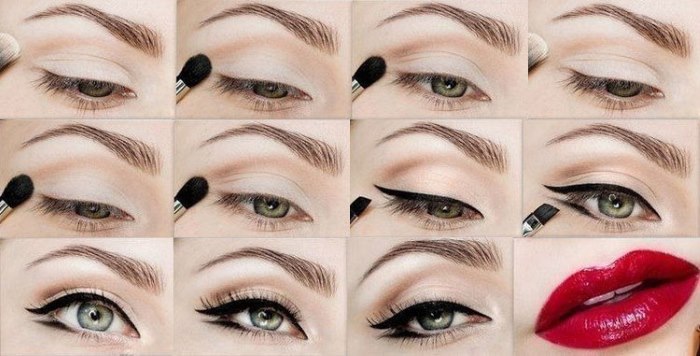
Basic steps:
- First you need draw a line that can start from the inner corner of the eye or from the middle of the eyelid. The line is brought to the very edge, then goes a little upward, forming a tail.
- Along the lower eyelid you also need to draw the main line, then the tail, which should be parallel to the upper tail.
- To create an Egyptian look, you should not move the end of the arrow up, it should remain in a horizontal position.
- For make-up in retro style, the tail of the arrow can be raised and also made longer.
How to Draw Raised Eyeliner with a Cat Eye Effect
Eyelid makeup with a “cat eyes” effect is suitable for daring and relaxed young ladies. Such a unique make-up will give the look sexiness and mystery. 
Technique for applying this type of arrows:
- At the first stage it is necessary to draw a contour on the upper eyelid along the growth of the eyelashes.
- Then a pencil is applied to the corner of the eye and stretches upward. This will create the tail of the arrow.
- The resulting ponytail connects to the main outline of the arrow.
- The most decisive stage in creating this spectacular arrow - drawing a triangle on the eyelid. To do this, you need to draw a line from the end of the tail of the arrow to the middle of the upper eyelid.
- After making a triangle– it needs to be painted inside.
Good to know! To get an even tail of the arrow, you can use a small ruler or a plastic card. The selected prop must be positioned at the edge of the eye at the desired angle, and then draw a line along it.
Master class on drawing arrows with shadows
As soon as beginners master the technique of drawing arrows on the eyes with a pencil, you can try a more complex technique - using shadows. To perform this technique, you can use liquid, cream or crumbly shadows. 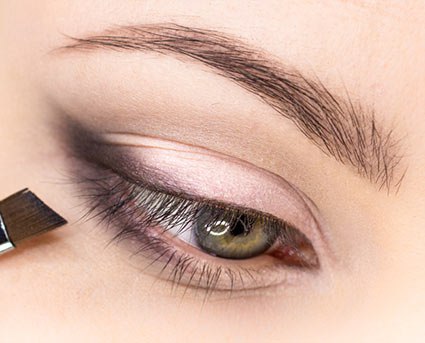
Master class using dry shadows step by step:
- To start you need to lay out all the necessary details in front of the mirror: a thick brush for applying the base and shading, a thin, slightly beveled brush for drawing arrows, shadows of a dark and light shade.
- Shade throughout the century basic foundation light color.
- For getting bright arrows need to be moistened with a thin brush.
- Removed from the brush excess moisture, pick up a small amount of dark-colored eyeshadow.
- Swipe with a brush along the line of growth of the upper eyelashes.
- From outer edge draw a small line up from the eye.
- To expand the arrow, make a few more strokes on top of it.
- If evening makeup, then you can add a “smoky” effect. To do this, you need to blend the shadows in the outer corner of the eye using a flat thick brush.
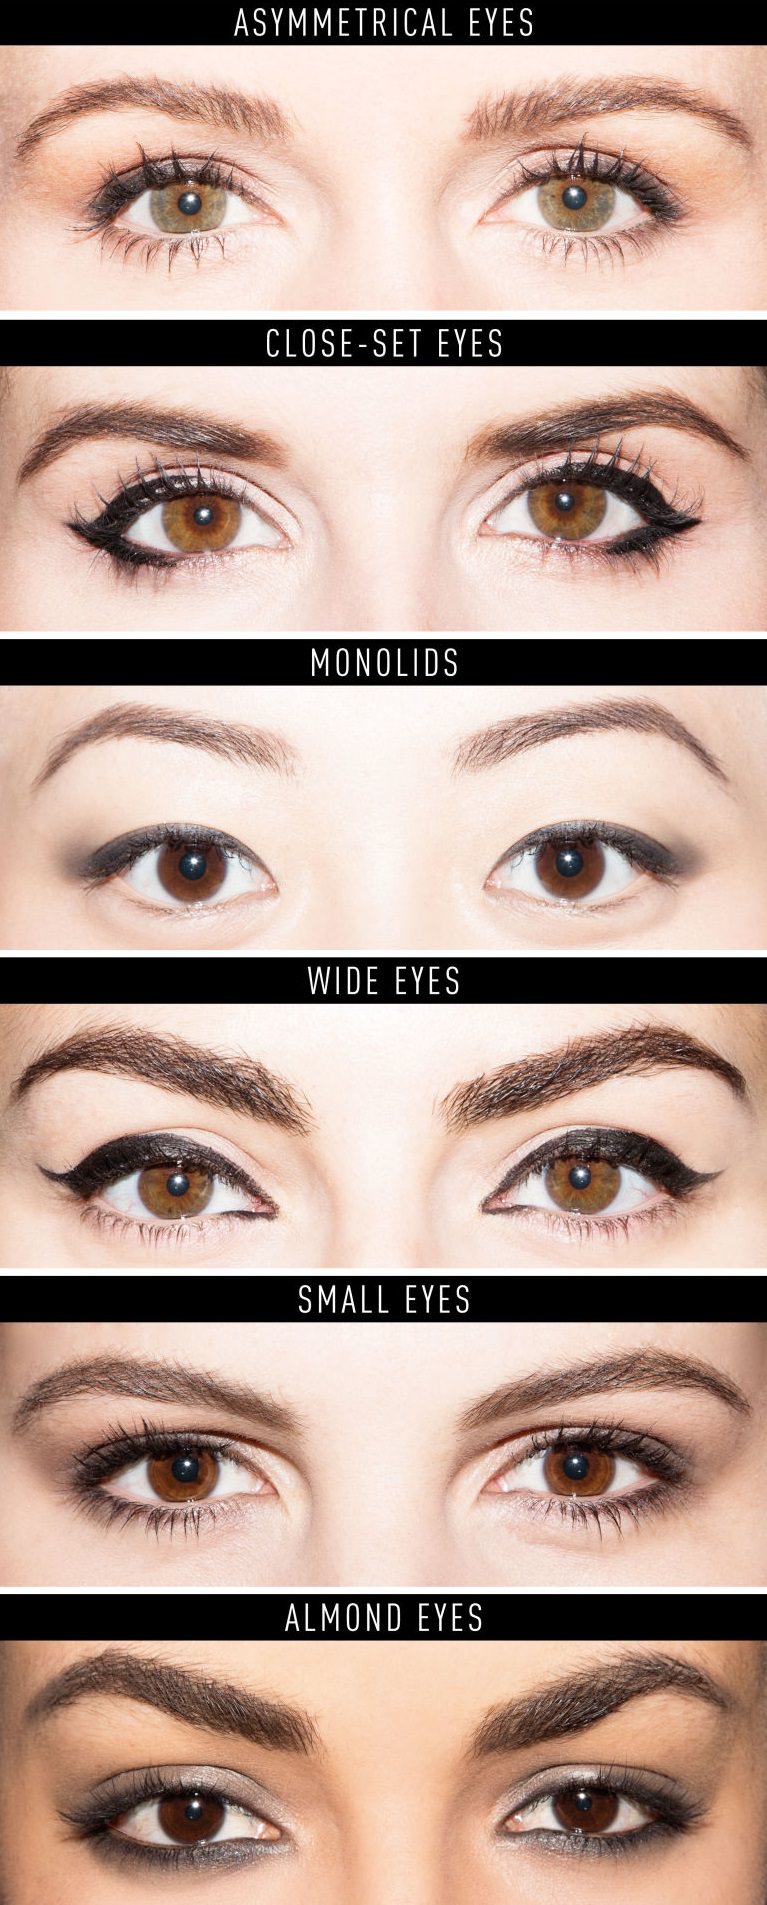
How to make arrows to make your eyes appear larger?
Correctly placed arrows are an indispensable option for those whom nature has not rewarded big eyes. Using professional techniques for creating eyeliner, you can visually enlarge your eyes, make your gaze more expressive, your eyes wide and open. 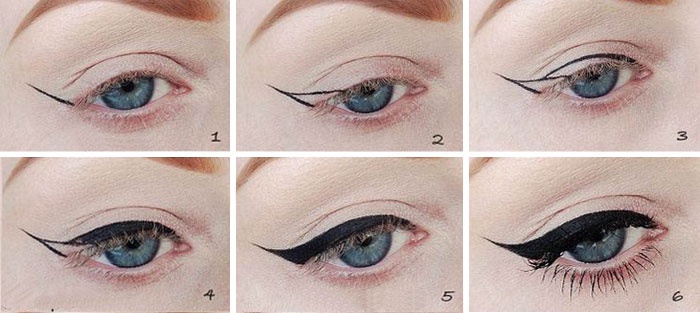
Experienced makeup artists will tell you how to make arrows on your eyes for beginners, whose advice we will consider.
To adjust the cut in big side, you should not draw a line from the very edge of the inner corner of the eye: you need to retreat about half a centimeter. The tail of the arrow must be extended beyond the outer corner of the eye. At the same time, he should look slightly upward. It is also worth remembering that the arrow should not be too thick.
Rules for performing arrows on eyes with drooping eyelids
Those with drooping eyes should avoid makeup, which will “heavien” the look. To draw arrows on such eyes, it is best to use loose shadows or a cosmetic pencil. In order to achieve open-minded, you need to lift the outer corner of the eye. 
The end of the arrow should become a continuation of the growth line of the lower eyelashes. You need to start drawing the main line from the place where the eyelid falls. This must be done with open eyes.
Ideal wings for deep-set eyes
The main task of makeup for deep-set eyes is to make them brighter and more noticeable.
Thin arrows with a small tail are suitable for this.
To draw them, you should not choose liquid eyeliner, as well as black shadows and pencils. Below you can draw a line that will start from the middle of the eyelid and connect to the top arrow.
The best eyeliners for wide-set eyes
Those with wide-set eyes should opt for wide arrows, which will taper towards the outer corner of the eye. The contours of such arrows should not extend beyond the edges of the eyes. 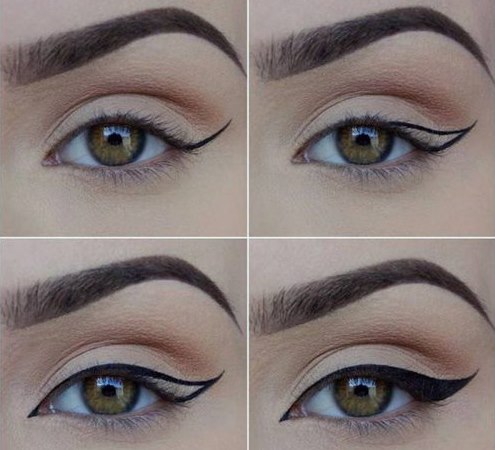
Tips for beginners: how to draw straight arrows
Many women are interested in how to learn to draw perfectly straight arrows before our eyes.
To do this, beginners should adhere to certain recommendations:
- It is best to use a rotating mirror with a stand, which can be adjusted if necessary and turned in the desired direction. It shouldn't be too small.
- You need to draw arrows in good lighting. If it is daylight, you need to make sure that the sun does not shine directly into your eyes.
- When applying the contour, your arms should not be suspended: you need to lean on a hard surface.
- You should not draw arrows on a completely closed eye.
- If you can't draw straight line entirely, you can first make a few small strokes, then carefully connect them.
Good to know! Despite the abundance of educational materials on the Internet, not all women can understand how to properly draw arrows on their eyes.
For beginners, we can advise you to use special stencils, sketches of which can be found online, bought, or made yourself. Such a stencil must be applied to the eyelid, then traced along the contour lines.
Recommendations from makeup artists when choosing the shape and color of eyeliner
Basic tips:
Proper eyelid makeup will help a woman emphasize her individuality, make her image unique, and also help hide imperfections. Therefore, it is very important to thoroughly study how to draw arrows on the eyes.
For beginners, this activity requires daily practice. Theoretical knowledge of all the subtleties and rules, as well as daily training, will help you become a professional in this matter.
At first glance, the “arrows” seem to be simple to perform - no thinking about the selection color range, no pain in shading. But the “arrow” actually turns out to be insidious: either it turns out too low and “overwhelms” the eye, or there is no symmetry, or it is different in thickness, or even uneven and crooked. Most stop at the first or second unsuccessful attempt. But if you decide to understand how to draw the right arrows, read the article.
The main thing, of course, is practice. But theory also takes up almost main role. I’ll tell you about the method of constructing a classic arrow (how to draw, what to draw with) and about the possible forms.
The arrow can be graphic (clear) or soft. A graphic arrow gives a strict look to the image, a soft one does the opposite.
About products and tools
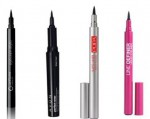
They sell a lot in stores various means to draw arrows:
- liner (liquid eyeliner)
- felt-tip eyeliner
- regular or waterproof pencil
- dry eyeliner/eyeshadow
If you have not yet learned how to easily draw arrows, then most of these products will not be useful to you, I will explain why.
 In liners (eyeliner) As a rule, you don’t always come across a fairly convenient brush. In liners (eyeliner) As a rule, you don’t always come across a fairly convenient brush. Also, when the hand is not yet filled, the arrow may turn out to be crooked - in this case, you will have to wash everything off and draw it again. And this is inconvenient, because... Pre-applied shadows will also disappear (more on this below). |
 At the eyeliner-felt pen You get thick lines if the applicator is not thick enough. This is a good express product and is more convenient to work with than a liner, but it’s still not worth starting practice with. At the eyeliner-felt pen You get thick lines if the applicator is not thick enough. This is a good express product and is more convenient to work with than a liner, but it’s still not worth starting practice with. |
 will become good tool in the practice of drawing arrows, it is easy to adjust. will become good tool in the practice of drawing arrows, it is easy to adjust. But there are several points here: a regular pencil will not last all day on your eyes if you don’t go over it with eyeliner or shadows; a waterproof pencil requires fast and clear lines, because... It hardens quite quickly and is not washed off as easily as a regular pencil. When choosing a pencil, pay attention to the fat content - a pencil that is too thick (kayal pencil) is not suitable for drawing an arrow, because it will instantly be imprinted on the eyelid. And a very important point - the pencil must be sharpened! |
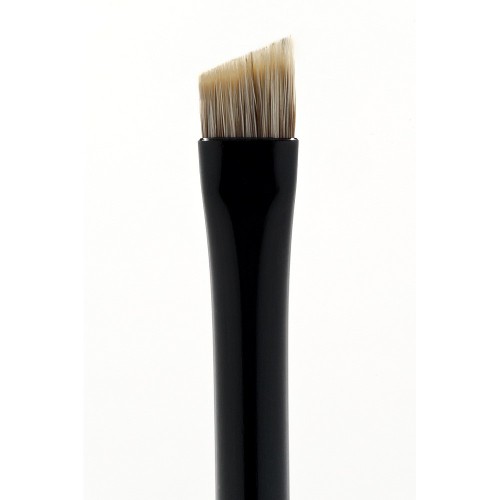 For myself, I chose the method with dry eyeliner/eyeshadow. For myself, I chose the method with dry eyeliner/eyeshadow.The main advantage is that the shadows can always be shaded without ruining all the makeup. And the arrows are drawn with a flat brush with a bevel (the same brush can also be used in eyebrow makeup). |
Stages and subtleties of performing makeup with an arrow
- We first perform all stages of makeup (tinting, powdering, eyebrow makeup).
- Apply shadows to the eyes. The shade depends on your intention (day, evening, holiday makeup). But even arrows, for example, like Marilyn Monroe’s, require shadows - white + peach + brown.
- The tip of the arrow should always point upward.
- It’s not worth drawing arrows only with a pencil - later little time the arrows will “float”. If you use a pencil, it is better to secure the arrow with a liner or shadows.
- To make the arrow neat, draw it directly along the eyelash contour.
- When applying arrows, the hand must have a support (for example, place the elbow on the table). If you try to draw an arrow on a canopy, then most likely the line will not be as elegant and neat as you would like.
Schemes for constructing a classic arrow
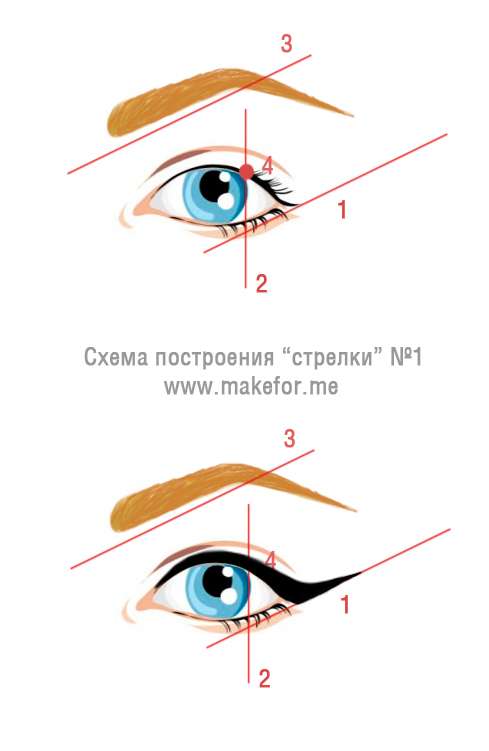
| Scheme No. 1
Line 1 should be parallel to line 3 (tangent along the bottom of the eyebrow). 2. Visually draw a perpendicular tangent to the end of the iris. We get point 4 - from here there will be a connection between the arrow and the tip. Please note that at the inner corner of the eye (at the nose), the eyeliner is applied thinly, gradually increasing towards the center of the eye. |
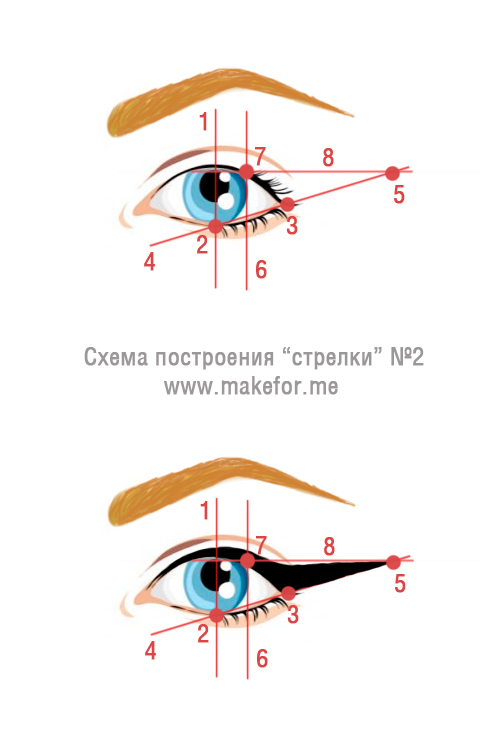
| Scheme No. 2
At the intersection with line 1 and the lower eyelid we get point 2. We also have point 3 - the outer corner of the eye. Visually draw tangent 4 through points 2 and 3 - this will be the direction of the arrow. We draw line 6 at the edge of the iris - we get point 7. From here there will be a connection between the arrow and the tip. Through point 7 we draw visually perpendicular line 8, which at the intersection with the direction of the arrow forms point 5 - the end of the arrow. |
I’ll say right away that this is a diagram of the classic construction of an arrow. There are different eye structures and sometimes it is necessary to adapt the scheme to suit you. But for most women, one of the proposed schemes is suitable. Remember, practice is key! Don't give up right away :)
How to choose the shape of the arrow for your eyes
Not everyone's eyes have the ideal shape, cut, or fit. Even if you strictly follow classic scheme building an arrow, it may seem that the arrows are ruining all the makeup. Let's figure it out.
Eyeliner is a popular element of eye makeup that, when done correctly, can work wonders.
With the help of arrows, you can not only adjust the shape, size of the eyes and their fit, but also change your facial expression.
Neat arrows require skill from every woman who wants to highlight her eyes in this way. In addition to skill, you need high-quality tools and cosmetics created specifically for drawing arrows.
 Modernity has given women and girls the opportunity to do makeup with high-quality and convenient cosmetics. Gone are the days when you had to be sophisticated and paint arrows with lead paint using a tool that vaguely resembles a spoon.
 Today, arrows on the eyes are created using the following means and tools:
- Contour pencils
- Liquid eyeliners
- Gel eyeliners
- Pressed eyeliners
- Felt-tip pens (markers)
New generation contour pencils are distinguished by a variety of colors and lead quality. The latter can be soft, medium and hard. Thanks to this, you can choose a pencil for oily and dry eyelid skin, for young or elderly skin.
In addition, the different quality of the lead allows you to choose the optimal pencil for drawing. different arrows: be it “cat eye” or “smoky eyes” and so on.
The color palette of pencils allows you to individually approach each color type and preferences of girls. Various shades gray, black, blue, brown - allow you to adjust the shape, size and shape of the eyes, as well as the depth and width of the fit.
Recently, another type of pencil has appeared - shadow pencils. This product is distinguished by a more rounded and wider lead, and by the diameter of the entire pencil. Such pencils come in a very wide color palette, and therefore will be an excellent tool for creating festive and shocking eyeliner.
Pencils available today are mechanical and automatic, wooden and plastic. Each of them has its own advantages and disadvantages, as we wrote about earlier.
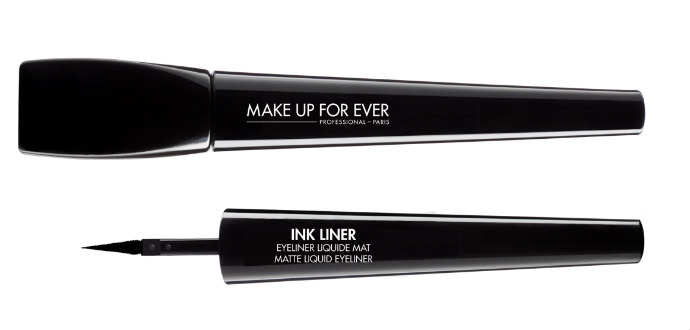
Liquid eyeliners, also known as liners appeared much later than pencils. Today they are produced by all leading manufacturers, and have found their fans among millions of women. Young girls especially like these eyeliners for their glossy finish and rich pigment.
The packaging of the liquid eyeliner is a small bottle and an elastic thin brush. This makes it very convenient to use. It is worth remembering that drawing arrows on the eyes using this tool requires a little experience. This is especially true for those who have “shaky” hands. But once you get the hang of it, the arrows will turn out simply perfect.
Eyeliner allows you to create arrows of varying complexity. Thanks to the ability to shade the arrow, you can create different makeup.
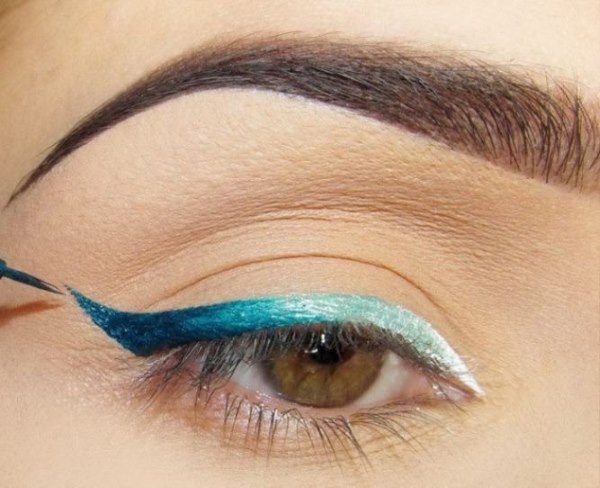
Liquid eyeliners typically come in black, jet black, and brown. It's rare to see colored liquid eyeliners. At the same time, some manufacturers have a collection of eyeliners with glitter for creating holiday makeup.
Gel eyeliners conquered many girls at first sight. This product has long gone beyond the professional environment. Today, gel eyeliner is available to everyone. Besides, this product Now budget companies also produce them, so you can purchase such eyeliner at a very reasonable price.
Gel eyeliner has a consistency corresponding to its name and is stored in a small jar. Eyeliner, as a rule, comes with a brush for application.
Unlike liquid eyeliner, gel eyeliner gives a matte finish, and its color can be deeper.
Like liquid eyeliner, gel eyeliner requires a little eyeliner skill. The first time, despite its consistency, it will be difficult to draw an even and neat arrow.
The color range of gel eyeliners is similar to liquid eyeliners. Having mastered the application technique, you can draw arrows of varying complexity, with or without shading.
Pressed (dry) eyeliners- These are essentially shadows that have a denser consistency than eye shadow. Thanks to this, with the help of a brush you can draw a rich arrow that will not “spread” across the eyelid and will remain clear throughout the entire time the makeup is on the face.
Unlike other types of eyeliners, this product allows you to create softer arrows. At the same time, eyeliner is suitable for any makeup – evening, day, everyday, and so on.
The color range of pressed eyeliners is varied, so this a good option for summer and holiday makeup.
Felt pens (markers)) is the most modern type of eyeliner. Externally, the cosmetic marker is very similar to its artistic “brother”. This product combines the benefits of a pencil and liquid eyeliner.
Thanks to the easy sliding of the felt tip over the skin of the eyelids, even beginners can cope with drawing simple arrows.
The color range of felt-tip pens can be varied. The most popular color is, of course, black.
Thus, today every woman and girl has a huge assortment for creating beautiful arrows.
To do the right thing and beautiful make-up, you don’t have to be a professional makeup artist. Of course, knowledge and skills are needed, but for this it will be quite enough to watch educational videos on makeup.
For example, it is quite possible to learn how to draw arrows on your eyes correctly by watching a video. After just a few viewings of different videos, you can feel confident in your hands, even the most “shaky ones”.
To make the training video as useful as possible, you should do the following:
- Watch several videos and select those in which the author/model has similar facial parameters.
- Prepare everything necessary materials for training: eye makeup base, eyeliner different types and flowers, contour pencils. You also need consumables - cotton pads and swabs, eye makeup remover (it is better to take micellar water or a two-phase product).
- While watching the video, repeat everything the author does. If necessary, repeat until the drawing skill is honed.
Note that you need to start with the most simple ways drawing arrows. During this training, you can learn several types and methods of drawing arrows, choose the most convenient type of eyeliner and its color.
Next, when learning to draw arrows on your eyes, you should select videos in the direction of complicating the lessons. Having learned how to clearly draw an arrow for daytime makeup, you can begin to study the rules of eye correction using arrows.
So, by watching the video, you will learn that the thickness and size of the arrow, as well as its color, can change not only physical parameters eyes, and also change facial expression beyond recognition.
For example, using a white and black pencil you can significantly increase the shape of your eyes. To do this you need to draw inner side century with a white pencil. This will widen your eyes. Then, any suitable arrow is drawn - simple or with a “tail”.
But if you draw arrows on both the upper and lower eyelids, slightly extending them towards the temples, you can narrow your eyes that are too round.
We wrote earlier about other methods of eye correction using arrows.
I would especially like to note common mistakes and misconceptions about arrows that prevent you from gaining the correct knowledge and skills in drawing arrows and creating makeup in general. And they don’t always talk about this in videos.
The most popular misconceptions, This:
Arrows suit everyone! This misconception is often the reason why a big mistake is made in creating makeup. Arrows, no matter how fashionable they may be, are strictly contraindicated for women with small eyes.
It doesn't matter how you draw the arrow! Today this is not at all true, since in addition to pencils there are many other eyeliners. Each eyeliner gives a different result, so first you always need to decide on the type of makeup, and then choose a tool for drawing an arrow.
Drawing arrows is extremely difficult! Not at all, to comprehend this subtle matter is given to everyone who wants it. Therefore, you should not even allow such a thought, otherwise things will never come to training.
Everyone needs to know how to quickly draw arrows on the eyes using any type of eyeliner. After all, as a rule, there is not enough time for makeup, especially in the morning. And you always want to look perfect.
So, method one: draw arrows with a pencil:
- Apply eyeshadow base and blend well;
- Take a pencil with a soft or medium soft lead and make three dots - one near the inner corner, the second in the middle, just above the growth of the eyelashes, and the third just above the second, parallel to the outer edge of the eye;
- Carefully connect the lines, trying to make smooth transition. In this case, you need to ensure that the arrow runs clearly along the eyelash growth line.
Method two: draw arrows with a pencil and liquid eyeliner:
- Using a pencil with a hard lead, draw a contour - from the inner edge to the middle, after which we smoothly rise above the eyelash growth line. Then, continuing the movement, draw a “tail”;
- Using liquid eyeliner of a similar color, paint over the arrow, leaving no white border between the lash line and the upper contour of the arrow. You can use gel eyeliner instead of liquid eyeliner, but this will take more time.
Method three: draw arrows on the eyes using eyeliner with a marker:
- Apply eyeshadow base to eyelids;
- Place the felt tip of the marker near the inner corner of the eye at the beginning of the lash line;
- Using short movements, draw out the appropriate arrow;
- If desired, fix the arrow with colorless loose powder.
Any of these methods can be easily and quickly completed, even for beginners. Moreover, these three methods are a good basis for creating more difficult arrows and a variety of eye makeup.

In order to draw the right arrows on your eyes, you first need to learn how to do it.
When learning how to make arrows, you should remember the importance correct selection type of arrows, eyeliner - its type and color and application technique.
Eye arrows are selected based on the shape and size of the eyes:
Almond-shaped eyes are the ideal eye shape that will be emphasized by any arrows.
Round eyes are favorably emphasized by wide arrows with an inflated “tail”.
It is better to line narrow eyes in this way: at the beginning and end of the eyelash line, the arrow should be thin, and in the center wider. At the same time, the transition should be smooth.
It is better not to let down small eyes with arrows. Only in some cases can you make a very thin arrow along the eyelash growth line.
Wide-set eyes will be emphasized by arrows drawn clearly along the length of the eyelash line. There is no need to retreat from the inner edge.
Close-set eyes can be emphasized with an arrow that starts from the middle of the eyelid and runs along the eyelash line without a significant rise.
T Now, depending on the shape and size of the eyes, the type of eyeliner is selected:
- Almond-shaped eyes can be lined with any type of eyeliner.
- Round eyes are best lined with a pencil. This line is the easiest to shade.
- Narrow eyes are best lined with pressed eyeliner or eye shadow. A pencil with a soft lead will also work well.
- Small eyes are best lined with liquid eyeliner, which allows you to draw the thinnest arrows possible.
- Regardless of eye placement, any type of eyeliner works equally well.
Next important point is the color of the eyeliner. Because she happens different color, you can choose the one that will most advantageously emphasize the beauty of your eyes.
The main criteria for choosing arrow color are:
- Personal preferences;
- Style and situation;
- Skin, eye and hair color;
- Season.
In addition, it is worth remembering that the use white pencil for the purpose of correction, it is not suitable for everyone, just like eyeliner with mother-of-pearl. Therefore, you should not blindly follow fashion.
And finally, the application technique. Regardless of the type of arrow on the eyes, there is basic technique their drawing. How it is performed and what you need to pay attention to, we wrote earlier.
Thus, the ability to draw arrows is a matter of time. And there should be no doubt that they are an important part of makeup.
Video
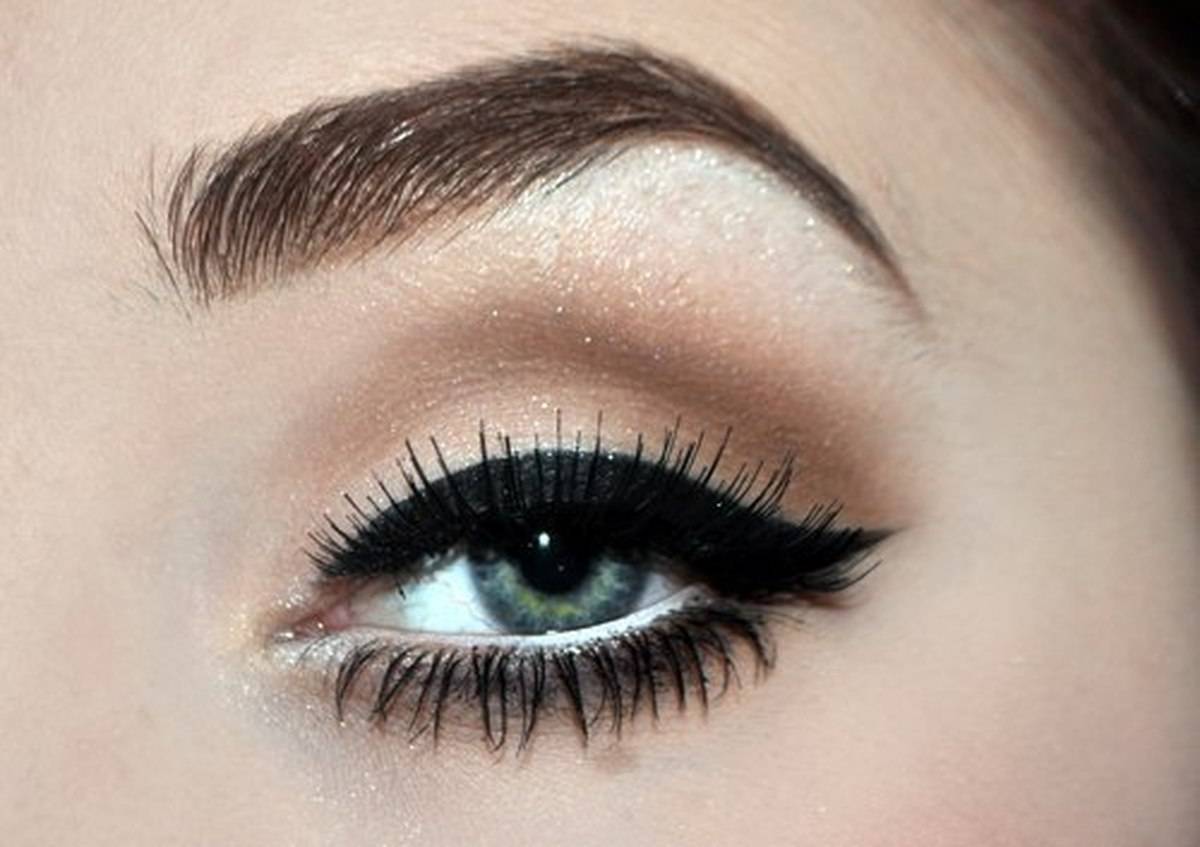
What do you think unites Marilyn Monroe, Elizabeth Taylor, Audrey Hepburn and other beauties who can perform masterfully? That's right - graceful arrows on the upper eyelid that can not only correct the shape of the eyes, but also divert unnecessary glances from “tired” bags and dark circles under the eyes.
Types of arrows for the eyes
This retro trick, originally from the Hollywood 50s, is extremely popular among modern girls. What they haven’t come up with over the years to make the process of creating identical hands easier and faster. However, there is actually nothing complicated in this science, although young divas sometimes try to avoid this type of eye makeup.
Fashion, like time, does not stand still and tends to change, which happened in the case of fashionable arrows before our eyes. Over the entire existence of this trend, many of its varieties have appeared, but let’s look at everything in more detail.
How to choose arrows
The answer to this question is unequivocal - success in this difficult task can only be achieved through trial and error, but we will try to help you reduce their number at least a little.
First, determine the shape of your eyes, taking into account their size and distance from each other.

The “ideal” shape of the eyes is considered to be almond-shaped (not to be confused with Asian eyes!): this eye shape does not require correction, so absolutely any eyeliner will suit it, including those with smokey eye makeup. Just as in the case, “arrows” in eye makeup have the functionality of giving the eyes a shape that is as similar as possible to the “standard” - in our case, almond-shaped eyes.
Girls with small eyes are better off avoiding black eyeliner, especially around the entire eye contour, as this will make them look even smaller. But pearlescent and eyeliner is suitable for you. light shades- gold, silver or white. By the way, double arrows drawn parallel to each other will also be a good option for your eye shape. 
Round eyes will be given an almond shape by wide arrows, tapering towards the outer corners, but not thickening in the center. There is little secret: move the tip of the arrow 2-3 mm beyond the edge of your eye and apply the same eyeliner from below, clearly along the lash line, you can start from the middle of the lower eyelid. Connect these two lines by slightly lifting the tail of the arrow.
Girls with Asian or simply not wide enough, narrow eyes should not extend the arrow beyond the eyelid, this will only narrow them even more, as well as the arrow along the lower eyelid, along the growth line of the lower eyelashes.
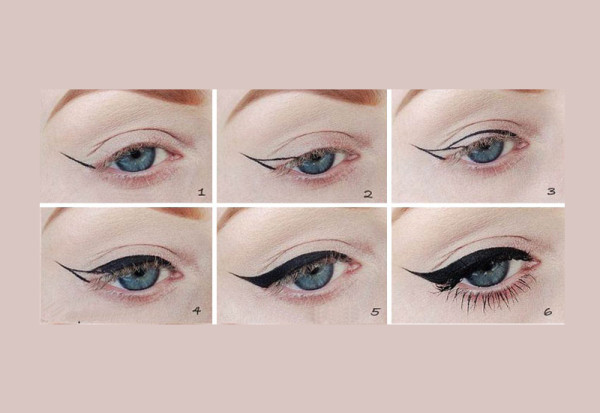
How to draw arrows correctly
Why do some girls avoid drawing “arrows” on their eyes? That's right, simply because sometimes it is very difficult to draw them equally on both the left and right eyelids, and even if this can be achieved, it will take a lot of time, which sometimes simply does not happen, especially in the morning. But we will tell you a few secrets on how to do perfect arrows in just a few movements.

Draw arrows on the eyes step by step
So, let's move from theory to practice.
- Sit comfortably, so that your working arm rests on the table, and the mirror is at eye level, directly in front of your face, and not to the side.
- Prepare your skin for makeup as you usually do.
- Fine-tune your eyebrows, apply foundation, eyeshadow base and shadow if necessary.
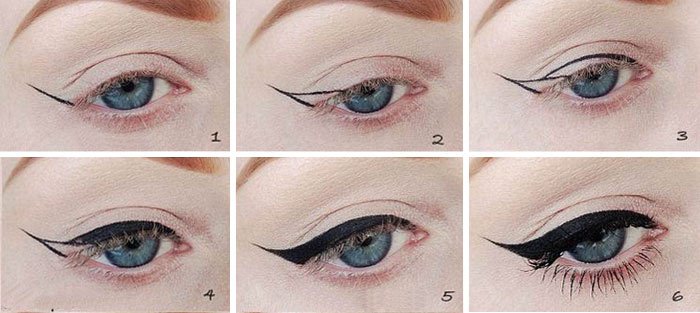
- Determine the middle of the upper eyelid along the lash line: from here we will begin to draw an even arrow.
- Move your hand, drawing a thin line from the middle of the eyelid to the outer corner of the eye, giving the arrow a classic shape.
- Draw a thin line from the inner corner of the eye to the middle, as close to the eyelashes as possible, almost touching them.
- Paint over the arrow, giving it the required thickness and shape.
- Do the same on the second eyelid and apply mascara to your eyelashes.
How to Draw Arrows for Beginners
If this is your first time deciding to become the fatal owner of playful arrows, then we recommend that you still choose classic version. As an option, you can use a stencil, which have long been sold even in ordinary retail stores, or even make such a stencil yourself from paper or paper tape.
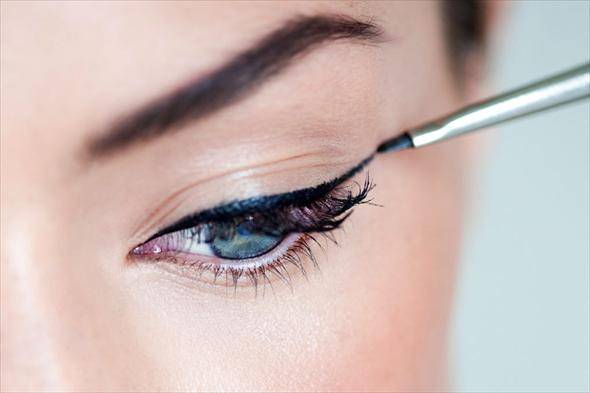
How to draw arrows with eyeliner
Once you get the hang of drawing straight arrows, you will soon be able to do this in a matter of minutes, even with liquid eyeliner, a pencil or a special felt-tip pen - liner.
But there are still a few tricks that can make your trial and error easier.
- If you bought the eyeliner a long time ago, but you didn’t get your hands on the arrows for so long that it had time to thicken, then you can revive it a couple of times by putting it in a tightly closed plastic bag and placing it in hot water(not boiling water!).
- Completely dried eyeliner can be diluted a little with alcohol or regular vodka. But you should still remember that this is your face, and even more so your eyes, so we still use cosmetics that have long expired.
How to draw arrows with a pencil
As a rule, drawing arrows with a pencil is more difficult than with liquid eyeliner or a special marker. The pencil gets dull very quickly and due to the thick shaft, the arrows turn out to be thick and sloppy. Another common problem with cosmetic pencils is that the lead is too hard, which not only draws lines poorly, but also scratches the delicate skin of the eyelids. However, if you do come across such a pencil, try holding it over a fire (for example, a lighter) for a few seconds before using it. Although, of course, this option is only possible at home - you can’t put such a pencil in your makeup bag with you, - you won’t warm it up every time.

How to draw arrows - photo
Now that you have already learned how to draw classic arrows, you can experiment with all sorts of variations of them - come up with them yourself or use them from our article.

We really hope that our advice will help you avoid such a result.

How to draw arrows: video
In order to aim the arrows, you need to train your hand and be patient. Although this task is not complicated, it is quite painstaking and requires concentration.
How to draw
You can draw an arrow using various means, each of which has its own nuances of application. For those who are just starting to master the technique of winged eyeliner, it is recommended to use a pencil. It makes it easier to draw a line and remove imperfections. Pencils with a greasy consistency do not injure the delicate skin of the eyelid and form smooth connections.
The following tools are used to draw arrows.
Liner
- represents ;
- applied with a long thin soft brush;
- has more long term services;
- not used in techniques that include shading;
- requires longer drying time.

- has a hard tip;
- easy to use;
- not used with shading;
- service life is short (dries quickly).
Pencil
- easy to use;
- easy application technique;
- easy to sharpen;
- needs adjustment during the day due to the low strength of the coating;
- Available in a wide range of colors and hardness levels.
Dry eyeliner
- has a shadow structure;
- applied with a damp thin brush;
- considered a professional remedy;
- difficult application technique.
Gel

- have a liquid structure;
- create a smoky effect, allowing you to use eyeliner for daytime makeup;
- applied with a thin long bone;
- The waterproof base makes the coating durable and stable.
How to draw an arrow
The only difficulty in drawing the arrow is the positioning of the hand. The first time, most likely, you won’t get the expected result, and that’s okay. When trying to draw a line, you need to rest the elbow of your leading hand on a hard object. This will give you confidence. There is no need to create a thick layer right away.
The eyeliner should be elegant and run along the eyelash line. The main emphasis is on symmetry. You should not open your eyes wide or close them at all. A half-open eyelid will create the necessary conditions to control the formed arrow.
Eyeliner technique:
- clean your face of cosmetics;
- straighten the skin of the eyelids with transparent powder or soft shadows to match the skin color;
- remove defects, if any, using concealer and blend the eye area again with a soft brush;
- highlight the eye contour with shadows of rich shades;
- Apply pearlescent shadows under the eyebrow to highlight the natural curve;
- blend the points between the eyelashes with a pencil or liquid eyeliner;
- mark the end point of the arrow;
- slightly pulling out the outer corner of the eyes, draw a thin line from the middle of the eyelid;
- draw a thin arrow from the inner corner to the middle, carefully connecting it into one whole;
- if thickening of any zone is planned, do it in stages;
- decorate the contour of the lower eyelid with contrasting shadows;
- lightly shade the edge of the arrow with transparent shadows to secure it.
How to make them perfectly even
To ensure that the arrow line is straight, the following recommendations should be followed:
- control the position of the eyes, do not open them wide;
- elbow working hand it is necessary to rest on a solid place, this way the trembling will decrease and confidence will appear;
- You need to apply eyeliner only after applying mascara;
- check points made in advance will help maintain symmetry;
- moistened cotton swabs will help remove unevenness;
- those who cannot make a perfect line need to use a hard pencil.
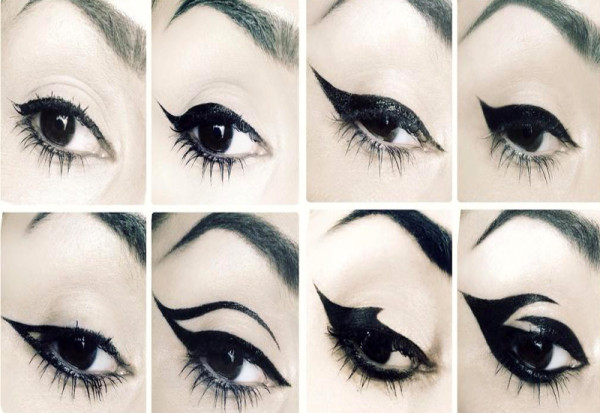
Types of arrows
Eyeliner is carried out in different forms, which makes it possible for each woman to choose the most successful option for her appearance.
![]()
Among the popular ones are the following:
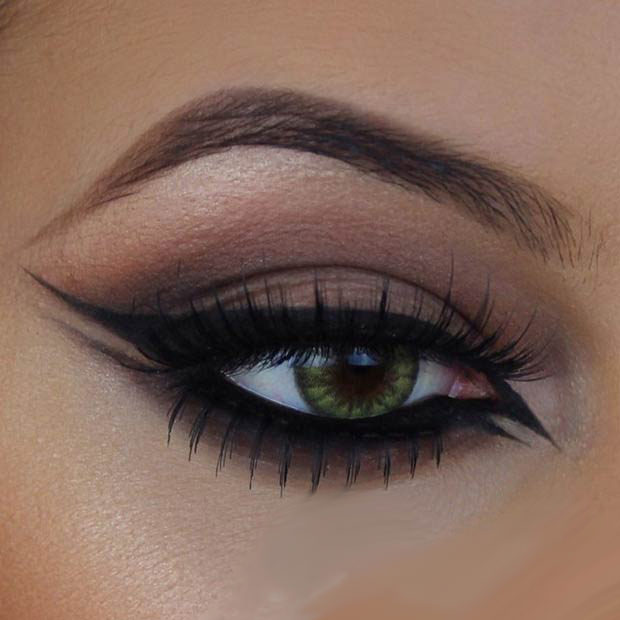
- Graceful and emotional cat eye shape. Thin lines start from the middle of the upper and lower eyelids, thickening towards the corner. In the corner the lines do not connect; the gap between them is painted over with light shadows.
- Classic shape emphasizes with a thin line the entire eyelid or only a part of it, which enhances the appearance.
- "Sharp Arrows" are applied in a thin line over the entire eyelid, most often with a pencil. It is necessary to lighten the eyelids with light shadows in advance.
- "Double arrows-color block" applied with eyeliners different colors. More often than not, the thick main line is drawn in black or dark brown. And the other, thin one, is raspberry, blue and other bright shades.
- "Arrows in the smoky eye style" They focus all the attention on the eyes, so no more bright cosmetics are used in makeup.
For those who often use eyeliner in their makeup, there is a way to apply an arrow using tattooing. The effect remains for 4-10 years with the necessary adjustments every 2-3 years. Permanent makeup is long-lasting, which allows women to free themselves from daily drawing of arrows for a long time.
How to choose a form
The arrows differ in shape, line thickness, length, and this allows you to correct any eye shape. When selecting the type of arrow, anatomical features should be taken into account in order to natural beauty emphasize and disguise flaws. And even if the cut has ideal parameters, an easy transformation will allow you to feel yourself in a new image.
When choosing a makeup option, you should consider nuances that will help you avoid mistakes:
- Round eye shape A dense line of a dark shade will help visually stretch it. To lengthen the incision, the lateral corners of the lower and upper eyelids should be connected and lengthened, pointing the tail upward. The classic type of arrow on the upper eyelid with a rise in the outer corner would also be appropriate.
- Little eyes fine lines will do dark color along the upper eyelid. It is better to decorate the lower eyelid with silver or gold eyeliner. Dark color will make the shape even smaller.
- Wide-set eyes only dark eyeliner is required for the upper eyelid. The inner corners are drawn well, and on the sides the line rises sharply with a short tail, with the start of the rise a little before the corner.
- When the eyes are close together the line needs to start from the middle of the century. Reaching the outer corner, it should be compacted and given a raised shape.
- Narrow eye shape will correct multi-level eyeliner. The first thin line is drawn along the upper eyelid without accentuating the inner corners, and the second thick line is applied only to the middle of the upper eyelid. The lower part is shaded with dark shadows.
Color selection
The shade of the eyeliner can match the shape of the cut, but blend in with the color of the eyes.
Therefore, there are rules that, if followed, will help make the right choice:
- Green or nutty the color of the iris gives a beautiful amber tint, which can be emphasized by a purple, burgundy or plum arrow.
- Brown the color of the iris itself is expressive and warm. You can emphasize it with the help of cool shades: blue, plum, greenish. And coral or golden eyeliner will help make your look arrogant and mysterious.
- Blue and gray irises look good with a bronze or copper arrow. Purple and brown colors are also suitable.
- Dark Almost all eyeliner colors will suit your eyes. Violet or plum shades will help highlight your eyes.
Common mistakes
When applying eyeliner, you should avoid the following mistakes:
- Using black or dark brown eyeliner to decorate the lower eyelid of small eyes is unacceptable. Visual effect reduces the size even more.
- It is not recommended to use a thick line to design the lower and upper eyelids with narrow eye shapes.
- When drawing arrows, you need to stand straight in front of the mirror, and not at an angle or tilt. Then it will be easier to control the trajectory of the line.
- Drawing a line with abrupt movements will not give good result. It is recommended to hold the arrow without breaking until it ends. Small errors can be corrected with a moistened cotton swab.
- You should not use the smoky eye technique in everyday makeup. This method intended for evening time. In daylight, the effect of dense tinting is the opposite. A playful image develops into vulgarity and tastelessness.
- You should not experiment with types of arrows. You should select the option according to individual form eye. Otherwise, narrow eyes can be visually narrowed even more, and wide-set eyes can be emphasized and strengthen the negative effect.
Application secrets, various “tricks”
In order to get beautiful and even arrows, you can use the following life hacks:

- Form beautiful line The arrow will be helped by a pre-made mark in place of the tail.
- You shouldn't move your eyelids right away. The paint needs to be given time to dry (30-60 seconds).
- To obtain a beautiful, uniform line, you must first shade the spaces between the eyelashes with eyeliner.
- Before drawing the arrow, you need to prepare the area around the eyes, it should be perfectly smooth. To do this, you can use a corrector, concealer, or transparent powder.
- A beautiful tail of the eyeliner line can be drawn using a stencil made from strips of tape. Then all awkward movements will remain on film.
- Before using eyeliner, it is recommended to line the eyelids with skin-colored shadows or colorless powder. And it is better to fix the top of the dried line using the same transparent powder. This way your makeup will last longer.
- If you want to emphasize the color of your own eyes, you need to make a double arrow. Draw the first thin line with dark eyeliner along the lash borders. And the second, also thin, draw the area a little higher, using a pencil in the color of the iris.
Bright makeup always attracts the attention of others. It is important to observe moderation and use emphasis on one part of the face to prevent creating a flashy image. A beautifully executed eyeliner will add grace and individuality to any woman.


