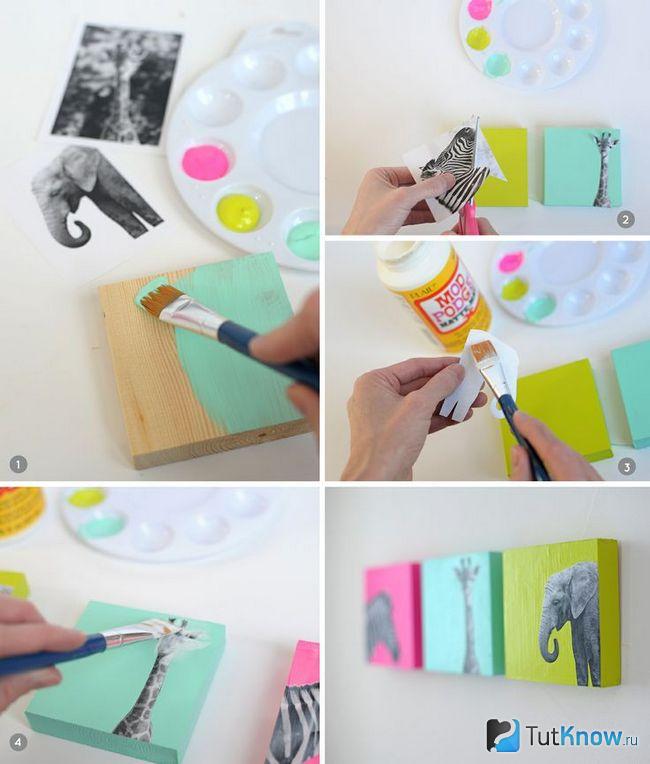
DIY painting ideas. Coffee and seasonings for paintings for the kitchen
Decorating the interior with paintings made with your own hands has become popular. Placing them on the walls of your apartment will add comfort, individuality and breathe a piece of your soul into the room.
Where to start drawing
First, you need to decide what you want to see as a result. You shouldn’t imitate other people’s ideas, it’s better to find your own. Think about what is missing in your home, feel the mood of the room in which it will hang. Any, at first glance not even real, fantasies have their place. Abstract images will add irresistibility to the interior, and posters in black and white will fit perfectly into modern design.
Having determined the style of work, you can begin to create a masterpiece.

Fabrication
Before applying the drawing, it is necessary to prepare the canvas. To do this, you will need cardboard and the fabric itself on which the image will be. A square or rectangle is cut out of cardboard, the size of the intended work. Fabric is cut out from this blank with an allowance of 5 cm. Then, the fabric is glued to the cardboard, and it should be stretched well. The corners are cut and carefully glued so that the fabric does not unravel.
You can use a simpler version of the base - cardboard painted with a white roller acrylic paint. It must dry thoroughly before painting is applied to it. This will be the background of the picture.

Drawing
Before applying the drawing to the canvas, you should make a sketch on plain paper. It is cut out, applied to the canvas and outlined with a simple pencil. The outline of the drawing must be outlined with black paint.
Now you can begin to design the planned picture. There can be different methods:
- paint - the most common, the design is painted with multi-colored paints;
- cereal, coffee, cloth - the elements are placed in the picture and secured with glue.

Paint selection
You can use any paint: acrylic, watercolor, oil. The main thing is to combine correctly color shades colors, then the picture will look impressive.

Stencils
A stencil is an ideal device for creating an image using paint or a can of spray paint. You can also apply a design using a stencil using the graffiti technique, which is at the peak of popularity today. The best base for this painting would be cardboard or plywood, which is painted in a contrasting color. Such ornaments look original on a gold or silver background.
The use of herbarium elements instead of a stencil or openwork napkins looks impressive.

Photo printing
Modern and stylish interior can be created if you use paintings ordered from a printing workshop. Such workshops produce high-quality prints on any surface.
Family photographs in covers or frames fit perfectly into any interior; they can be color or black and white, placed in chaotic order or in the same plane. It is possible to arrange photographs as modular elements, which creates the impression of a single image.

Textile
Masterpieces in the patchwork style can be easily achieved using scraps of fabric, braid, and ribbon. Such paintings are made using the appliqué principle. The basis is textiles, dense in quality and not flashy in design (polka dots, stripes). The elements of the picture, on the contrary, are cut out of bright fabric. Using different colors of scraps, you can get an original picture. And if you place it under glass, it will look stylish and impressive.
The combination of fabrics in one picture looks great different textures. And from materials that hold their shape (felt, corduroy, flannel), you can cut out elements of the design: a house, an animal, fruit.
These products are ideal for the kitchen or children's room. And a silk painting will be a decoration for the hall.

Modular paintings
Modular - these are several paintings with a similar plot or one drawing divided into separate elements that can be different sizes. Currently, they are popular as they fit perfectly into the interior of any room. You can make them yourself and arrange them at your discretion.
You should start by choosing a picture: landscape, abstract image or photo. Blanks can be printed on paper or canvas in a photo salon, and then cut into separate parts. The paper version is glued to plywood or chipboard, and the fabric version is secured to the back of the frame using a stapler. It is good to work on a fabric base using the batik technique.

If you create a drawing yourself, it is better to do it right away on individual elements. To make such a picture you will need:
- colored acrylic paint or waterproof marker - when drawing an image on paper;
- hacksaw;
- ruler;
- a simple pencil;
- foam sponge;
- sandpaper;
- tassels;
- polystyrene foam sheet (1 cm thick).
You should start working by dividing a sheet of polystyrene foam into the intended number of parts. To do this, you need to measure it with a ruler and cut it into modules with a hacksaw. the right size. Then sand the edges.
Now, all the parts are put together into a single canvas and the process of applying the image can begin. First, the background of the picture is made, the sponge is wetted in the paint of the intended shade. When the paint has dried, you can begin the drawing itself using brushes with paint, a marker, and applique.

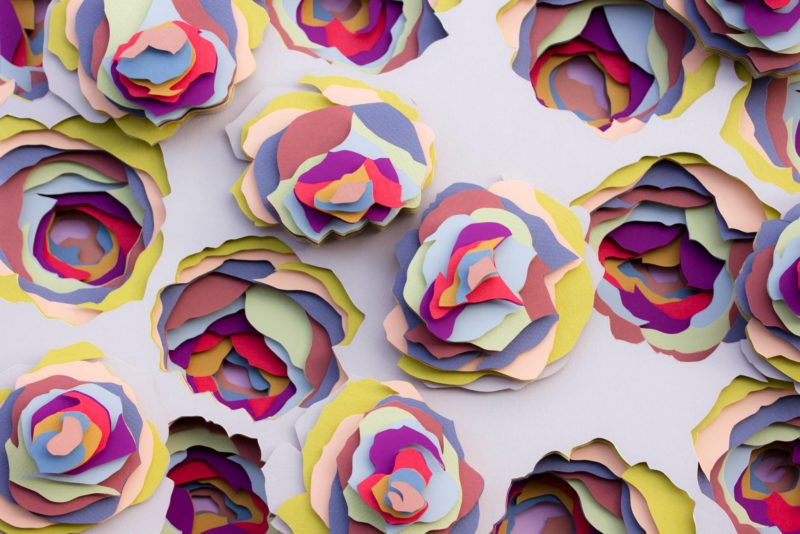
Creating a three-dimensional painting for the living room
Three-dimensional paintings look impressive in the living room; they can be made to suit any room design. Options are available: leather, paper, and even coffee and pasta. The following technique is perfect for making such paintings:
- decoupage - decorating objects;
- quilling - creating a design from curled paper.
A picture made of textiles or foam rubber will look creative in the living room; it is easy to make an original multi-layered image from this material. The picture frame should be taken simple and decorated according to the interior of the room.

Most easy way- where plain paper is taken as a basis, onto which elements (butterflies, animals, flowers) made of various materials are glued.
If the hall is large, then a plaster image - a bas-relief - will fit perfectly. It is done directly on the wall and goes well with the overall interior. However, making such a picture is quite difficult. Skills in drawing and working with plaster are required. General recommendation There is no instruction on how to make a bas-relief; some craftsmen create it directly on the wall, others separately make elements from plaster, which they then fit into the overall image. If you have no experience, it is better to use a stencil.

Master class: Paintings for the interior
An unusual and modern solution is to decorate the interior with a 3D painting. They are fun to make and look impressive. Eat different ways make similar products.

3d paper paintings
One of the easy ways is paper applique. To work you need:
- knife, scissors;
- pencils;
- not thick cardboard or paper white;
- PVA glue;
- frame with large sides, a candy box will do.
Step-by-step actions, using the image of a butterfly as an example:
- A rectangle the size of a frame is cut out of paper.
- A butterfly is drawn or printed on a printer and cut out.
- The resulting butterfly model is placed on the prepared white paper and traced with a pencil.
- The most difficult thing is to cut out the wings of the butterfly without touching the body.
- The wings bend to the top and to the middle, thereby adding volume.
- The blank with the butterfly is glued onto colored cardboard, which will be visible through the folded wings of the butterfly.
- At the end, the picture is placed in a frame and fixed with glue or a stapler.
This method can add volume to any drawing.

3d leather paintings
To create a 3D picture you don’t need expensive leather, pieces from old boots, bags, gloves, raincoats will do, but it is important that it is natural. To obtain the desired color, you can use acrylic paint.
The technology for creating paintings from leather is similar to the technology from paper. Leather is a material that can be easily manipulated and entire bouquets of ornaments can be created from it. The tools at hand are the same as when working with paper. Operating principle:
- a sketch is made on paper;
- transferred to the skin and cut out;
- so that the leather elements become rounded and voluminous, they must be held over a candle;
- the base of the picture is made of fabric;
- leather pattern elements are placed on it and secured with glue.
You can use buttons, dried plants, and beads as additional decoration.

Multilayer 3d paper painting
Multilayer 3D paper paintings look beautiful; they are not difficult to make. You should prepare:
- deep frame;
- cardboard;
- album sheets - for copies;
- printer;
- glue;
- acrylic paint;
- scissors,
- acrylic varnish;
- laminate backing.
Having chosen a drawing, we get to work. It’s good if the picture consists of several elements that can be cut out. A minimum of 10 copies must be made per album sheets. If used inkjet printer, then you need to apply varnish to the pictures, otherwise the image will flow; when using a laser, you can do without varnish.

The next stage is to cut out a base from cardboard, the size corresponding to the frame, and glue one drawing to it. The remaining images are cut out, but in different ways. Several copies (let's say a flower) are cut out completely: flower, leaves, stem. Others are just the flower and the leaves and just the flower.
Now the base for the laminate parts is cut out, and the elements are glued onto it. Then, these blanks are glued to common ground. The sides of the substrates should be painted in a color that matches the image so that they do not stand out.
The final stage is coating the painting with several layers of varnish.
DIY paintings for the kitchen from scrap materials
In the kitchen, homemade paintings look out of place. They add even more warmth and comfort. Eat different options making them, and any items that can be found at home are suitable here: buttons, seeds, cereals, coffee.

Pictures from cereals and seeds
This type of interior decoration is increasingly popular, it is environmentally friendly and inexpensive. These paintings look especially good in a rustic kitchen. Making a picture from cereals is not difficult. You will need several types of cereals, glue, cardboard and thick material.
First prepare the base. To do this, cut out a shape from cardboard future painting, and there is already fabric on it, with an allowance of a few centimeters for bending. The fabric is glued to the cardboard.
The intended design is applied to the resulting canvas. Now you need to spread out the grain or cereal; if necessary, you can paint it in desired color. After completing the drawing, you should glue all the elements to the canvas. This can be done using regular glue, but it is more convenient to use a silicone gun.

Crafts from cutlery for the kitchen
Spoons and forks made of metal coated with enamel are sewn onto the prepared base. This still life will fit perfectly into the interior of any kitchen.
If you take plastic forks and spoons, you can create a more original picture. Plastic objects easily stick to any surface and are easy to paint.
Fits perfectly into the kitchen french style decoration with cupronickel silverware.
A canvas with glued porcelain dishes will look aristocratic.
You can arrange objects arbitrarily or following a specific idea.

Paintings from buttons and plates
Buttons can be used not only for their intended purpose, but also to create original paintings. They can be glued or sewn. Easy to make from buttons different patterns, animal figures, flowers. Or you can use them as a background for an image; they are sewn onto fabric and all kinds of plates and saucers are hung on top. If necessary, paint with acrylic paint.

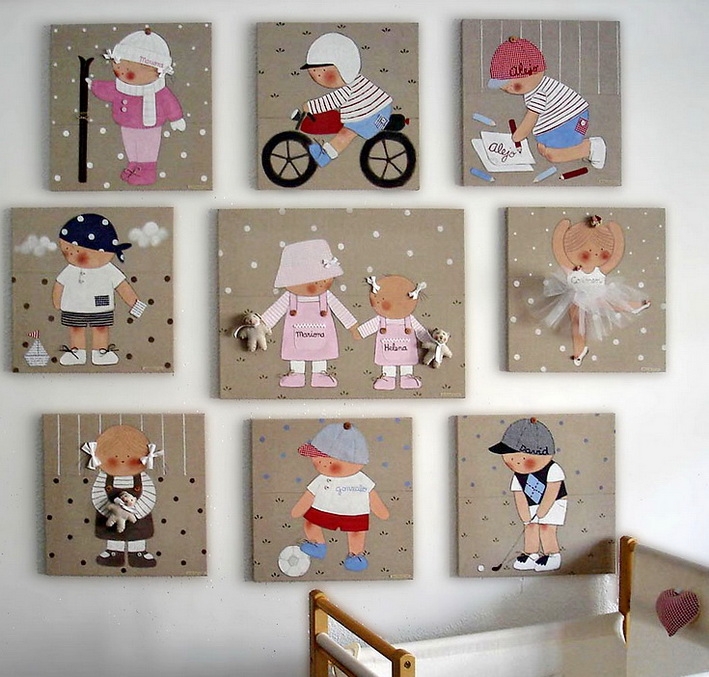
DIY paintings for the nursery
Do-it-yourself works will wonderfully decorate a child’s room, and they don’t have to be very complicated. When choosing a painting, you should take into account the design of the room, its color, the gender and age of the child, and his hobbies. Anything will do: a hand-drawn picture, an applique, a panel, a photo, maybe big picture or a modular option, the main thing is that it fits into the overall interior. Children's works framed will look original.
An excellent solution is a fabric version based on foam. To do this, you will need: a piece of foam plastic, shreds, pencil, glue, carbon paper, a sharp object to press the drawing.
The polystyrene foam is cut out to the required size, and the design is transferred onto it using carbon paper. The picture is pressed out with a sharp tool. The part on which the fabric will be is coated with glue and the fabric is applied to it. It is pressed into the previously pressed outline, the excess fabric is cut off with scissors, and the threads of the shred are hidden inside using a ripper. Using this technique, it is easy to create different fairy-tale pictures.
DIY paintings - photos
There are many ways to create paintings; you can use any materials and objects for this. It all depends on your imagination and creativity. The photo shows possible ideas.
Having decided on the style, you can begin to select materials for the future work:
- Paint and canvas.
- Cardboard, designer paper, magazine clippings, old photos.
- Textiles, leather, ribbons, braid.
- Glass or crystals.
- Buttons.
- Dried flowers, shells.
Advice! Don't throw away old children's drawings, scraps of fabric, magazines, decorations– all this can become part of the picture. Store them in a separate box, periodically reviewing and arranging them together.
Painting with paints
The easiest way to create an original painting for your interior with your own hands is to paint it. The subject is limited only by the imagination of the creator. Even in the absence artistic skills You may end up with a masterpiece: use abstract techniques, study master classes and photos of finished works.
Oil, watercolor, and acrylic paints will become faithful assistants in creating paintings for the interior. As a base, you can use either professional canvas or regular thick paper or a primed board.
Advice! You can draw inspiration from nature if there are picturesque places near your home. If you are unlucky with either the location or the weather, feel free to draw your household, pets, fruit compositions - whatever. The accuracy of the reproduction of reality does not play any role, the main thing is to approach the process with soul.
Modular paintings suitable for almost any room: from kitchens to living room, but it is important to select appropriate images. If you don’t have time at all to create a masterpiece with your own hands, then we have for you good news- today you can buy them in any specialized store!
Photo printing
The technical side of the issue is taken care of by a photo workshop, which can print a suitable image on almost any basis: canvas, paper, ceramics, etc. These can be ordinary posters with image interesting places, people, ornaments.
Advice! A poster is not just a picture, it must convey a certain idea, correspond to the interior, the theme of the room and the character of the owners of the house. IN lately posters gained particular popularity in pin-up style and retro.
If the poster is large-format, you can divide the image into several segments and, when combined into a single canvas, play with the joints, making it look like a modular picture.
If there is a child in the house, then you can scan his drawings and select the ones that match the color, shape, etc. Such a poster can be complemented by a photo of the artist himself. All that remains is to print the poster and place it in a frame that matches the color and style.
Collage of old and new family photos You can hang it as a picture in the bedroom or living room, and posters depicting the corresponding paraphernalia and fruits are suitable for the kitchen. Finally, it is worth noting that it is recommended to choose posters and panels for the kitchen in rich and bright colors. color ranges however, no one forbids you to go against the rules and create stylish ones.
Textile
From all kinds of scraps, fabric with beautiful patterns, ribbons, braid or lace, you can create real masterpieces in patchwork style with your own hands. Fabric paintings are most often made using the appliqué technique. The basis is taken of dense textiles with discreet and inconspicuous patterns (stripes, polka dots, etc.), and the main elements are cut out from bright shreds.
Most often, kitchens and children's rooms are decorated with textile works, since these rooms are characterized by a certain simplicity present in the appliqué.
Advice! From felt, flannel and other fabrics that hold their shape well, you can cut out fruits, animals, cars, and houses. You can safely combine different textures and patterns on fabrics, use braid, decorative cord, and buttons for decoration. For the living room, you can make a textile picture from crinkled silk with abstract patterns.
From buttons
With their help, you can create original things by sewing or appliqué. This type of fittings is often used to depict leaves on trees. Buttons can be glued in an original way inside any contour, for example, a silhouette butterflies or cats. In sewing stores you can pick up details various forms, colors and materials and lay them out like a mosaic according to a pre-prepared pattern. Such button creations will fit perfectly into the kitchen, however, they can also be used for the living room and bedroom.
Advice! Buttons can be glued around the perimeter of the picture frame, giving it individuality.
Wallpaper and panels
Often, after renovation, large pieces of beautiful wallpaper remain, which are useful for making unusual interior paintings.
- Wallpaper in a frame is the easiest option to create something like this panel. A piece of the desired shape is cut from the roll and placed in a frame. Moreover, the ornament may coincide with the pattern on the walls or differ from it. Such elements can come in a row of 2-3 pieces.
- Golden paint and a stencil or small ones will help to revive a boring canvas in a frame. black and white photos, stylized in antique style. Similar paintings wallpaper will fit perfectly into
In an age when all design solutions already seem boring and a little boring, making a painting on the wall with your own hands means finding an opportunity to stun your guests and make them admire the creation of a talented owner. However, experts insist that even talent is not strictly necessary, because the main thing is desire. Everyone has the right to a highlight in the interior, and the fact that you can do it yourself allows you to save a lot - it’s even strange that this technique has not yet become universally popular.
The idea of placing pictures on the walls is attractive enough to play a bad joke on the interested person. The owner of the premises, having heard about a unique opportunity to quickly, inexpensively and creatively decorate his home, may take rash steps - for example, make pictures sloppily or use the first idea he comes across instead of the one that would be ideal.
You can't do that. Failure in this matter can greatly disappoint an unlucky designer, but it is possible that he is really talented, he just doesn’t know it. The idea of a creative work must be nurtured for a long time - until all the details of its implementation seem obvious, and the idea itself becomes a familiar and integral part of the future implementer.

Remember that masterpieces are created only when the creator clearly understands both the work process and the final result.
Methods for making paintings
Once upon a time, paintings meant mainly paintings, but if we are talking about a design element for the wall, then there will be much more options. There will be no usual colors applied to paper here - anyone can figure out how to draw a picture and insert it into a frame. We will try to analyze only those solutions that look fresh, and at the same time they can be made with your own hands.

Ready-made fabric paintings
This method does not require any fine arts, except, perhaps, for correct compilation. The picture does not have to contain a clear plot and meaning - you can make a chic abstraction by simply hanging three pieces of fabric of the same shape and size stretched side by side on a base, which would be in proper harmony with each other.

If the fabric already contains some images, then this can be used additionally to create some kind of meaningful composition. Making these with your own hands is not at all difficult; here it will be more difficult to choose a good combination in such a way that it leaves a lasting pleasant impression. You can move away from the triptych proposed above - individual fragments of fabric may have irregular shapes, intertwined or combined in any other way.
 Main feature in creating paintings from fabric is the ability to choose the right combination, in accordance with the rules of color combinations
 Embroidery
This method is fully consistent with the wisdom that everything new is just well-forgotten old. In the old days, women decorated their homes in this way, but today this tradition has largely been abandoned - and in vain: when done properly, embroidery looks very attractive. Of course, only a true needlewoman can do such work with her own hands, but you can depict literally any subject. If the author also dreams of getting married, then her work, hanging on the wall in a frame, will tell a lot to potential husband candidates invited to visit.
Paintings in 3D
Who even came up with the idea that the wall should be flat? We propose to make a real one out of it with our own hands. three-dimensional image, whose features are conveyed not only by colors, but also by bulges and depressions!

Such work will be more difficult, more time and effort will be spent on its implementation, but the result will definitely be unusual! And you will need to do the following:
- On the wall that you plan to decorate in an original way, use thin pencil lines to draw the outlines of the intended design. It is advisable to immediately evaluate the sketch different angles view and from different distances, show several people for objective assessment and immediately correct if there is constructive criticism.
- Take a sufficient amount of putty into an oilcloth bag and tie the container, making a small hole in it. Using an improvised putty gun, outline the contours of the drawing so that the drawn lines become convex, thanks to the added layer.
- Wait for the material to dry and harden, and then use a small knife to carefully trim the volumetric contour. If the drawing is quite complex, you can highlight both the contours and internal details with irregularities.
- Since the resulting surface will not only be convex, but also very rough, use sandpaper to achieve a smooth surface. Don't choose the coarse grain option - it will only damage the results creative work. Preference is best given to the finest grains used for final sanding.
- Mix gouache with liquid PVA glue - this will make it much more stable and durable. Using a brush, paint the image as you intended at the planning stage.
- To completely complete the picture, its borders can be marked with special baguettes, which in this case will act as a frame.
Colored paper
Such a solution threatens to be short-lived, but it is easy to do it yourself and then periodically renew it by introducing additional elements. The idea is extremely simple - silhouettes, for example butterflies, are cut out of colored paper according to a template, which are freely pasted on the wall using ordinary PVA, or simply pinned. The cut out figures can be further decorated with intricate patterns. Ideally, the figures should differ in shape and size, and perhaps in color. It is best to combine opposite shades, for example, black and white or red and blue.

For the wall near the stairs, figurines that imitate a kitten, captured in various playful poses on different steps, are perfect.
Twine as a tool in the hands of an artist
Amazing, but do beautiful jewelry for the interior you can even use ordinary rope! Only a gifted person can make such a picture with his own hands - it requires artistic vision and great patience to secure the rope in a vertical position in the required shape. You can set the shape in any way - either using hot glue or using hidden thread fasteners. The resulting product is attached to the wall either with the same glue or with hidden pins.
 Pictures made from twine look unusual and stylish, so this option for wall decor definitely deserves attention.
 Three-dimensional paintings with appliqué elements
You can make a painting with your own hands that will combine both painting and applicative creativity. To do this you need:

The value of this product will be all the higher because, despite the availability and prevalence of all the materials used, not many people can create such a simple masterpiece with their own hands.
Option for the laziest
After all, there is a way to create a wall picture that requires no talent, no skill, or even effort at all. All you need is to find the desired image on the Internet in good resolution and print it on a printer. Next, the resulting printout is inserted into a frame purchased in advance from the store and voila - cheap and cheerful!
Do you have a blank wall in your home with nothing to hang on? Do scarlet pillows on the sofa look lonely and require another bright accent? Just take a canvas and paint a picture that suits you!
We live in an era of victory abstract art, when you want to say about every second gallery work that even a child can draw it. So why not put aside your fears and forget about realistic art for a while and create your own small masterpiece? Drawing is fun and abstract painting It’s simply impossible to draw badly or incorrectly! All you need is a canvas, paints, courage, a few hours of free time and perhaps a nice group of collaborators to create a unique work of art, perfect for your interior. This is much more interesting than just buying a poster from IKEA! If you agree with us, we offer you a selection the best technicians and master classes for creating your own painting.
Gold and concrete
The most favorite color of everyone who undertakes to make a stylish painting with their own hands is gold. You just need to add a little leaf foil or just paint to any background, even a plain one. Gold looks good and not too provocative with an uneven gray concrete color.
Photo: JenniferFlanniganart / etsy.com
Sound waves
Horizontal jagged lines always resemble some kind of graphs or visualization sound waves, in general, something important, and therefore interesting to look at. To dilute the boring monochrome of the image, you can, like the author of this master class, add a little (or a lot!) of gold.

Geology
Have you noticed how beautiful the cuts of stones are? This is a drawing with a story, a story about changes in climate, relief, and wildlife. You can create your own beautiful specimen of the rock: simply take a vertical canvas and apply horizontal stripes of different widths and different colors. Invite the children to draw with you - let them come up with the story of a fictional world in which such a beautiful cut could appear.

Photo: BrennaGiessen / etsy.com
Peas
Polka dots are a magical pattern: you can paint them on anything and it will turn out beautiful. You don't even have to have a brush on hand - just make a stamp from a wine cork or the bottom of a glass. If you use thicker paint (as in this case), the pattern of the prints will resemble a coral pattern!

Colored peas
If you want something more complex, then make a print with a colored pattern. In this master class, in order for the peas to be even, they are cut out with a special hole punch and then pasted onto canvas.

Blot
One way to create abstract drawing- distance yourself from work as much as possible and let the paint do everything for you. For example, pour a large blot and then tilt the canvas so that the paint flows picturesquely down it. You can make such a picture together with your child; you don’t even need a brush for this.

Photo: CelineZiangArt / etsy.com
Stencil
Tested: any abstract spots look cooler if their edges are very smooth. This contrast effect can be achieved by painting through a stencil, or pre-reserving part of the canvas using masking tape, or applying white borders using a stencil later, as in this master class.

Scribble
Make squiggles of any color on any color canvas, inspired by famous works, or relying only on your own inspiration - there are no boundaries or laws here, doodle art is a very democratic direction! You can, like blogger Michelle, create many layers, achieving a complex texture, or you can paint with pure color on white. The main thing is to relax your hand and not forget that this is pampering, and a bad option can always be painted over.

Color samples
Pictures with careless horizontal lines look as if they were a sample of colors from the desk of a Pantone Institute employee or a palette from a fashionable makeup artist. The secret to success here, as blogger Julia demonstrates, is to leave enough white space and apply the paint in one motion. Colors can be any.

Ombre
Gradient, or ombre, is a very simple and very beautiful effect. To repeat it, you don’t even need a master class. Two paints - main and white, a brush or roller, five minutes of time spent, and the picture is ready. An excellent solution if your bright apartment has a bright accessory that requires color support.

Vanguard
There is nothing easier than making a print in an avant-garde style. Draw straight lines using tape, like in this tutorial, and use bright paint straight from the can. My only advice is to take the time to make a few sketches in advance.

Stamps
The most budget paintings They don’t even require the purchase of brushes: just take the first item that comes to hand and use it as a stamp. You will be surprised what stylish thing you can draw using an ordinary glass!

Impressionism
And the last painting idea for today is an impressionist canvas painted with large strokes. Artist Ashley Sturgill shows how to write a bright picture with gold accent.

Get inspired and experiment, and we will help you with this!
Feather painting
Feel real contemporary artists, creating an amazing canvas. It will be light and airy, as it is created from feathers.
Here's what you'll need to make these interior paintings:
- feathers;
- spray paint;
- frame;
- large bead;
- glue;
- sheet of cardboard.

Then on another surface you need to paint the feathers using spray paint.

As you can see, shades of the same color look great. Therefore, you can take dark and light blue paint. Glue the feathers first on the outside of the circle, and then make rows closer and closer to the center.

When this entire surface is filled, glue a large bead in the middle.

After the glue has dried, you can frame finished work and hang it in the bedroom or living room or present it to a loved one as a souvenir.

This picture looks great in the interior, like the following ones.
Paper painting
Floating butterflies will certainly lift your spirits.

To create such beauty, you don't need a lot of materials. You will only need:
- colored paper in pink and white shades;
- sheet of polystyrene foam or expanded polystyrene;
- glue;
- whatman;
- scissors.

- Cut strips of pink colored paper to the desired width. The distance between the sides should be what you want the wingspan of this insect to be.
- Attach the butterfly to the beginning of the paper strip, fold the tape several times so that the insect has enough space in the square allocated to it. Outline the butterfly and cut out along the contours. You will get not one, but several insects at once.
- In the same way, folding the paper sheets into a stack of squares, cut out the remaining butterflies. Use dark pink, pink and light pink paper for this.
- Using double-sided tape, cover a sheet of polystyrene foam or expanded polystyrene with whatman paper. Draw the outline of the future figure on it using a washable marker or chalk. Start gluing butterflies, filling this shape with them. When the work is completed, you can use it for its intended purpose.
Also, as in the presented photo, make the left outline of the drawing fuzzy, as if it were hovering butterflies that were gradually landing here.
Such works look especially beautiful when sunlight. You can not glue the foam, but tint it using a sponge and paint. Then glue the butterflies using double-sided tape.

You can create interior paintings by making cardboard frames with your own hands. And so that butterflies are visible on the canvas, draw their outlines on a sheet of cardboard and cut them out using a stationery knife. But the lower part of the base should be a more contrasting color so that the butterflies are clearly visible.

You can leave them snow-white or paint them.
Get busy with it interesting creativity with children. After all, they can also create original paintings with you. Each butterfly can be painted and glued to the canvas.

To make a wall panel, use heart-shaped figures. For next job You don’t even need a frame, you just need:
- double-sided cardboard;
- scissors;
- fishing line;
- bar;
- dye;
- awl.
You should have several rows of hearts. Paint the block and tie the top parts of the fishing lines to it.
Now you can hang this beautiful panel above the bed in the bedroom or on the wall in another room.

The creative impulse should not be restrained by the lack of some material, for example, paper. If you don't have one, use newspapers you read. Cut out hearts from them and glue them to a paper base, make a frame for your work.

If you have any left ceiling tiles This material will make wonderful interior paintings.

For these you will need leftover colored paper. By using the template presented above or creating your own, you will make such a cheerful panel.
Pictures made from buttons and corks
The following design solutions will suggest waste material. After all, wine corks are usually thrown away, but you can make a lot of interesting things out of them. This is the kind of work created based on this material.

For the first picture, you need to cut each cork in half, and if you have a lot of such material, then use whole elements. First draw the outline of the future masterpiece onto the base, and then fill it with blanks. If you want the picture to take on a rainbow tone, then pre-paint them.
To get such beautiful interior paintings, you can only use:
- bottle caps;
- rope;
- awl.
For next picture no frame needed. You simply glue the corks in rows onto the main surface and you can attach a card here to congratulate your loved one.
If you have a lot of unnecessary buttons accumulated in your household, then you can also make interior paintings from them.

For the next one we will use:
- buttons in green and brown shades;
- glue;
- wooden plank;
- pencil.
The following will also decorate the interior.

You can put the first letter of your loved one’s name with buttons, glue them to the base and give the masterpiece to him. The motive can be very different. Make the outline of an animal or an anchor out of buttons; such works will also certainly be appreciated.
You can confess your love in the most unexpected way. Paint wooden surface When it's dry, glue pink heart-shaped buttons here. Seeing such a sign of attention, the person dear to you will certainly be happy.

Paintings in the interior can be very different. If you want to capture dark time days, then first paint the background with brown paint. It is not necessary to make it even. Spread the paint with a sponge, then it will turn out like this mysterious.

A black marker will help highlight the contours of the branches and trunk, and a rainbow crown can be made from buttons of a wide variety of colors.
If you prefer light colors, when you take a white base, draw the trunk here with a marker or brown pencil. You can give it to your creative imagination will and lay out this part of the tree using threads of this color. Glue buttons that will turn into colorful leaves.

Nature itself will help you paint interior pictures. Check out the following interesting ways their creation.
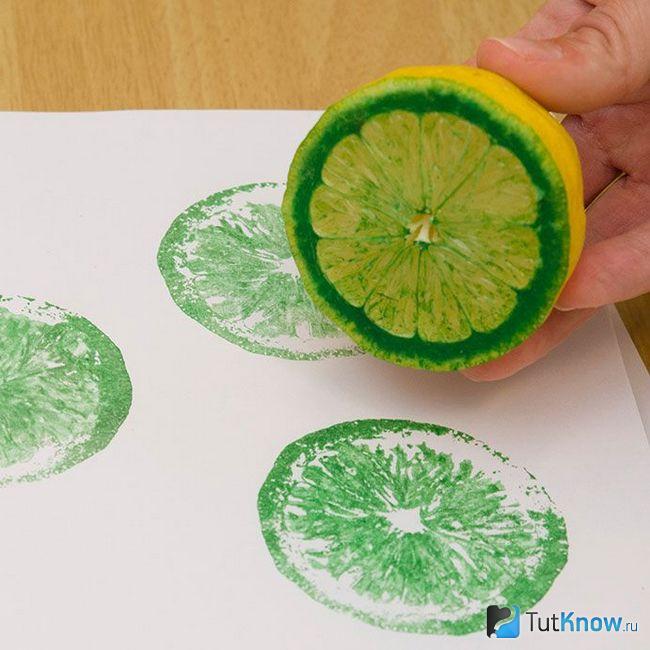
Method of printing interior paintings
Just dip a daisy or other flower in paint and it will turn into a wonderful printing tool. You will lean the plant against a white sheet of paper and create original designs.

Lemon can be used for more than just its intended purpose. Dip half of this fruit into paint and print on paper.
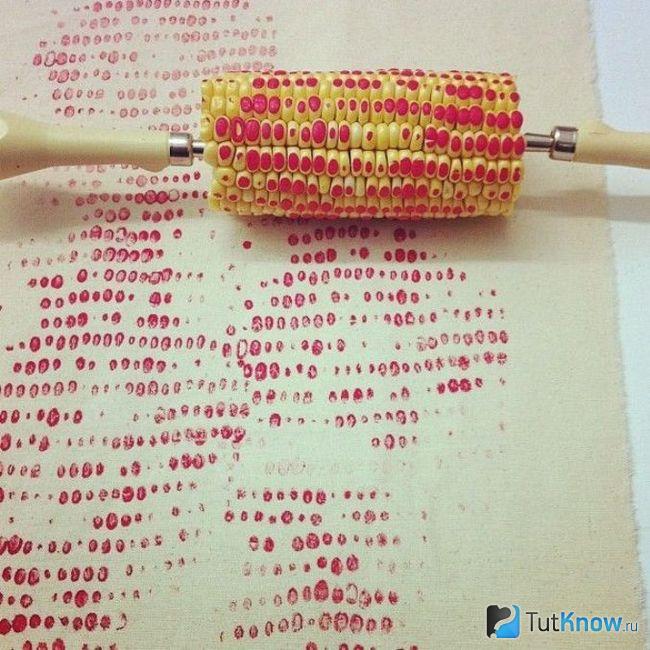
Such art therapy will certainly lift your spirits. You can use a wide variety of fruits and vegetables to create interior paintings. If you have an ear of corn, then cut a fragment of the required length from it, prick it on both sides with forks or other sharp objects and print to your health.
If you don’t have fruits and vegetables or don’t want to use them to create pictures, then you can take a balloon.

Pour paint into a bowl. And if you want the prints to be more interesting, then add paint in other shades. Dip the ball into this mass, then lift it and print patterns that you yourself come up with on a sheet of paper.
If you want to draw your loved one teddy bear, but you can’t do it, then you can make an impression. To avoid damaging the toy, use water-washable paint. Dip the bear here and place it on a piece of contrasting paper.

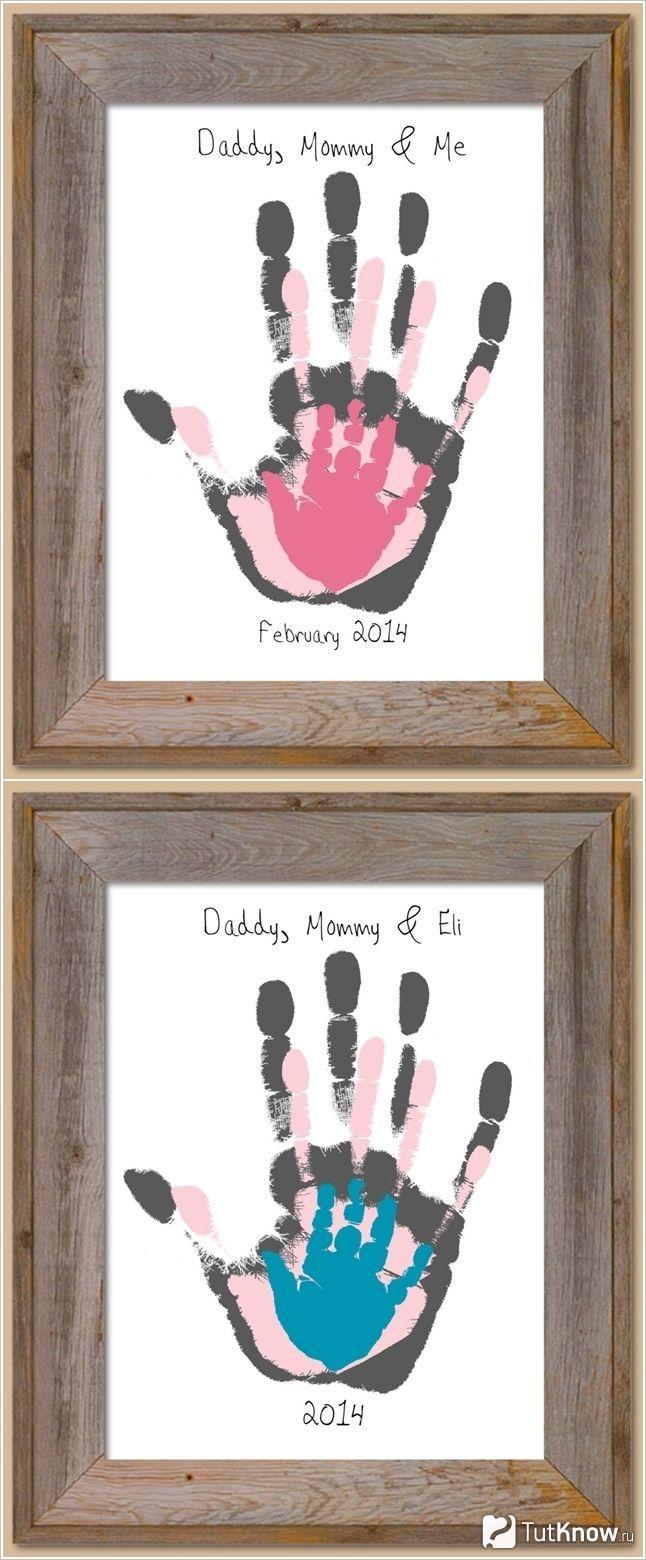
If there are no such consumables, then you can even use your own palm. Dip it into a bowl of paint and press it against the paper base.
If you want to make a picture as a keepsake, then invite all family members to do similar manipulations. In this case, the largest palm should be printed first, and then the next ones are arranged in decreasing order. Use paint different colors so that every print is clearly visible.
It remains to look at a few more ways that will allow you to create interior paintings. To make such masterpieces, you will need very little time.
Interior paintings on the wall in 15 minutes - master class
That's how long it will take to create your next masterpiece.
Also for the interior painting you will need:
- planks;
- dye;
- brush;
- glue;
- pictures.
You will create the next painting just as quickly. Such works will appeal to lovers of glamor.
Step-by-step master class, detailed photographs will help you quickly understand interesting idea. First you need to prepare:
- a simple pencil;
- scotch;
- glue;
- sparkles.
If you don't have glitter, then you can shred the broken Christmas ball. To do this, cover it with a cloth and gently knock on top with a hammer.
Remove the tape after the glue has dried. Where there was adhesive tape, you need to paint it using a brush. After some time, the work can be glued to the wall using double-sided tape.
If you liked these interior paintings, then create the next one using almost the same principle.
To do this you will need to take:
- picture;
- self-adhesive letters;
- white acrylic paint.
If you have even less time, then you can make a panel in the same minimalist traditions as Malevich’s black square.

To do this, cover a white sheet of cardboard with black paint using a rough brush. All you have to do is hang your masterpiece on the wall and wait for approving responses from home and visiting guests.
Even leftover fabric will give you interesting ideas.

Wrap rectangles and squares pre-cut from cardboard with such flaps. Fold the fabric over reverse side and pin here. Make a loop and hang your masterpiece using it or double-sided tape. You can create interior paintings so that you have a whole exhibition or make one or two. It all depends on the amount of free time and the availability of material.
If you have small scraps left, then you can make a voluminous flower like this.

Using the template, cut out the petals for it. Slightly bending the edge of each, glue it to the prepared surface. This can be a sheet of polystyrene foam or cardboard with non-woven material, wrapped in fabric. First create the outer circle of petals, then the next one, arranging them in a checkerboard pattern. As you move toward the center, complete your work. In the middle the petals are slightly smaller and point upward.
If there is braid left over from needlework, you can also use it. See what kind of interior paintings you can create with it.

To do this, you need to cut these tapes into strips of the same size and glue the end and beginning of each. Then you need to pull the resulting circles from 4 sides to the center, and you will get four-petal flowers. You can also quickly make a panel from cupcake and cookie packaging. Glue these paper molds to the prepared surface, see what a delicate and airy picture you get.

By applying a template of leaves to paper, you can cut out such blanks of the same size quite quickly.

All that remains is to glue them next to the paper branches and frame the finished work.
Here are some interesting works of art that can be created in a matter of minutes from available materials. If you want to see how others make interior paintings, then your wish will be fulfilled right now.
Do not deny yourself the pleasure and see how you can make a picture whose surface will resemble marble:


